In today’s global marketplace, making your website accessible to users across different languages is more important than ever. Adding translation support can significantly improve your website’s accessibility and online presence, helping you reach a wider audience and increase engagement.
Wondering how to translate WordPress plugins? Fortunately, there are localization tools available, such as the Loco Translate WordPress plugin, that streamline the translation process and make it easy to create translations of your plugins and themes. In this article, we’ll explore the benefits of offering translation support on your website and guide you step-by-step on translating WordPress plugins and themes using Loco Translate.
Whether you’re looking to expand your business internationally or make non-native English speakers understand your website content in their local language, this guide will provide you with the information and insights you need to get started.
Table of Contents
Benefits of Using Loco Translate Plugin for a WordPress Site
Using Loco Translate provides several benefits for website owners.
- It simplifies the translation process by offering a user-friendly interface directly within the WordPress dashboard. This eliminates the need to manually edit code files, making translations more efficient and accessible.
- Loco Translate enables the creation of localized websites by easily translating theme and plugin strings into different languages. This expands the reach of your website and allows you to cater to a broader audience.
- Loco Translate provides convenient translation management, allowing you to effortlessly view, edit, and create translations for different languages.
- If you encounter a scenario where you need to modify certain strings on your website, but the theme or plugins you’re using do not provide any options to do so, Loco Translate can be of great help. This invaluable plugin allows you to customize and change those strings that lack dedicated options within the theme or plugins.
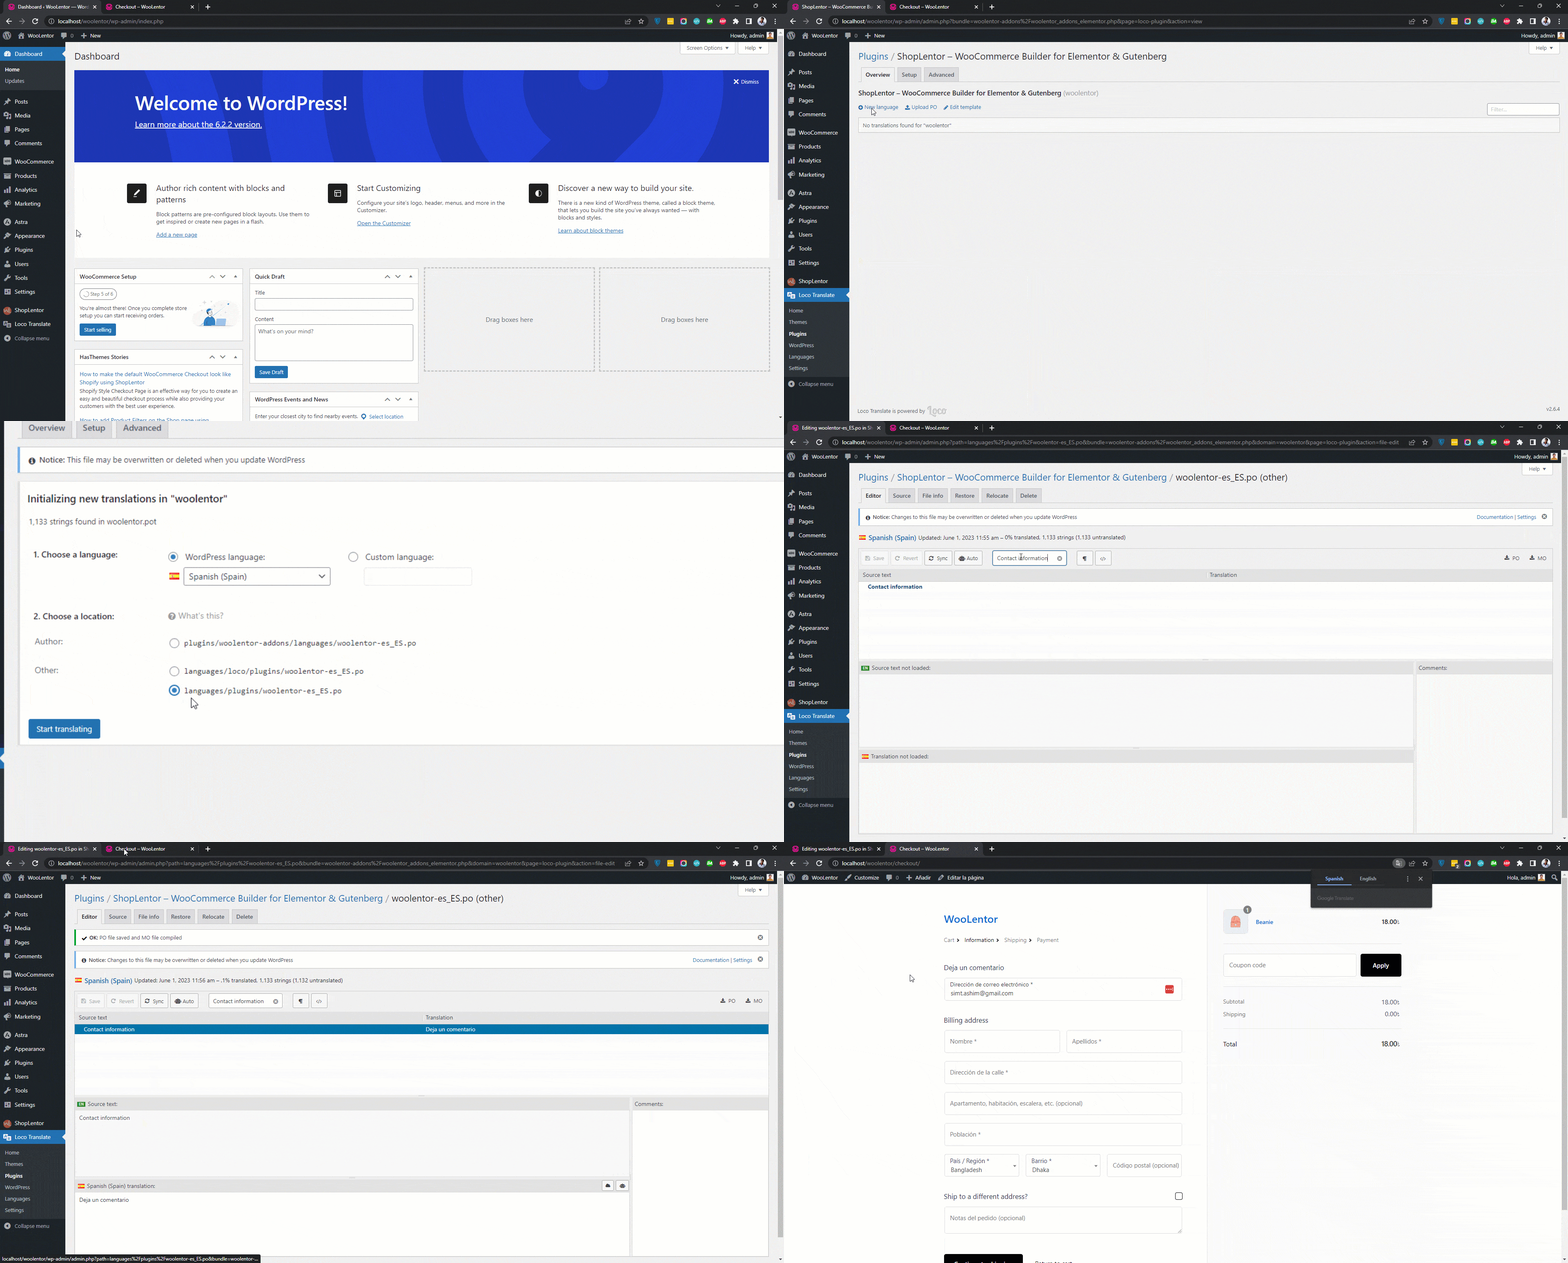
Overall, Loco Translate streamlines the translation process, enables localization support, offers customization options, ensures compatibility, and provides convenient management, making it an invaluable tool for website owners.
In this guide, we will give you a detailed walkthrough on How to Translate WordPress Plugins and themes using Loco Translate, empowering you to communicate effectively with a global user base.
ShopLentor- WooCommerce Builder for Elementor & Gutenberg
A versatile page builder to build modern and excellent online stores with more than 100k+ Active Installations.
Steps of Theme and Plugin Translation with Loco Translate
When it comes to How to Translate WordPress Plugins and themes , Loco Translate simplifies the process with its user-friendly interface and intuitive features. Below are the simple steps required to translate WordPress themes or plugins using this fantastic plugin.
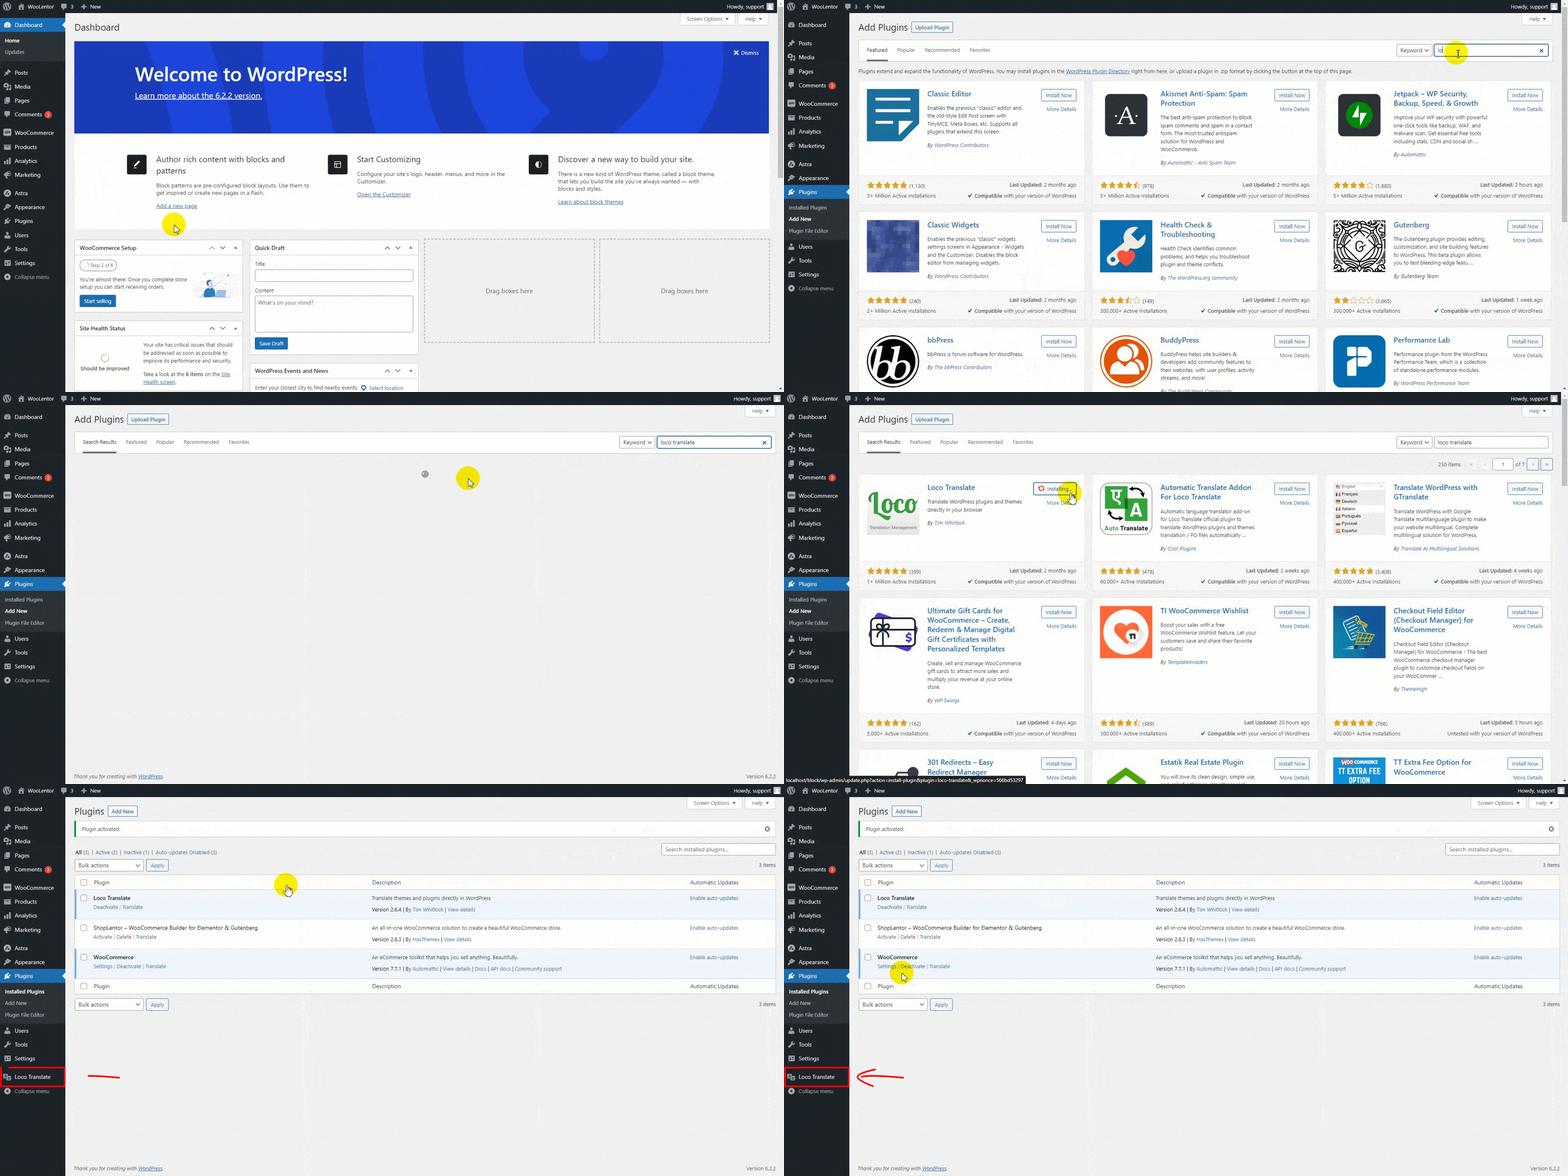
Step 1: Install and Activate Loco Translate:
- Log in to your WordPress dashboard.
- Navigate to “Plugins” and click on “Add New.”
- Search for “Loco to activate the plugin.
Step 2: Select the Plugin or Theme for Translation:
- After activating Loco Translate, go to the “Loco Translate” menu in your WordPress dashboard.
- You will see a list of plugins and themes installed on your website.
- Select the plugin or theme you want to translate by clicking on it.
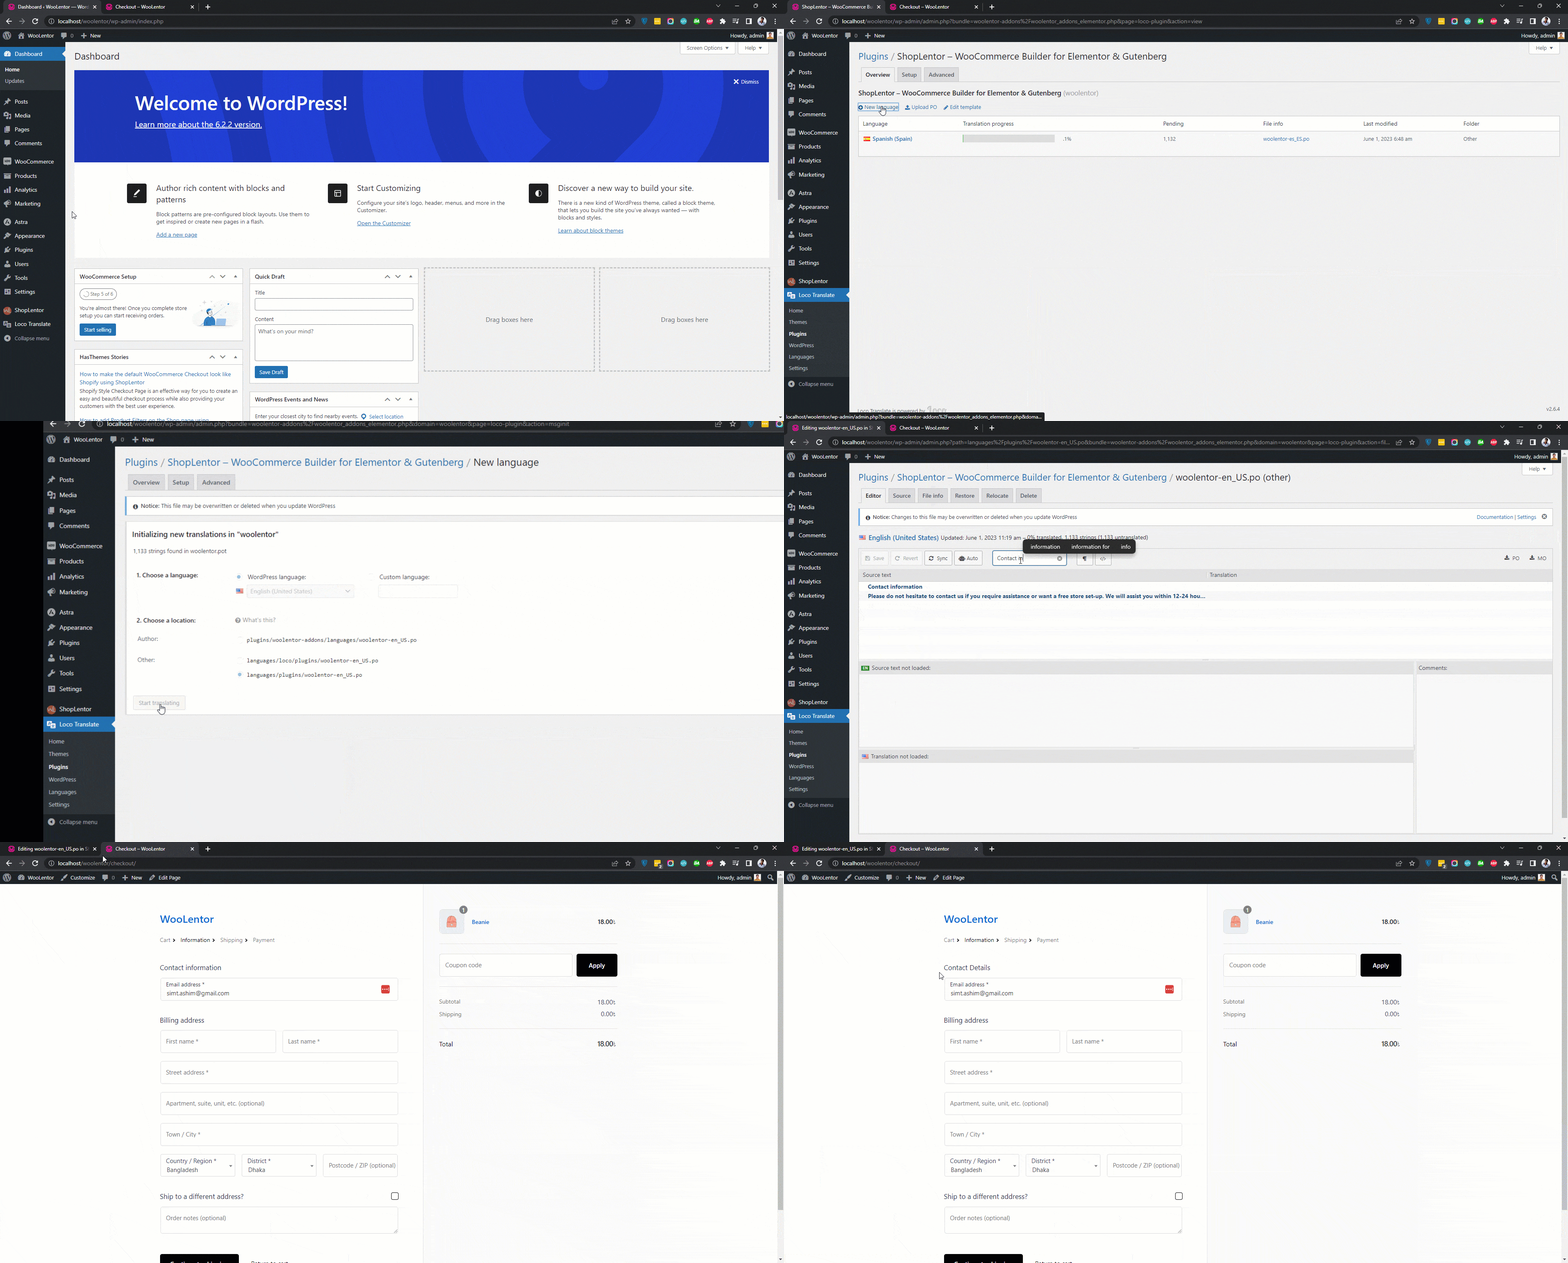
Step 3: Creating a New Translation:
- On the translation page for the selected plugin or theme, locate the “+ New Language” button.
- From the dropdown menu, select the target language for translation.
- Loco Translate will automatically generate the necessary language files for translation.
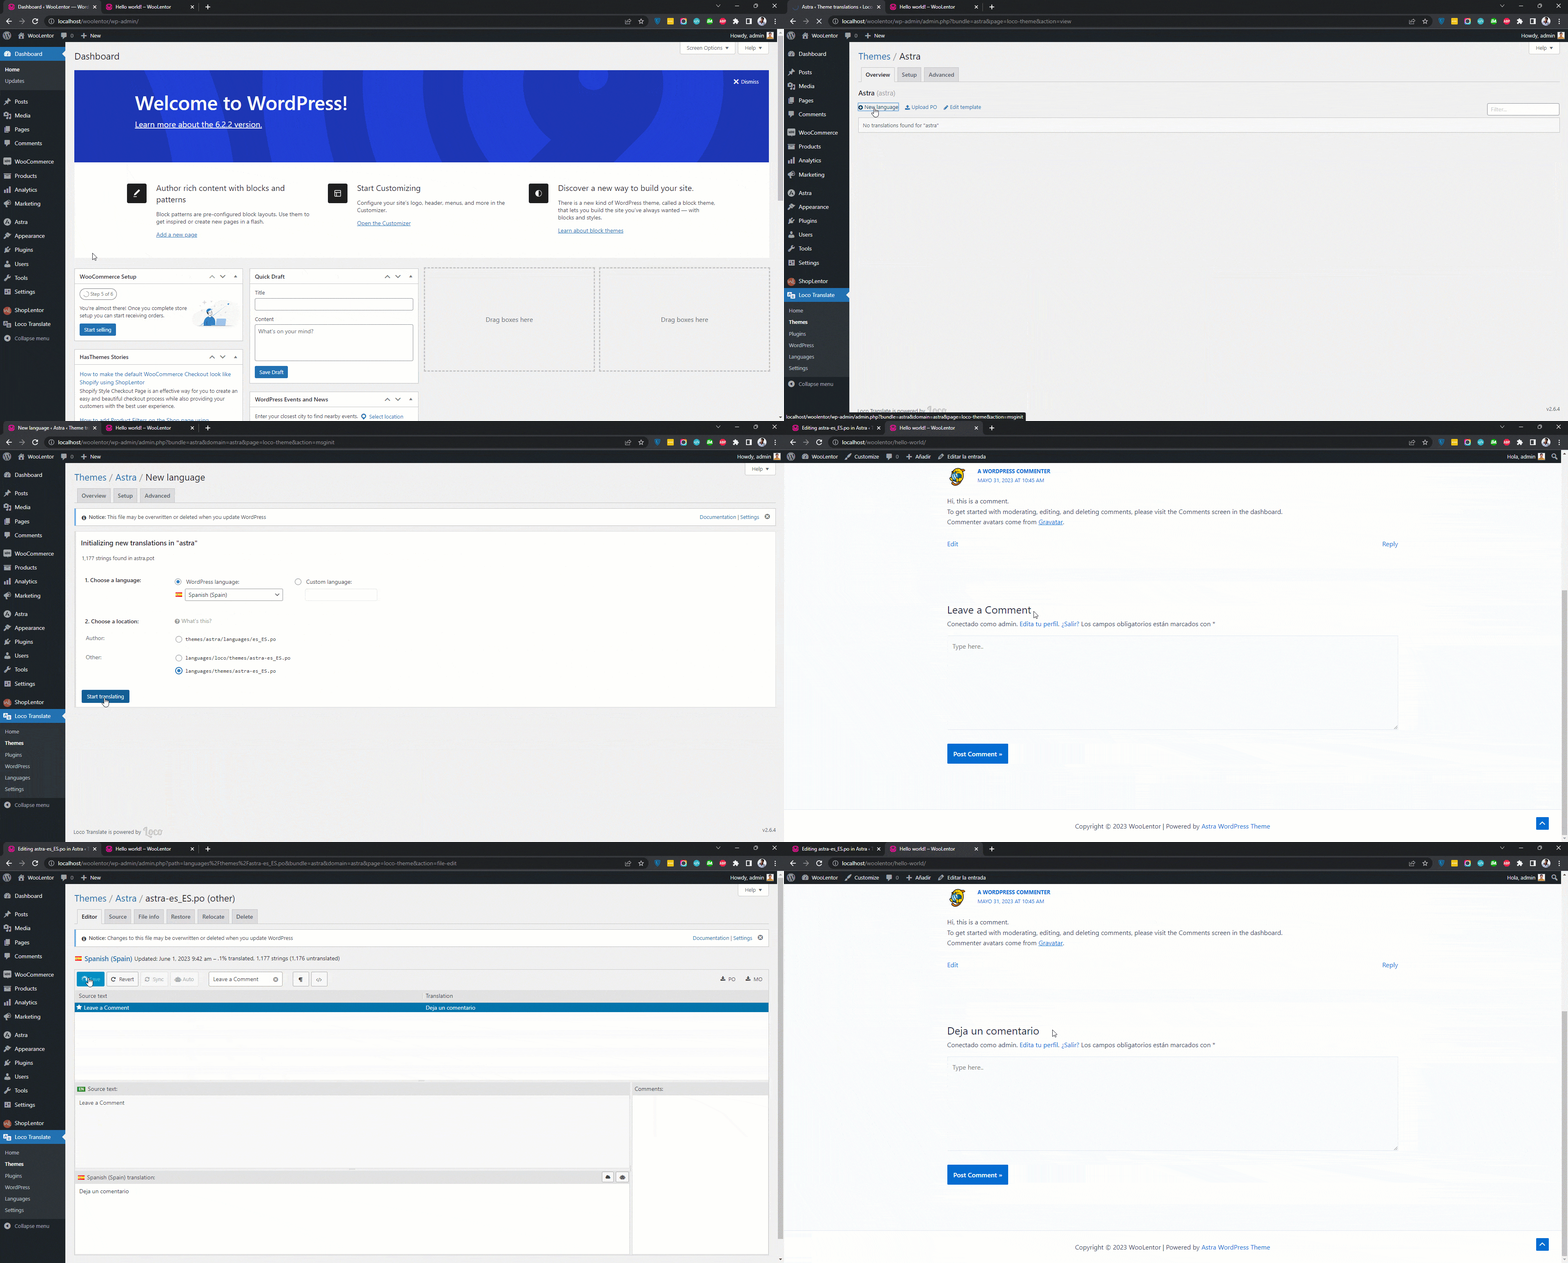
Step 4: Translate Strings:
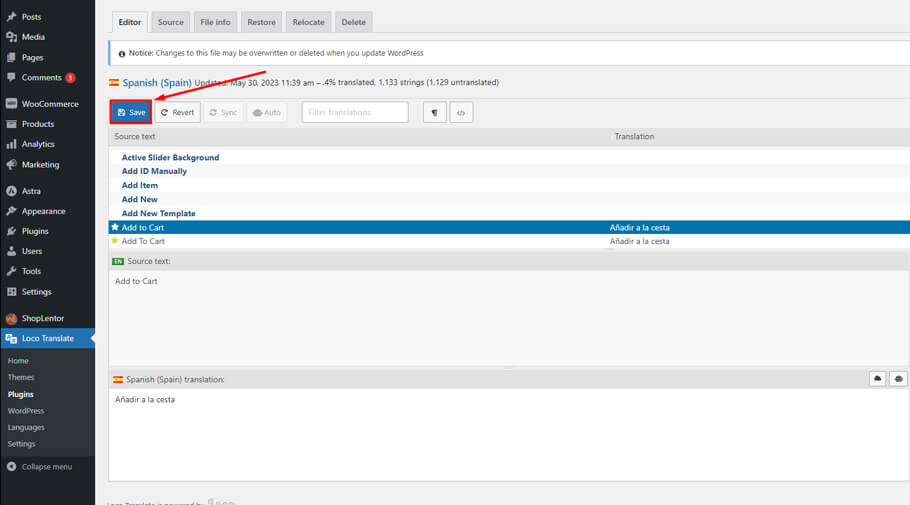
- Loco Translate will display a list of strings or text elements that need to be translated.
- Locate the string you want to translate and click on it.
- In the translation editor, enter the translated text in the corresponding field.
- Repeat this process for all the strings you want to translate.
Step 5: Save and Generate Translation Files:
- Once you have translated the desired strings, click on the “Save” button to save your translations.
- Loco Translate will automatically generate the translation files for the selected language.
- These files will be stored in a separate folder within the plugin or theme directory.
Step 6: Test and Verify Translations:
- To ensure the translations are working correctly, visit your website and switch to the translated language.
- Check if the translated strings appear correctly on your website.
- If needed, go back to Loco Translate and make any necessary adjustments or corrections.
ShopLentor- WooCommerce Builder for Elementor & Gutenberg
A versatile page builder to build modern and excellent online stores with more than 100k+ Active Installations.
FAQs
Here are some common mistake questions and their corresponding answers related to How to Translate WordPress Plugins and themes using Loco Translate:
I installed Loco Translate, but it’s not appearing in my WordPress admin panel. What should I do?
Make sure that you have installed and activated Loco Translate correctly. Double-check that it is listed under the “Plugins” section in your WordPress admin panel. If not, you should deactivate and reactivate the plugin or reinstall it.
I can’t find the plugin or theme I want to translate in Loco Translate. What could be the issue?
Loco Translate only displays plugins and themes that are properly coded to support translation. Ensure that the plugin or theme you want to translate is compatible with Loco Translate. If it doesn’t appear, contact the plugin or theme developer for assistance or consider using an alternative translation method.
How can I add a new language for translation in Loco Translate?
To add a new language, go to the translation settings for the desired plugin or theme in Loco Translate. Click on the “New Language” button and select the language that you intend to translate into from the available options. Then, choose a location to store the translation files and click on “Start Translating” to begin the translation process.
I accidentally deleted a translation file in Loco Translate. Can I recover it?
Unfortunately, Loco Translate does not have a built-in recovery option for deleted translation files. It’s necessary to maintain regular backups of your translations to avoid losing any progress. In case you have a backup, you can restore the deleted translation file. Otherwise, you may need to retranslate the strings.
I finished translating strings, but the translations are not appearing on my website. What could be the problem?
Ensure that you have saved the translation file after completing the translations in Loco Translate. Additionally, check if the plugin or theme is correctly configured to load translations from the designated translation file. You may need to clear your website’s cache or adjust the language settings to activate the translations.
How can I update the translations when a plugin or theme is updated?
Loco Translate has an update feature that syncs your translations with the updated files. When an update is available for a plugin or theme, Loco Translate will display a notification on the translations page. You can choose to sync the translations with the updated files by following the prompts provided by Loco Translate.
Remember, if you confront any issues or have specific questions related to Loco Translate, it’s always a good idea to consult the plugin’s documentation or get in touch with the plugin’s support team for further assistance.
Final Words on How to Translate WordPress Plugins
Translating plugins and themes using Loco Translate is a straightforward process that empowers you to reach a wider audience. By following the steps outlined in this guide, you can easily translate your website’s plugins and themes into multiple languages, enhancing the user experience for your global audience.
Note: It’s important to regularly update your translations as plugin and theme updates may introduce new strings that need translation.

