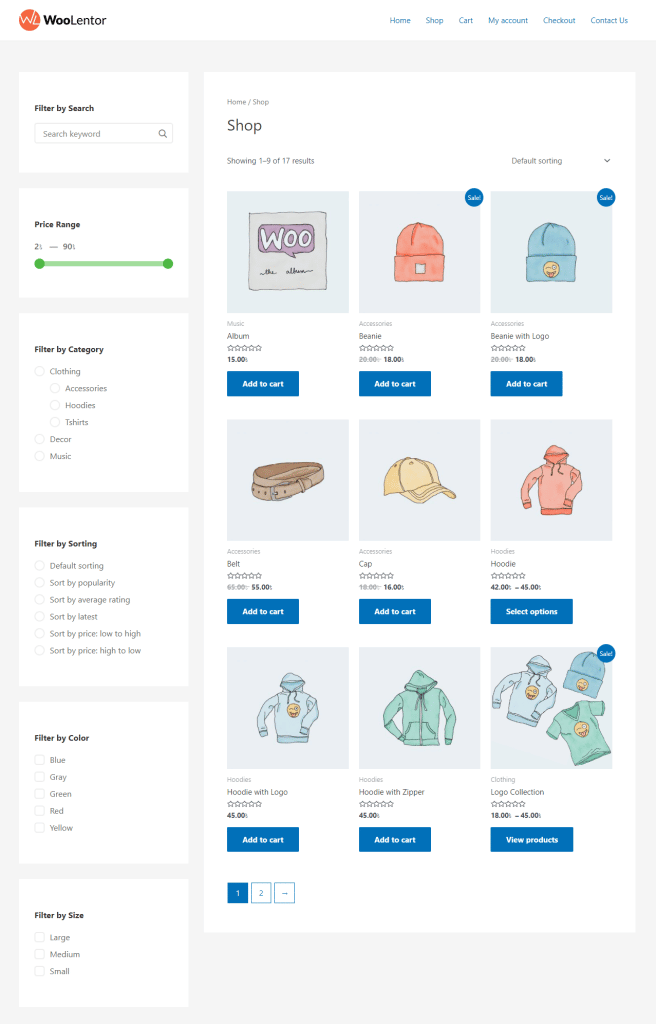
The Product Filter module in WooLentor allows users an opportunity to customize their WooCommerce Product Filter easily and gives them a professional look desired by many – without having any coding knowledge whatsoever.
Why use a Product Filter? #
The WooLentor Product Filter Module is useful for assisting clients in discovering items more quickly and conveniently. Without writing a single line of code, you can easily change the product filtering feature on your WooCommerce site using numerous options included in this module. Every filtering element, including Taxonomy (Product Categorie, Product Tags), Attribute (Product Color/Image, Product Size), Price Range, Search Input, Sorting, Authors, etc. is customizable.
Moreover, with WooLentor’s product filter module, you can introduce a group filter or single filter on your WooCommerce shop pages. Also, you can modify the product filters using both Elementor and Gutenberg page builders.
Steps of adding Product Filter #
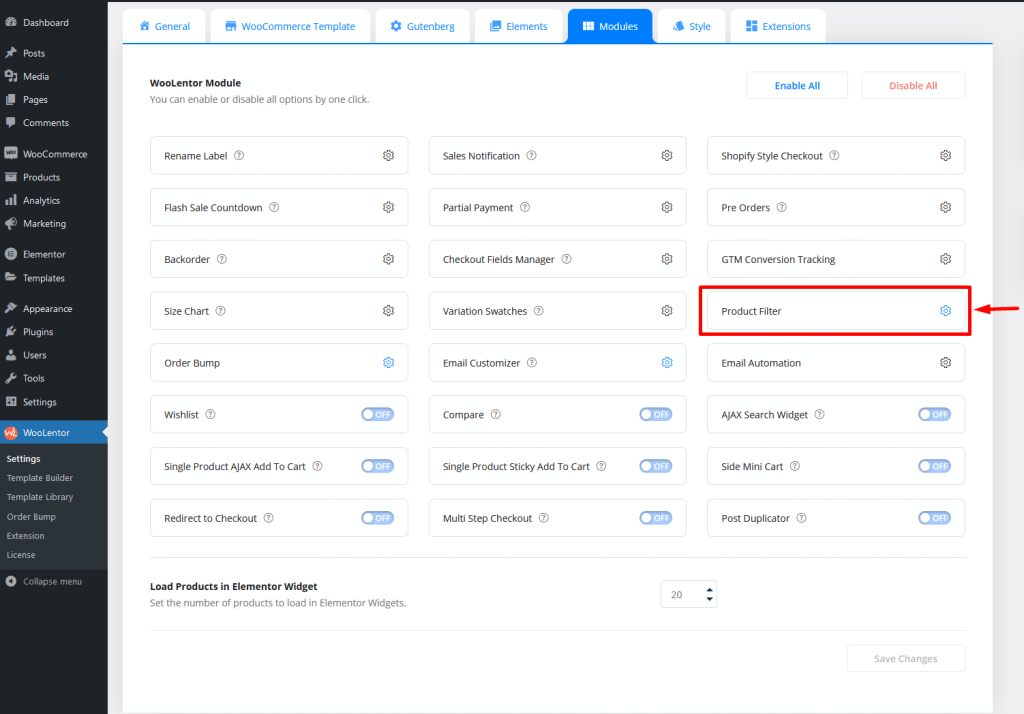
Go to WordPress Dashboard > WooLentor > Settings > Modules. From the list of Modules, turn ON the “Product Filter“ Module.
Step 1: How to Enable Product Filter Module? #
Go to Dashboard > WooLentor > Settings > Modules. From the list of Modules, click the setting of Product Filter Module.
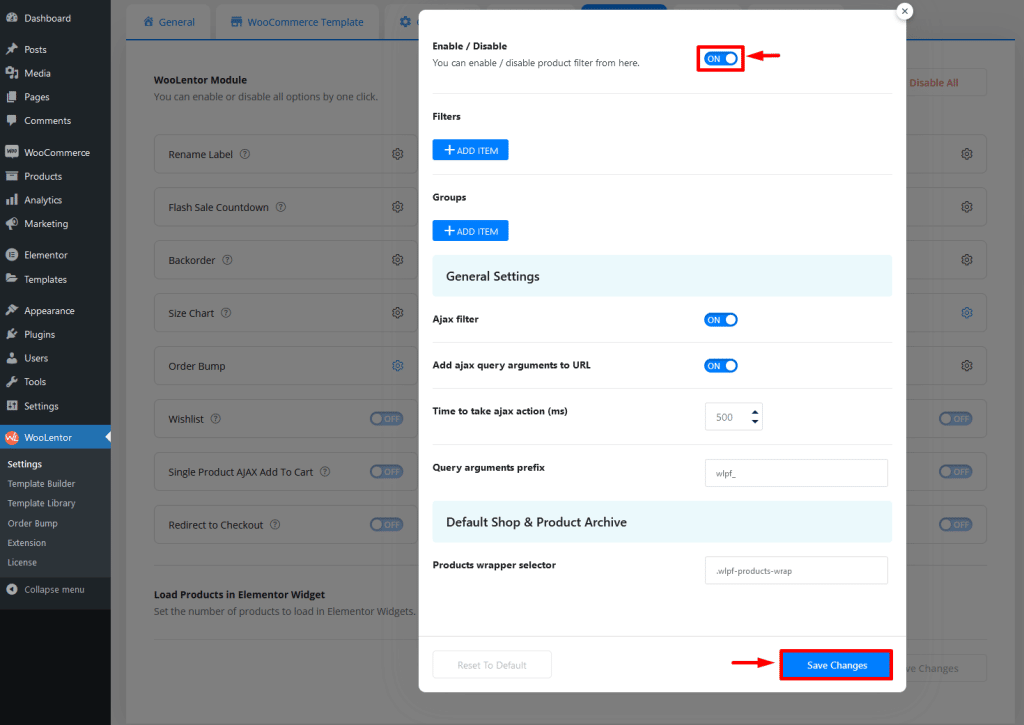
Turn On to enable Product Filter and click the Save Changes button to save
Step 2: How to use the Product Filter Module? #
If you want to customize your traditional WooCommerce Product Filter, you need to use the module called Product Filter. To do this, simply turn on the module in the Modules panel and save changes.
General Settings: #
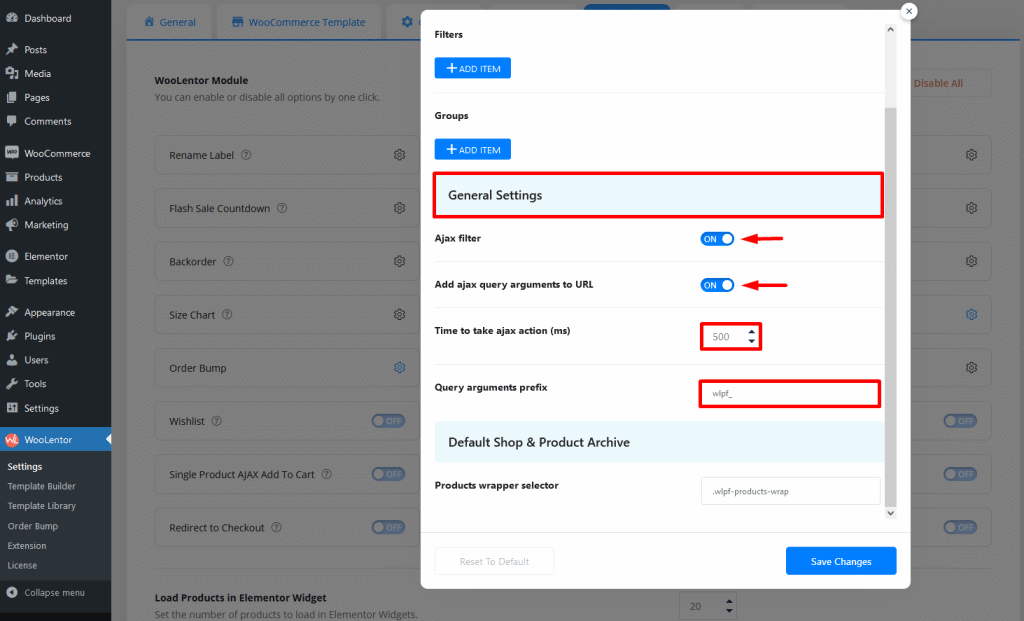
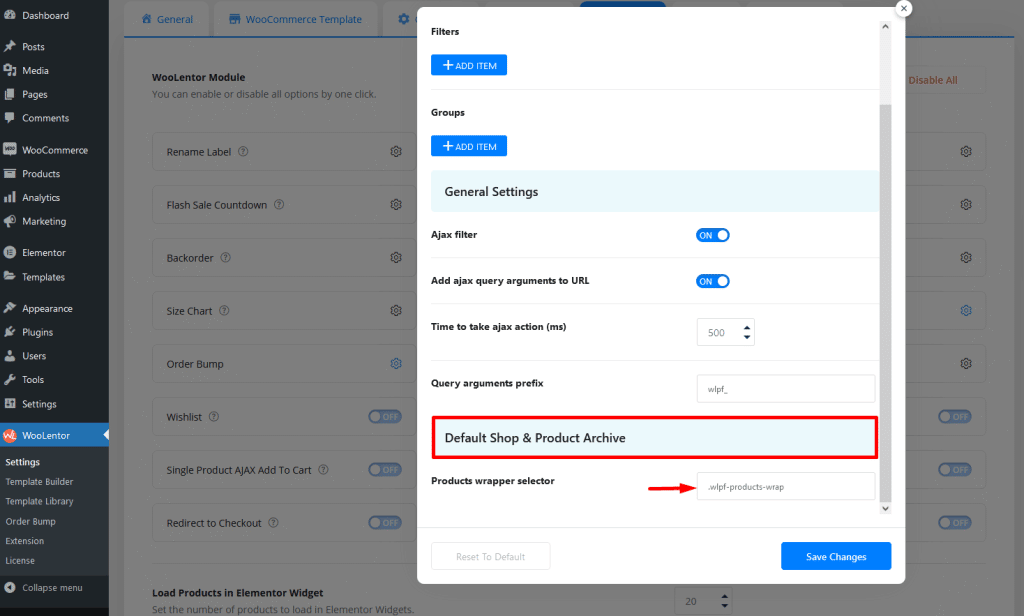
You can different options from General Settings.
- Ajax filter: Enable/disable Ajax filter from here.
- Add Ajax query arguments to URL: Add Ajax query arguments to URL enable/disable from here.
- Time to take Ajax action (ms): Change the take time set of Ajax action as needed.
- Query arguments prefix: Set the query argument prefix from here.
Default Shop & Product Archive:
The default shop and product archive page product wrapper selector can be set as needed.
How to add a product filter item (Filter by Category) #
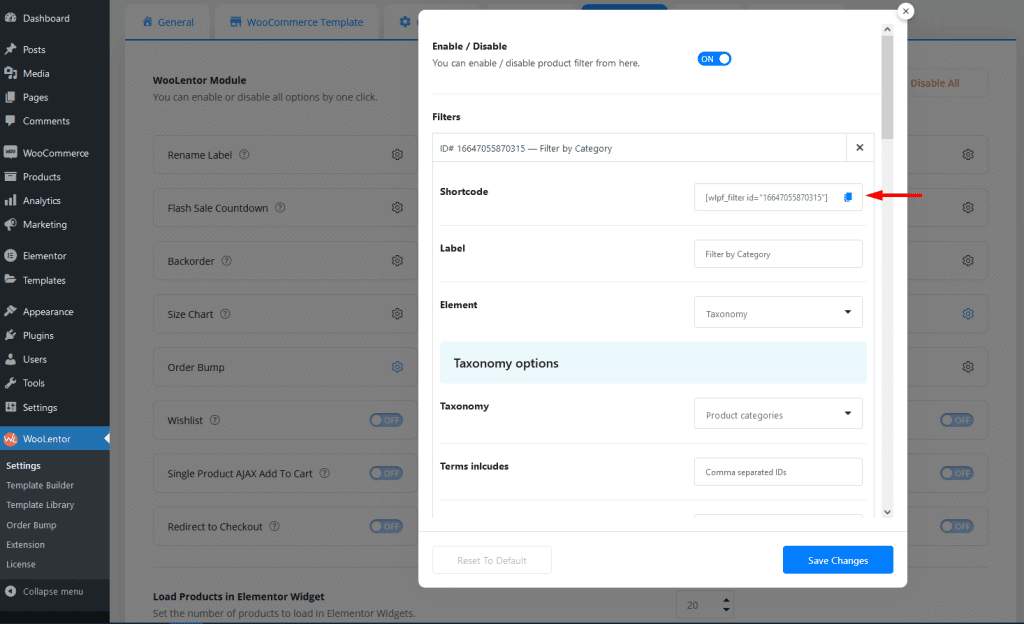
Click the Add Item button for the new product filter.
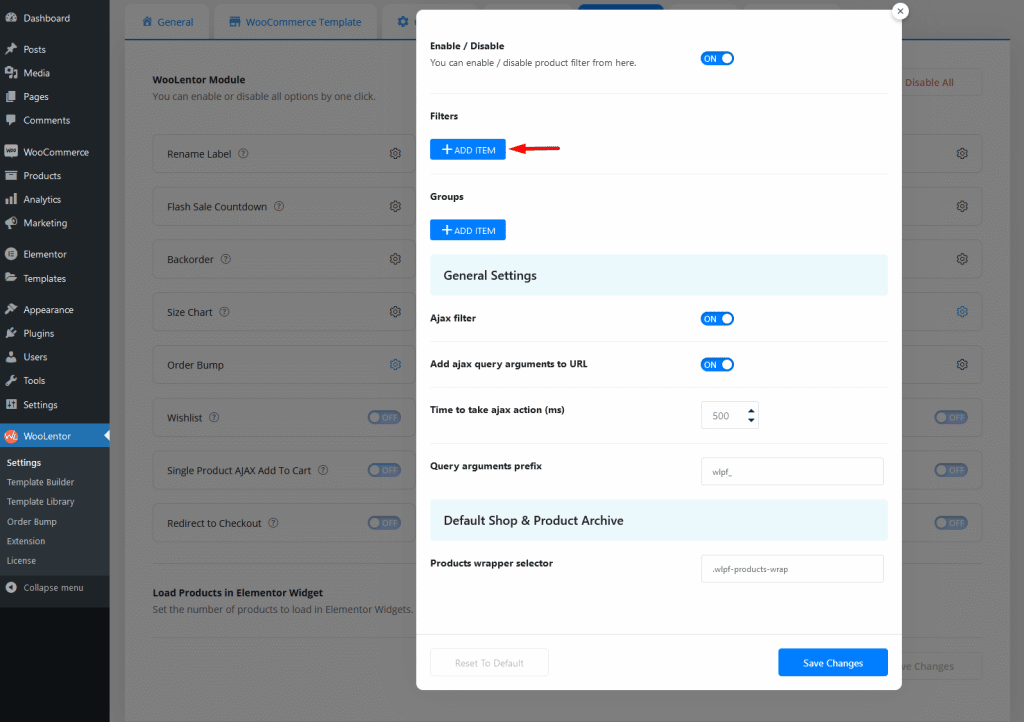
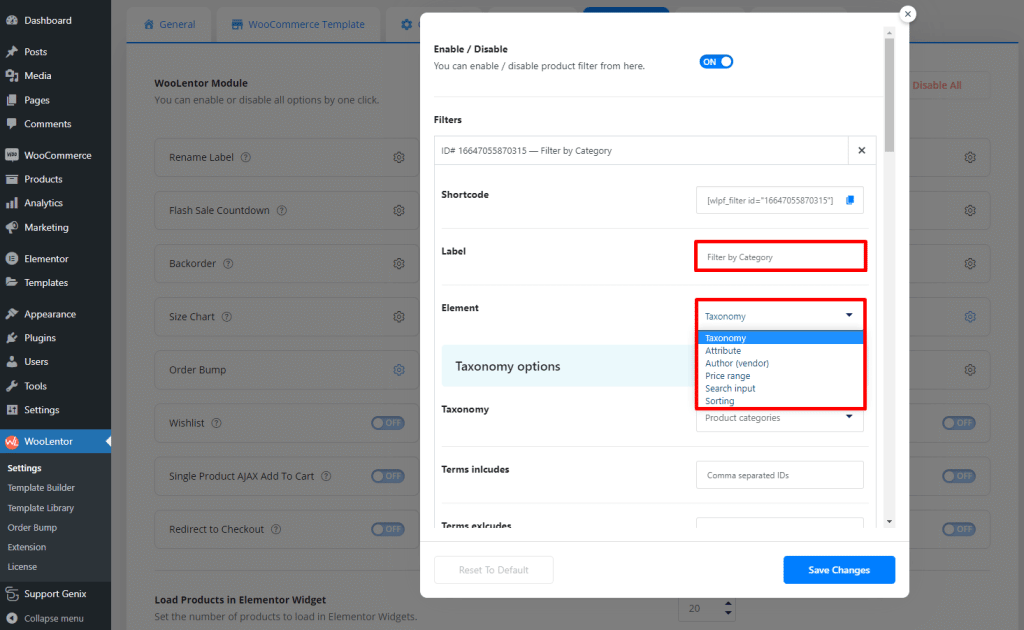
After adding items, you will get the required fields option of the product filter.
Label: Enter your product filter item label name.
Element: Here are product filter elements such as Taxonomy, Attribute, Author, Price Range, Search Input, and Sorting.
Select the product filter element as required from here
Now click the Save Changes button click.
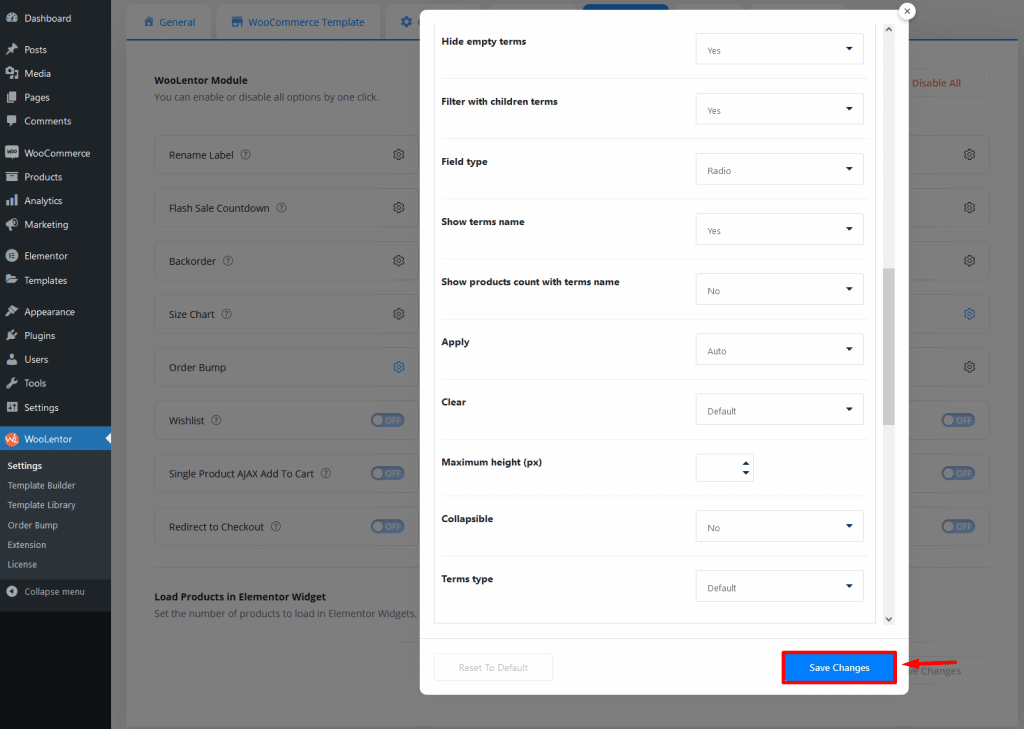
Then get a label named Shortcode above the filter item panel. Click here to copy the Shortcode.
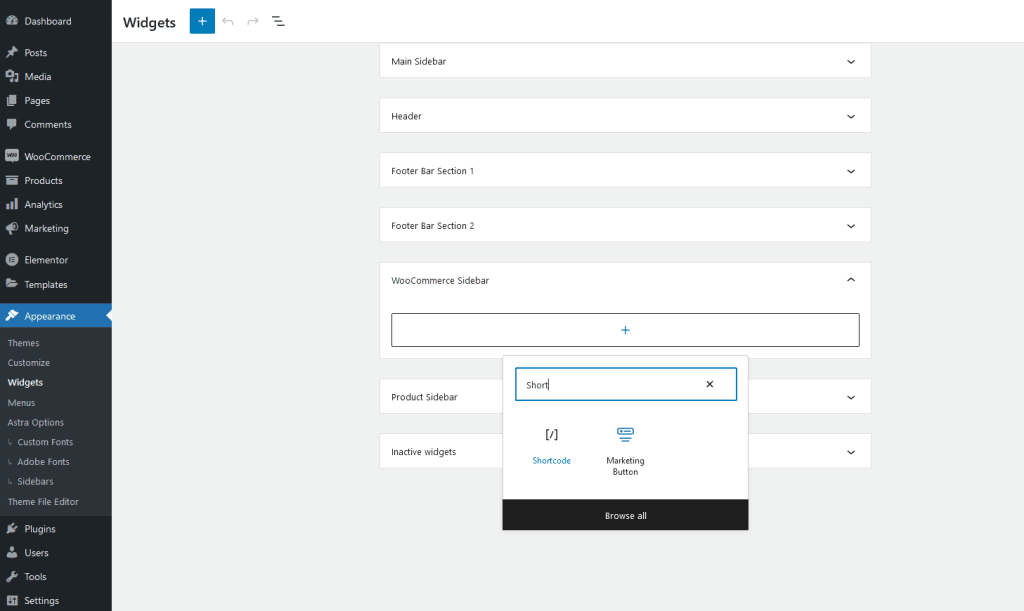
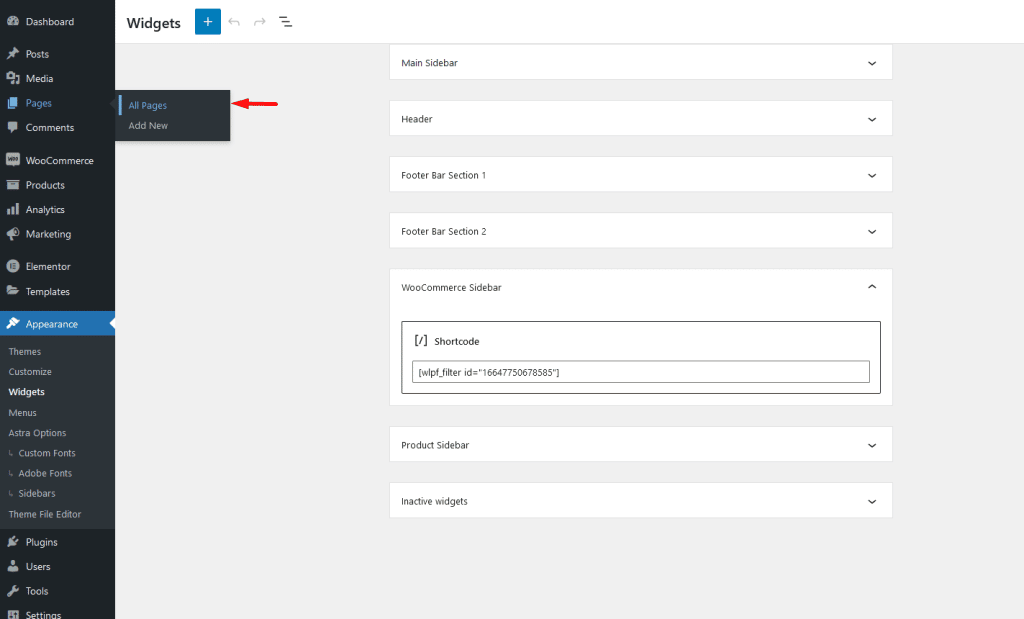
- Navigate to “Appearance > Widgets”
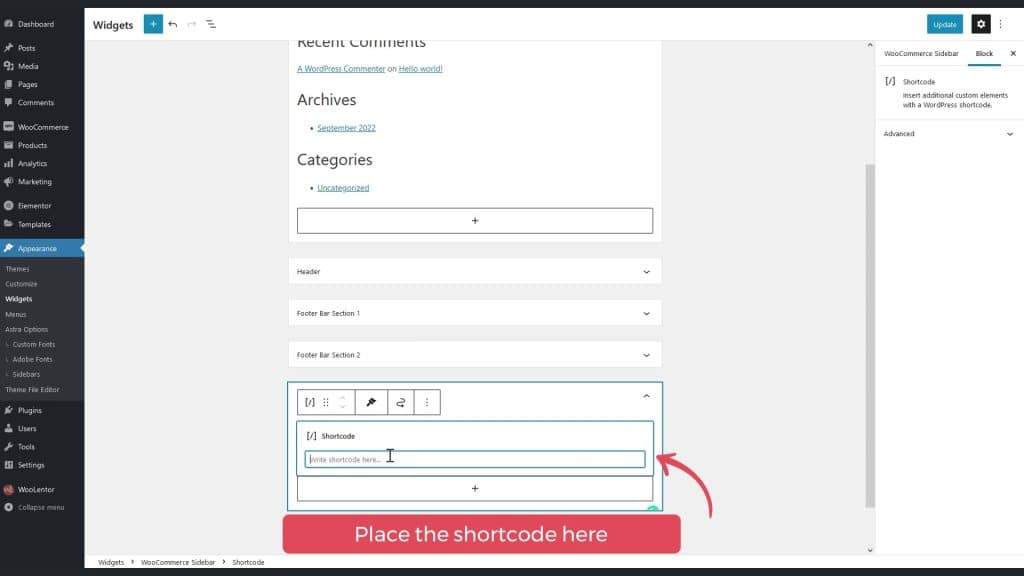
Place your Shortcode in the field by selecting the Shortcode block within the WooCommerce sidebar widget.
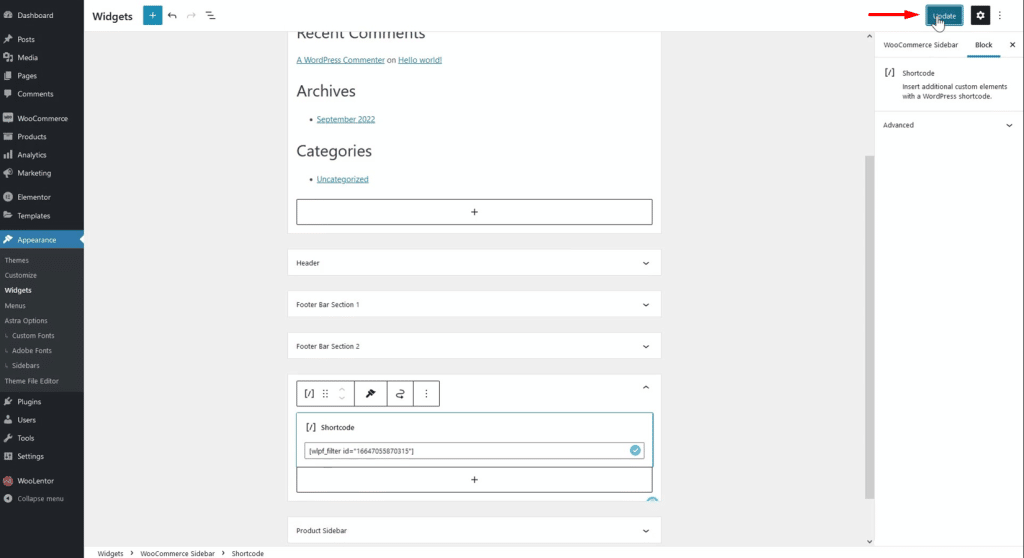
Then update and save the widgets page
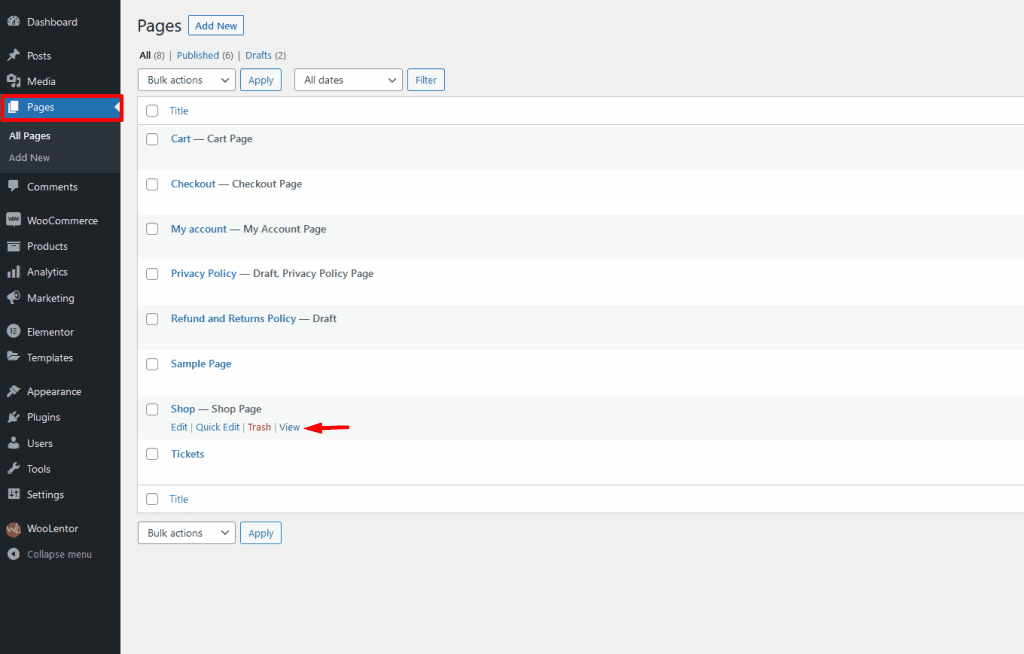
- Navigate to “Pages > All Pages”
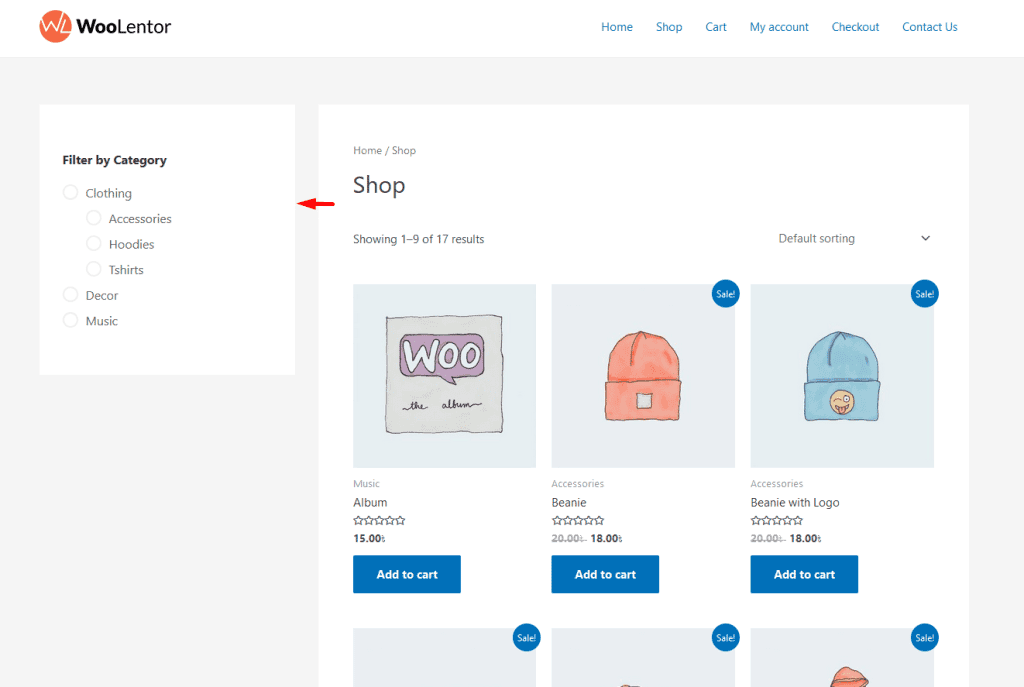
Now view the shop page, Filter has been added shop page.
View the Shop Page
The Filter has been added shop page
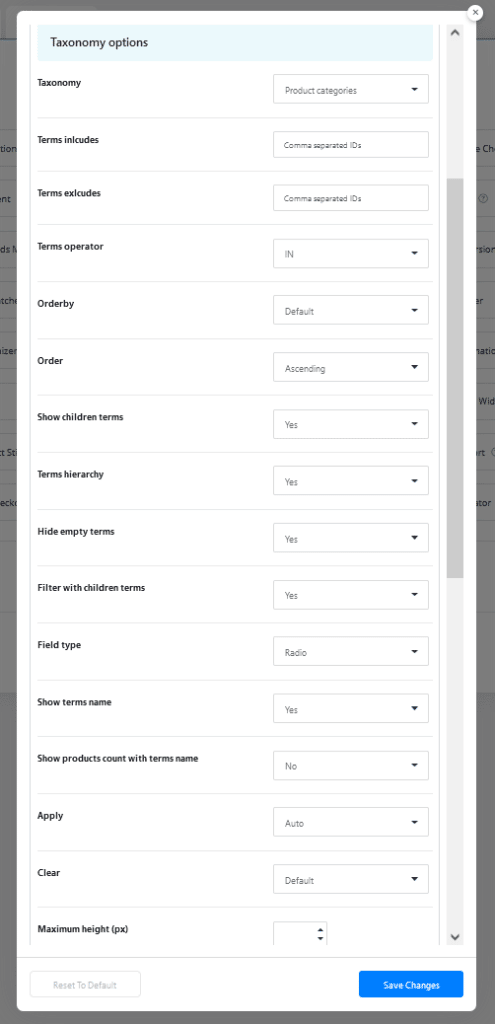
There are different options for customizing based on each filter element. #
- Here are some customized options on the Filter element Taxnomoy such as
- Taxonomy: Select taxonomy
- Terms includes: Terms included by Comma separated IDs
- Terms excludes: Terms excluded by Comma separated IDs
Terms operator: Select terms operator (IN, NOT IN, AND)
Orderby: Select order by (Term name, Term Slug, Term ID, Term order, Term item count, Include) - Order: Select ordering which can be either Ascending or Descending
- Show children terms: Show children category terms (Yes or No)
- Terms hierarchy: Show hierarchy (Yes or No)
- Hide empty terms: Hide empty terms (Yes or No)
- Filter with children’s terms: Filter with children’s terms (Yes or No)
- Field type: Select field type as needed (Radio, Checkbox)
- Show terms name: Show terms name (Yes or No)
- Show products count with terms name: Show products count with terms name (Yes or No)
- Apply: Apply button Auto or Button click
- Clear: Clear button Default or Button click
- Maximum height (px): Define the height
- Collapsible: Collapsible icon (Yes or No)
Add another filter item (Filter by Color): #
Click the Add Item button for the new product filter.

After adding items you will get the required fields option of the product filter.
Label: Enter your product filter item label name.
Element: Select the product filter element Attribute
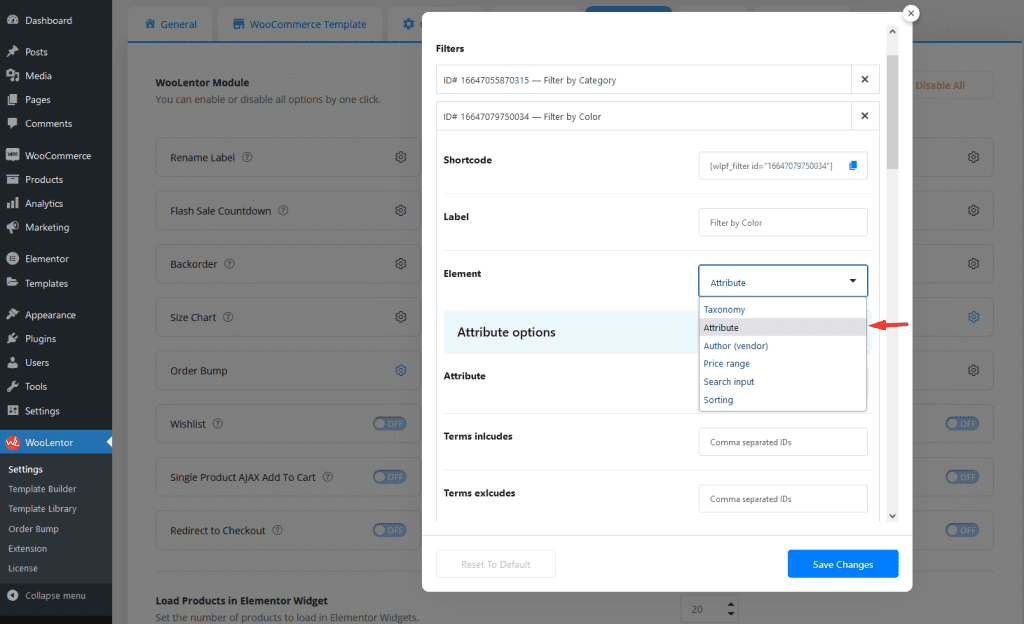
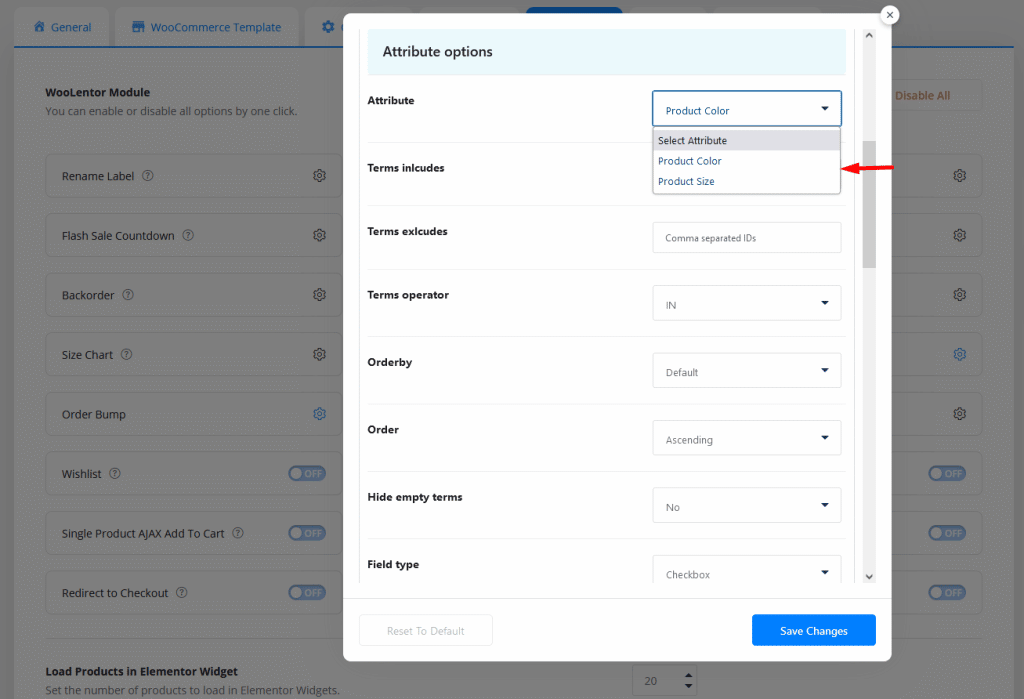
Select the attribute type and set the attribute settings as required
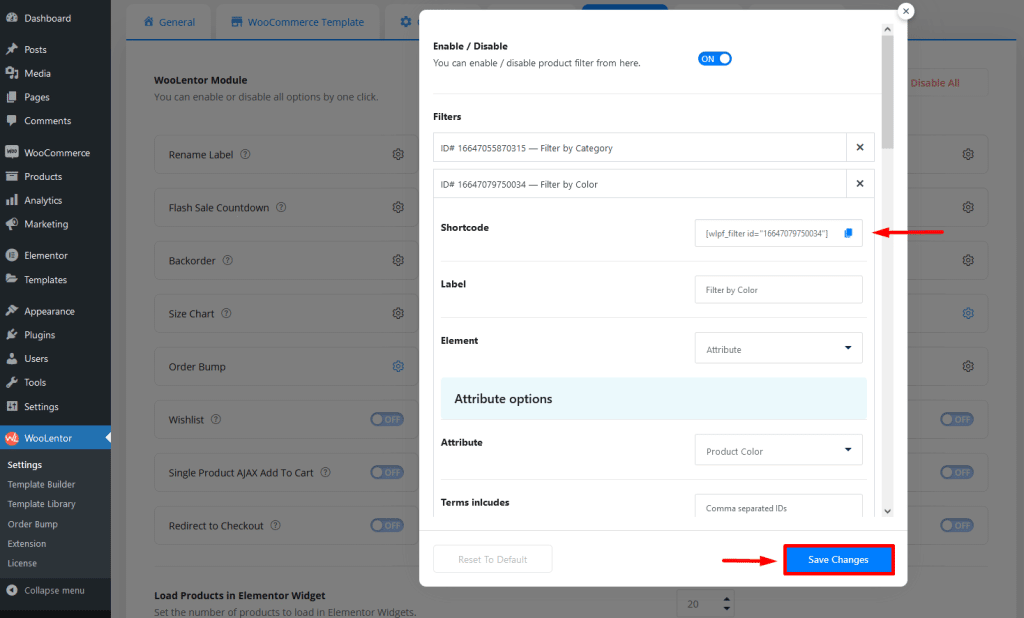
Save Changes button click, and here to copy the Shortcode.
Navigate to “Appearance > Widgets”
Place your Shortcode in the field by selecting the Shortcode block within the WooCommerce sidebar widget.

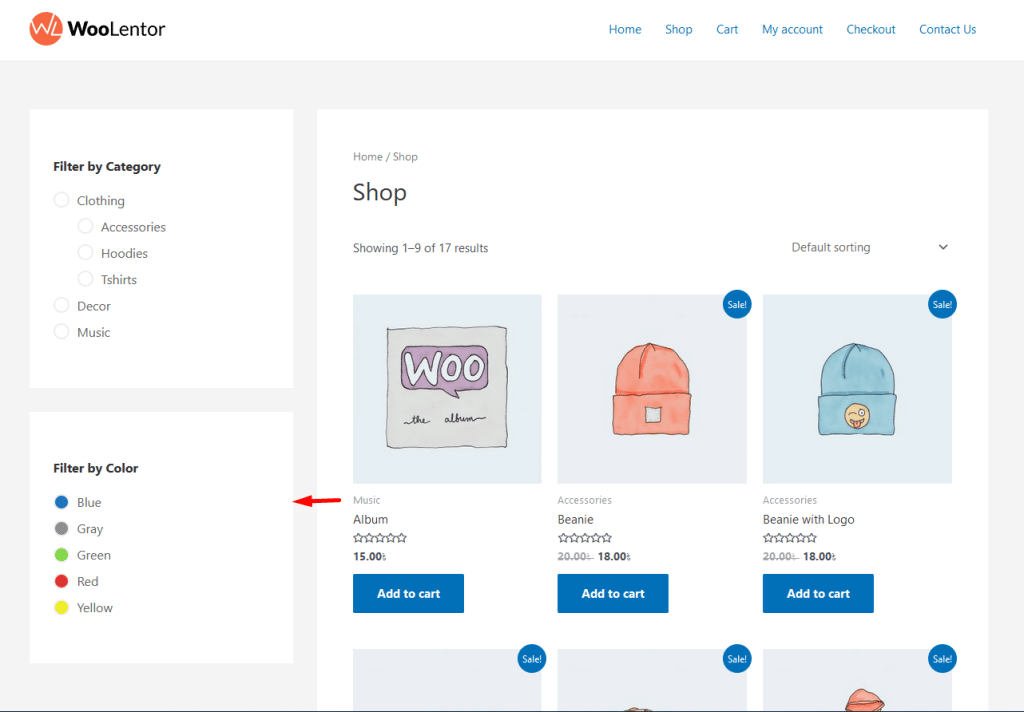
Now view the Shop Page as another Filter has been added to shop page.
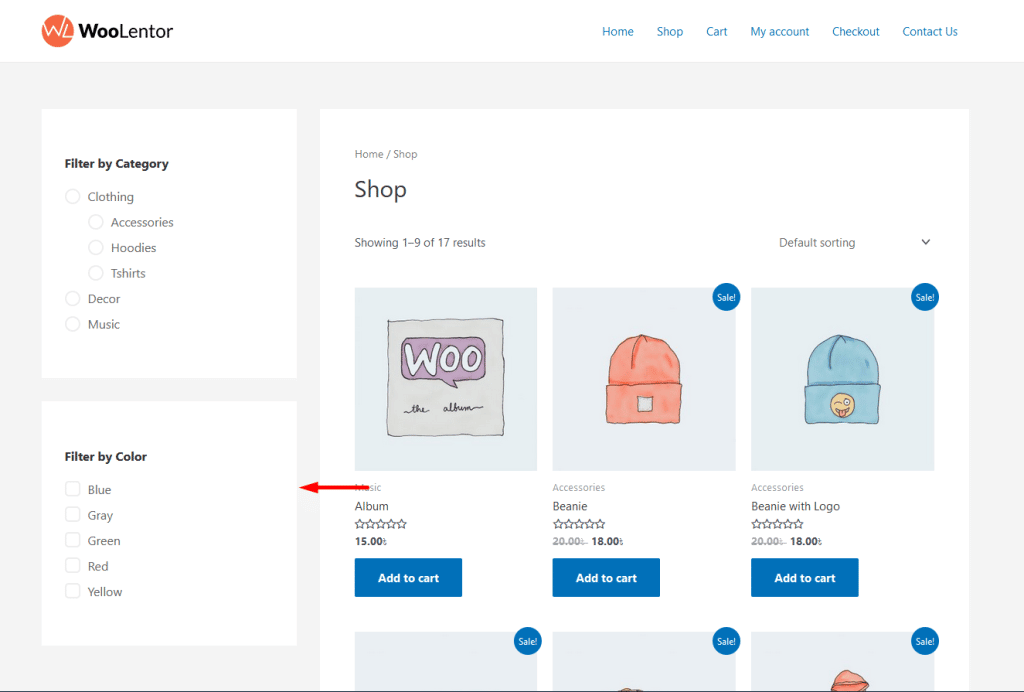
Also, customize attribute filter terms type (Color, Image)
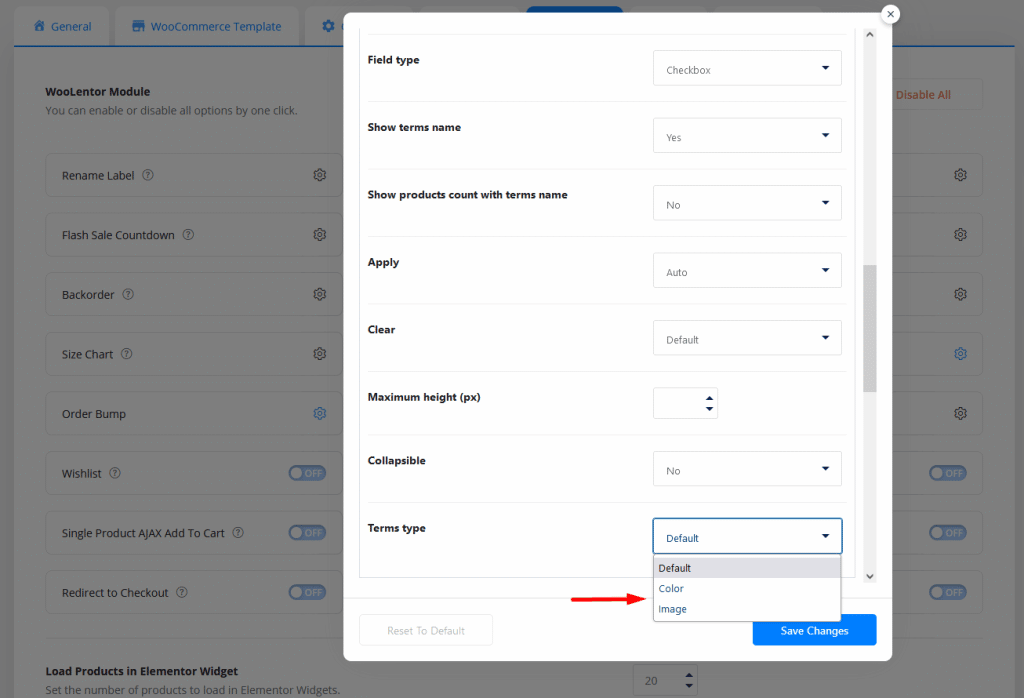
Configure the terms type
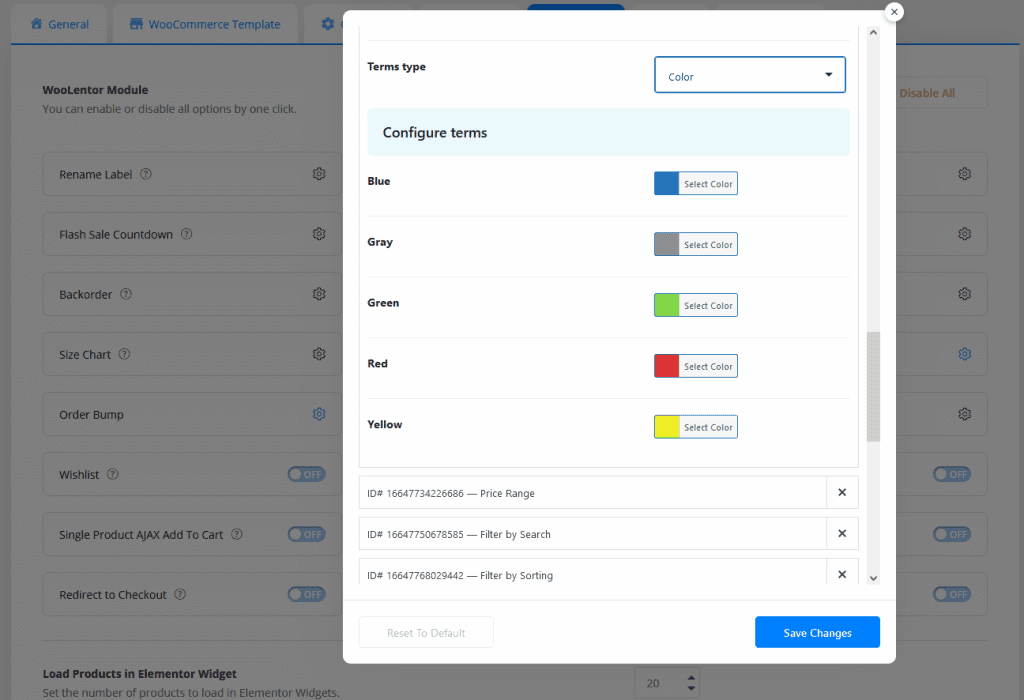
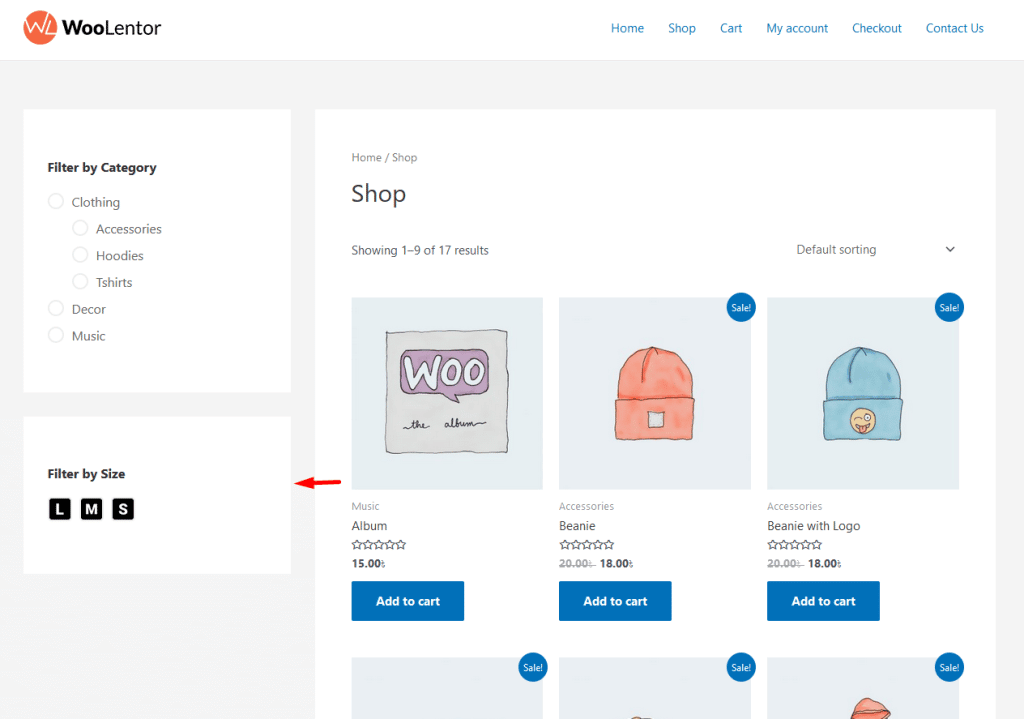
Visit the shop page and see the attribute type color is changed
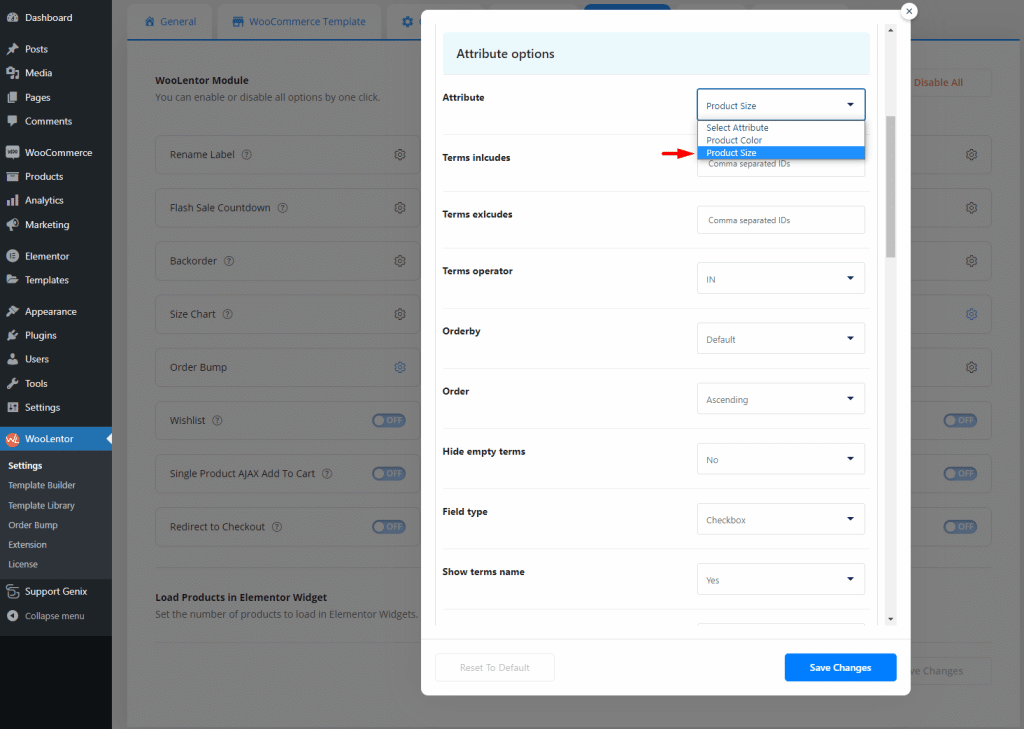
How to set product filtering size, follow the below screenshot for steps
By selecting the attribute Product Size
Select Terms type Image, and set the product size image according to size.
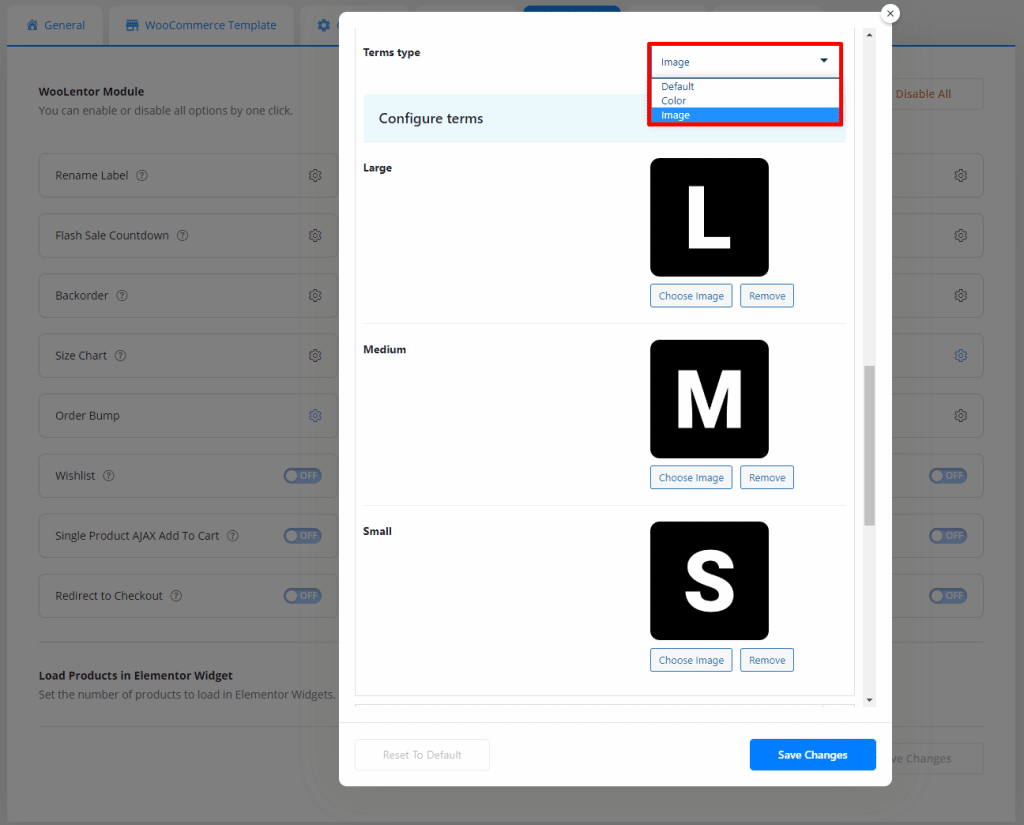
See the below screenshot as the demo
Add another filter item (Price Range): #
Click the Add Item button for the new product filter item Price Range

After adding items you will get the required fields option of the product filter.
Label: Enter your product filter item label name.
Element: Select the product filter element Attribute
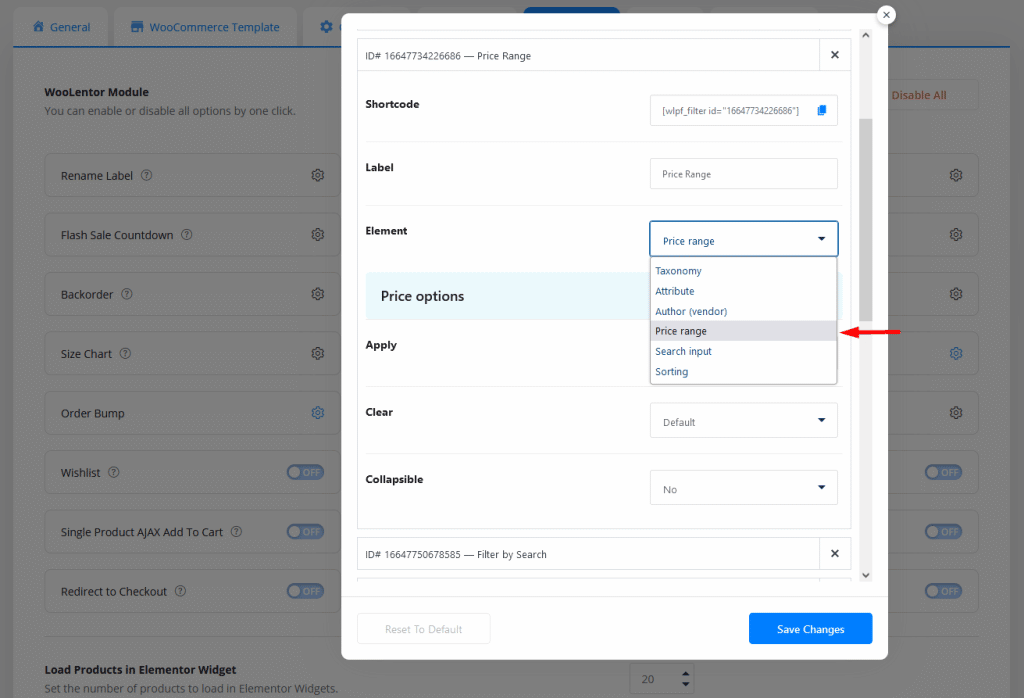
Save Changes button click, and here to copy the Shortcode.
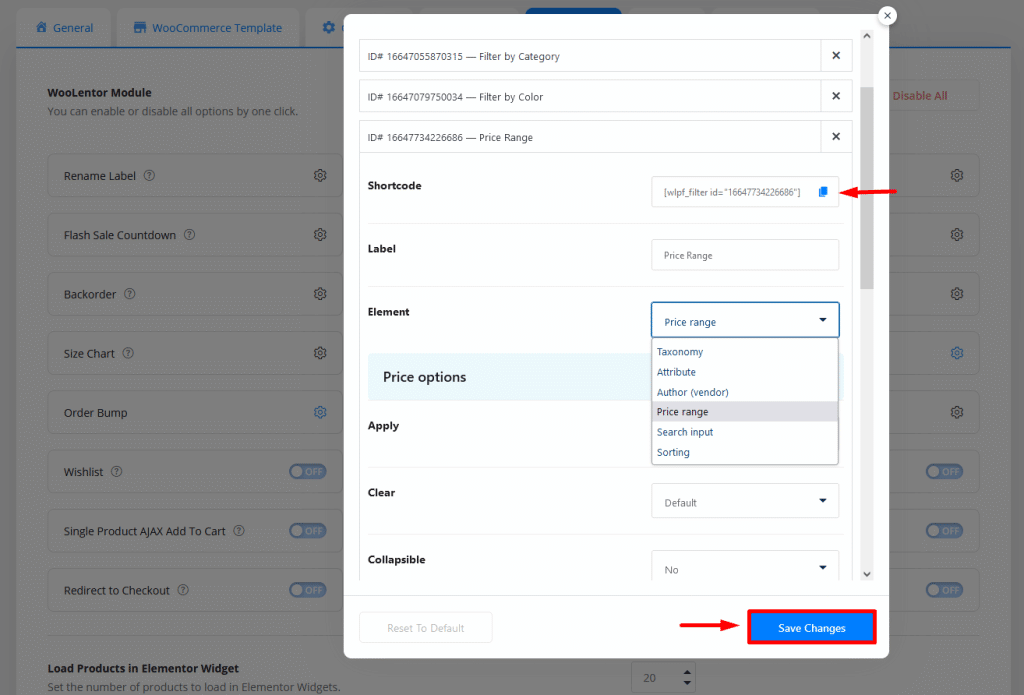
Navigate to “Appearance > Widgets”
Place your Shortcode in the field by selecting the Shortcode block within the WooCommerce sidebar widget.
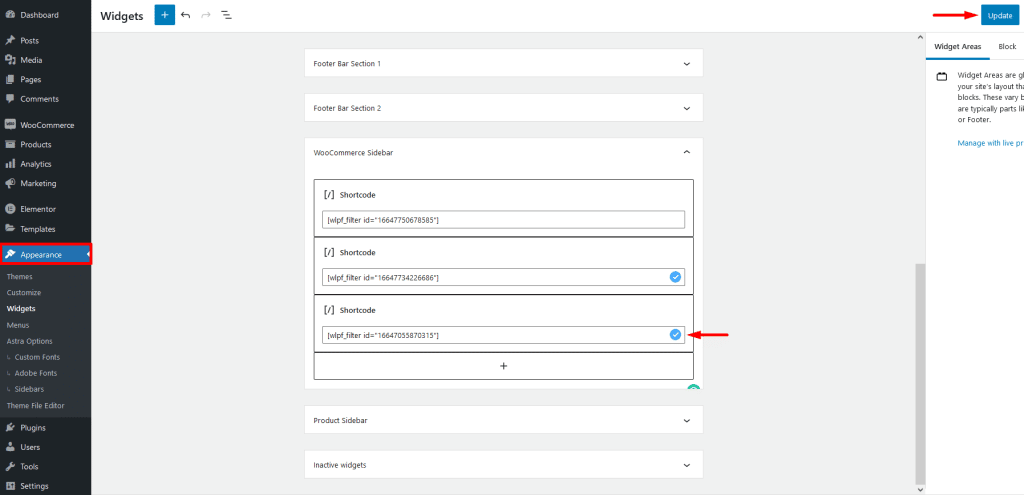
Now view the Shop Page as another filter has been added shop page.
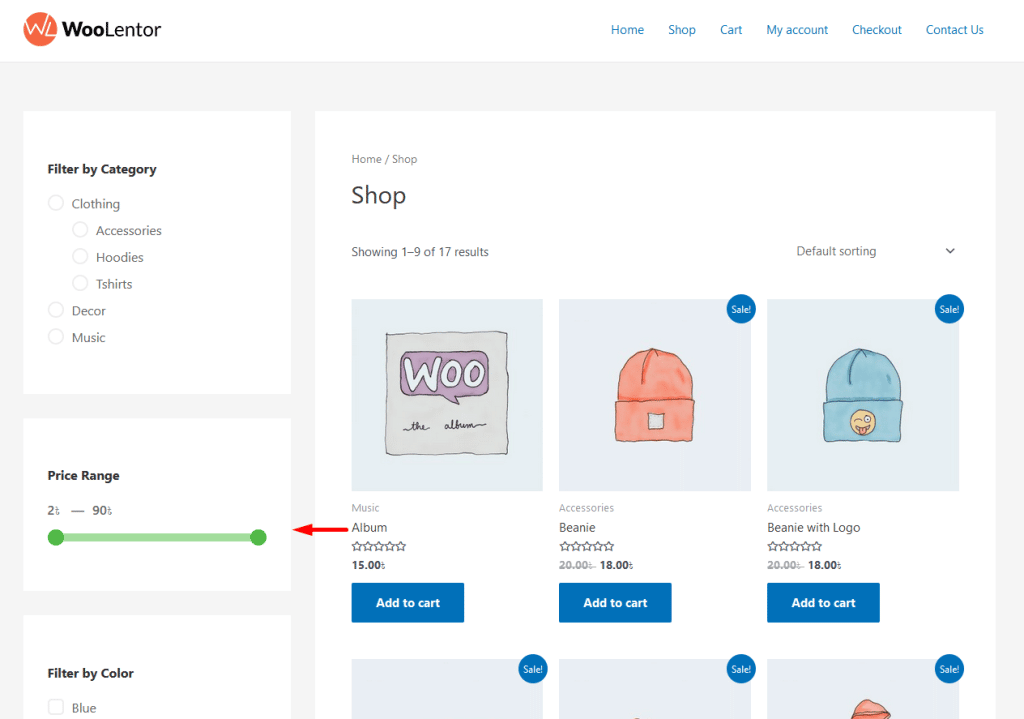
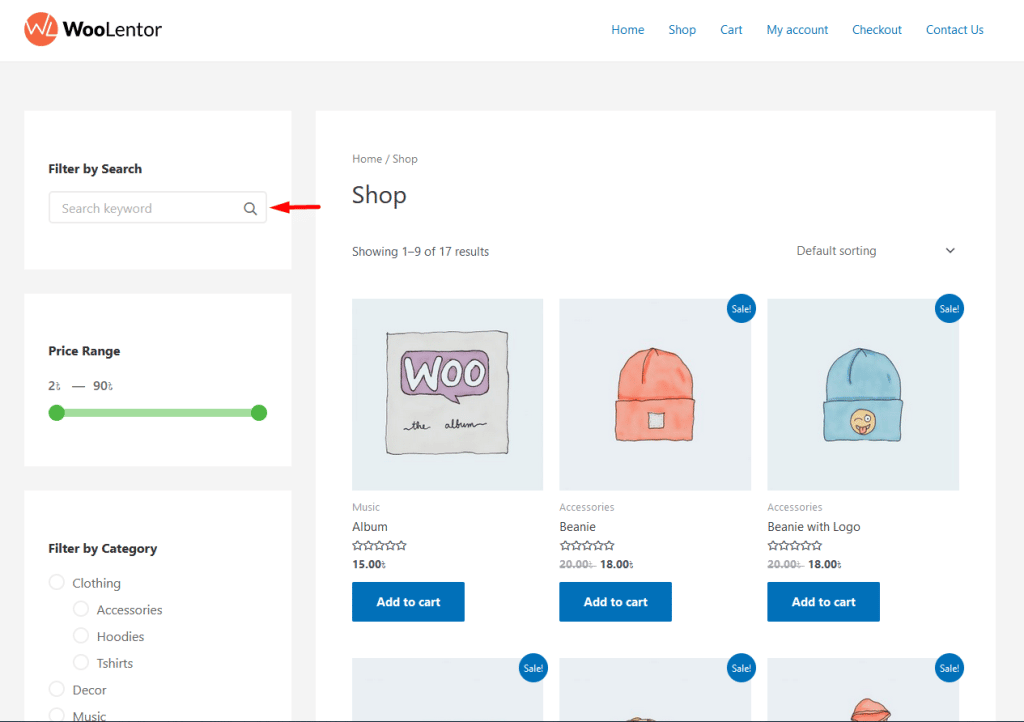
Add another filter item (Filter by Search): #
Click the Add Item button for the new product filter item Price Range

Label: Enter your product filter item label name.
Element: Select the product filter element Attribute
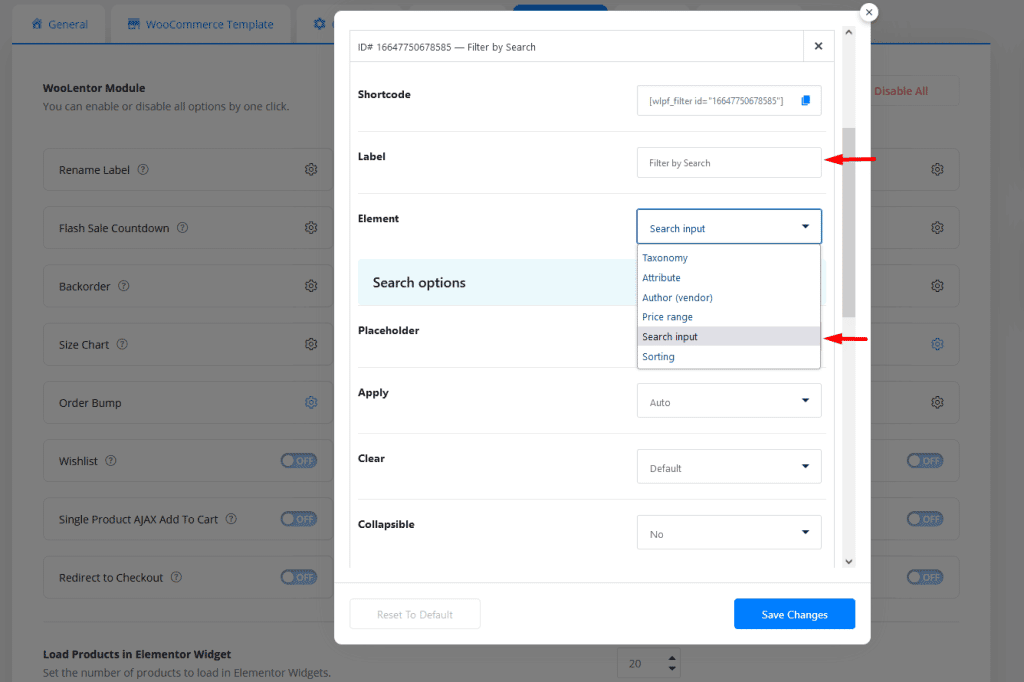
Press the Save Changes button, and click here to copy the Shortcode.
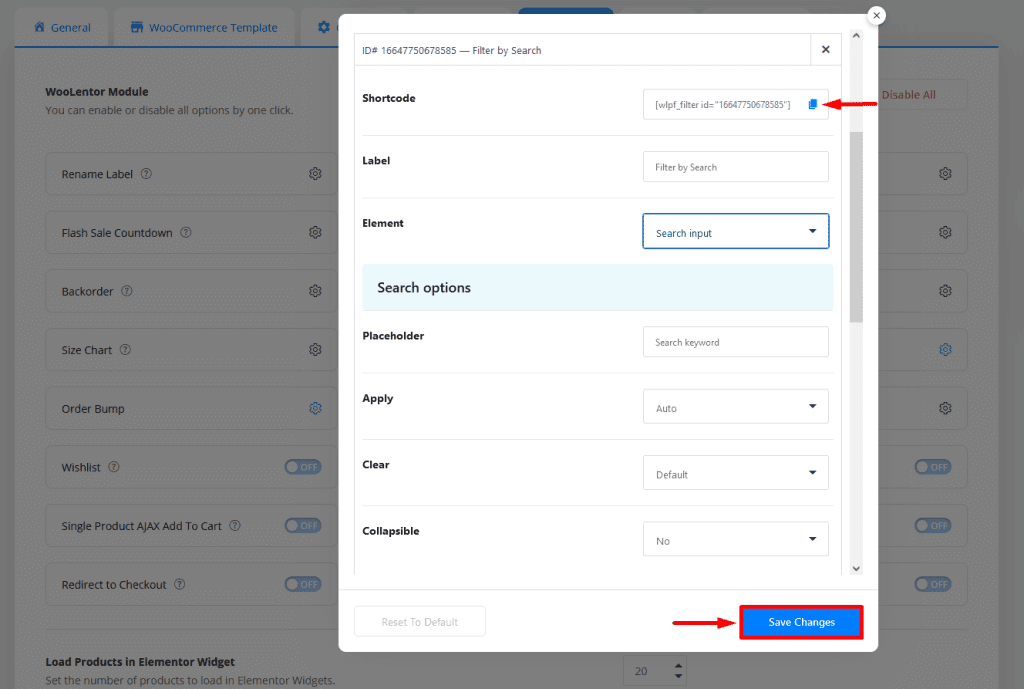
Navigate to “Appearance > Widgets”
Place your Shortcode in the field by selecting the Shortcode block within the WooCommerce sidebar widget.

Now view the Shop Page as another filter has been added shop page.
Add another filter item (Filter by Sorting): #
Click the Add Item button for the new product filter item Price Range

Label: Enter your product filter item label name.
Element: Select the product filter element Attribute
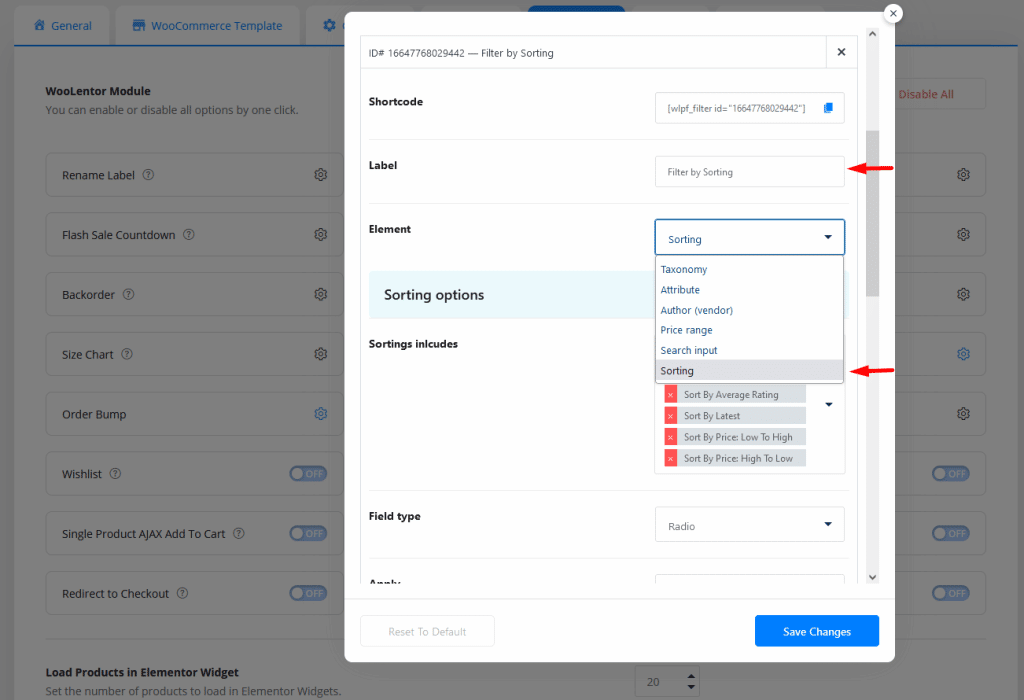
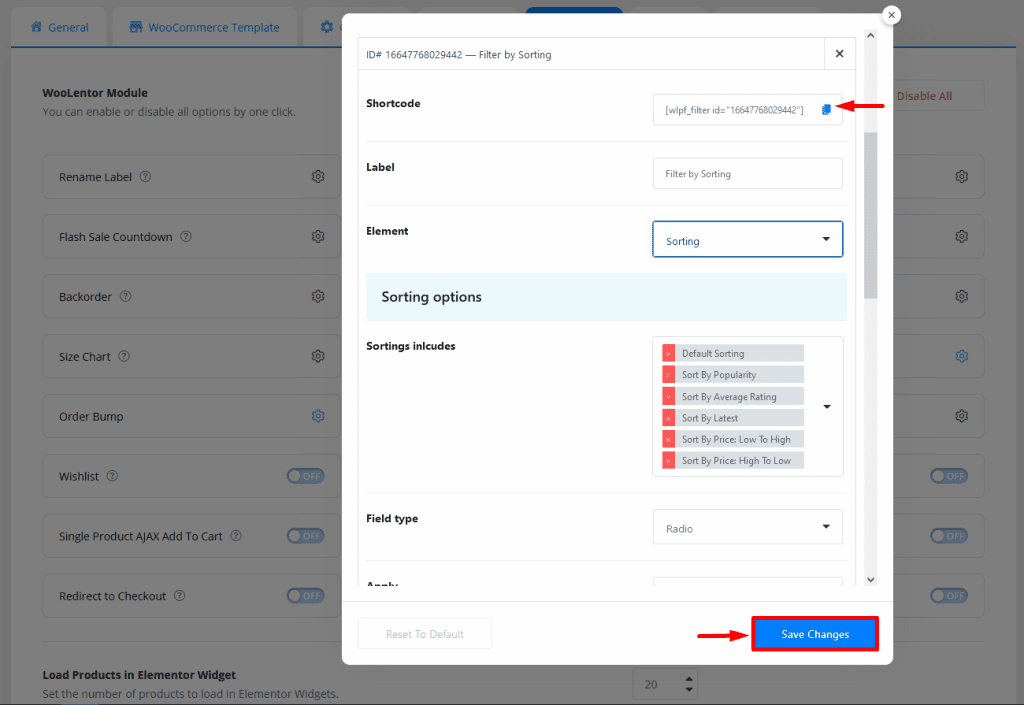
Press the Save Changes button and click here to copy the Shortcode.
Navigate to “Appearance > Widgets”
Place your Shortcode in the field by selecting the Shortcode block within the WooCommerce sidebar widget.

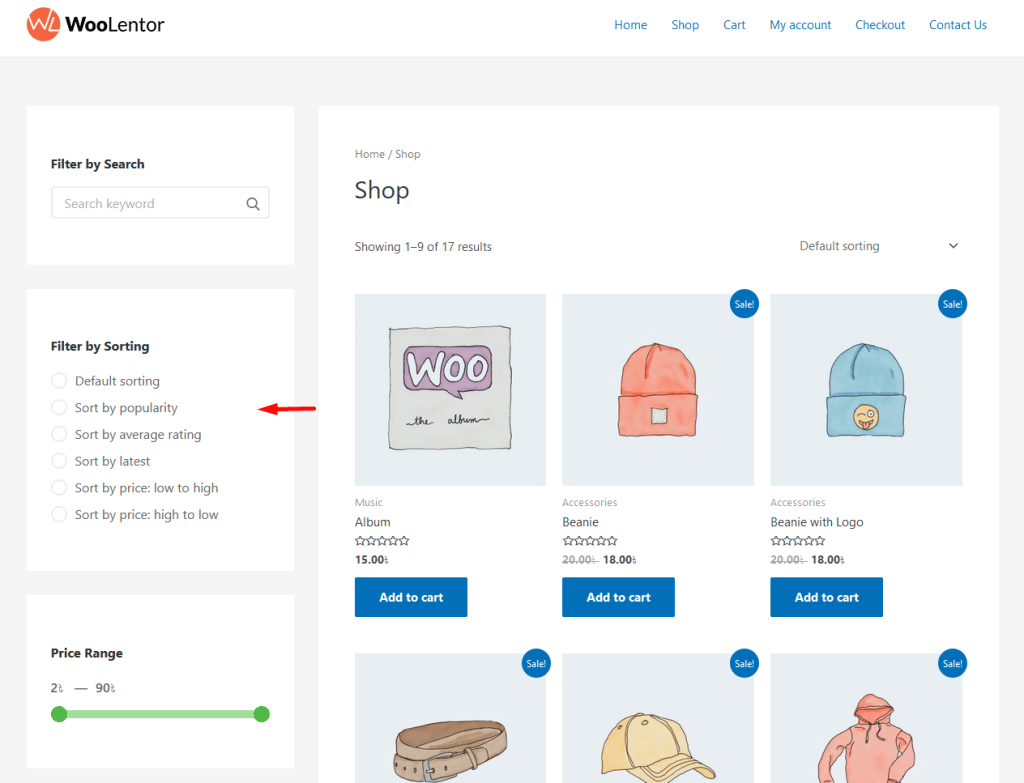
Now view the Shop Page another filter has been added shop page.
Step 3: How to add a group filter item #
Click the Add Item button for the new group’s filter.
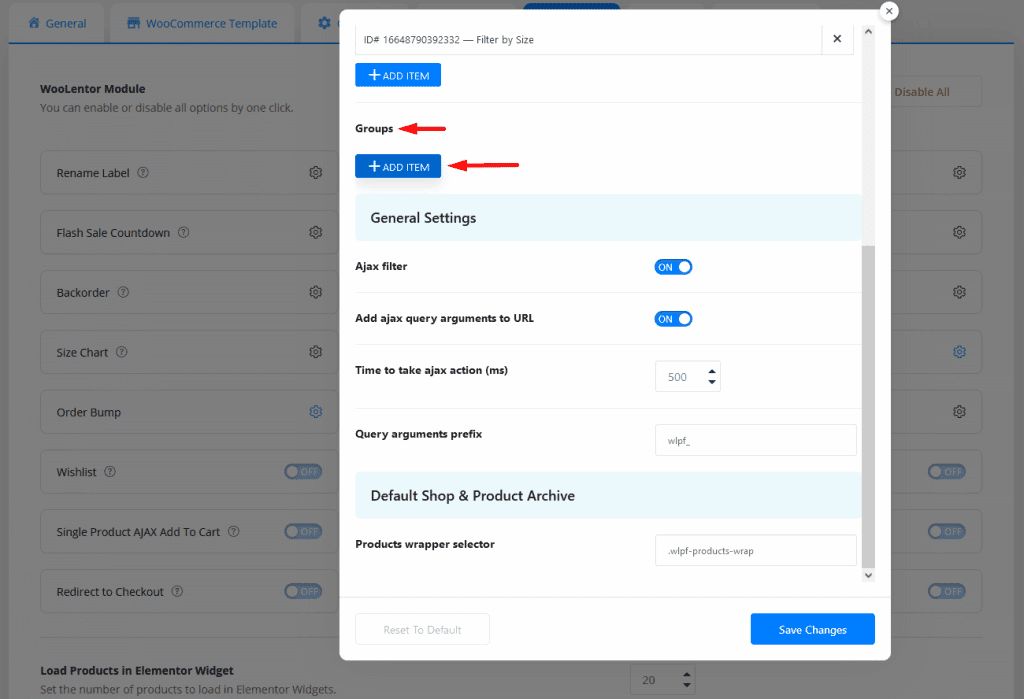
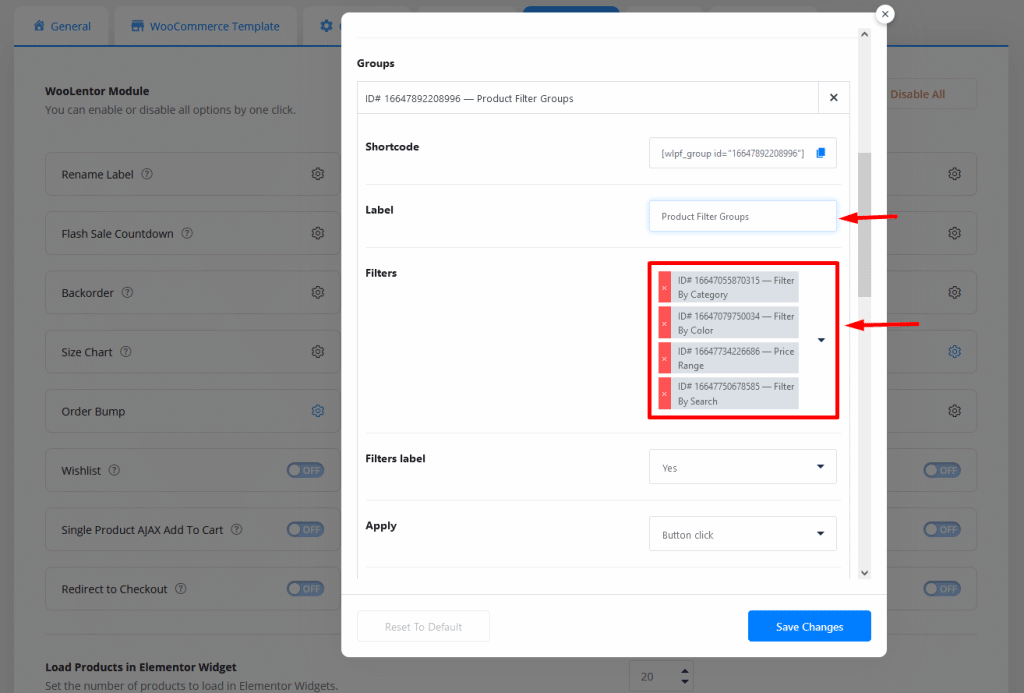
After adding items you will get the required fields option of the product filter.
Label: Enter group filter item label name.
Filters: Select single filter items within group filters.
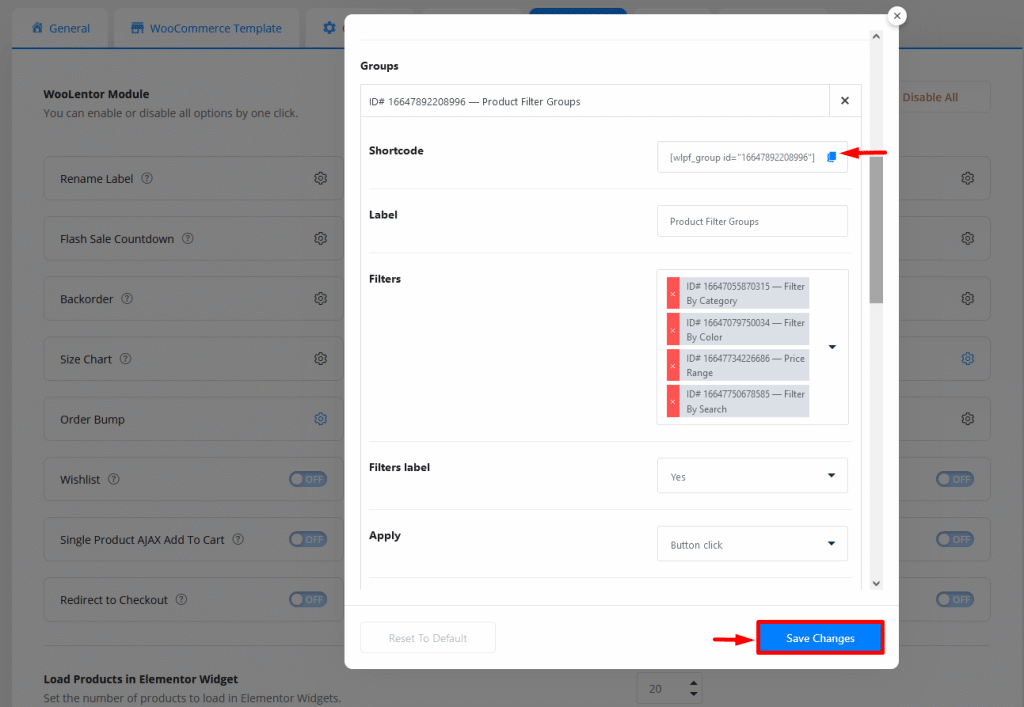
Save Changes button click, and here to copy the Shortcode.
- Navigate to “Appearance > Widgets”
Place your Shortcode in the field by selecting the Shortcode block within the WooCommerce sidebar widget.
Then update and save the widgets page


- Navigate to “Pages > All Pages”
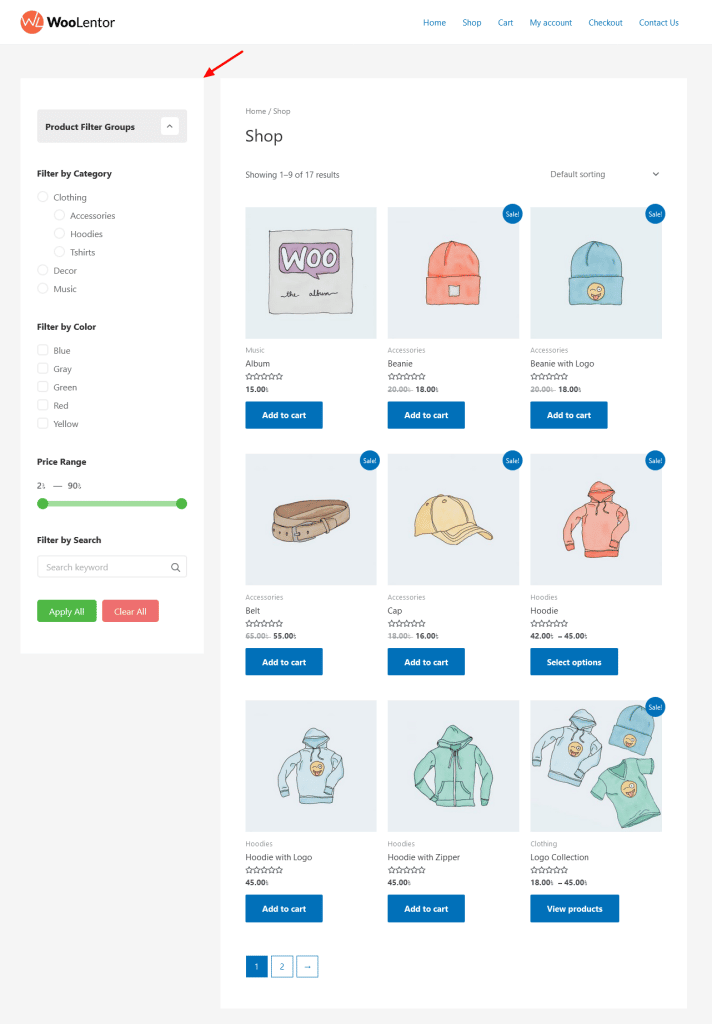
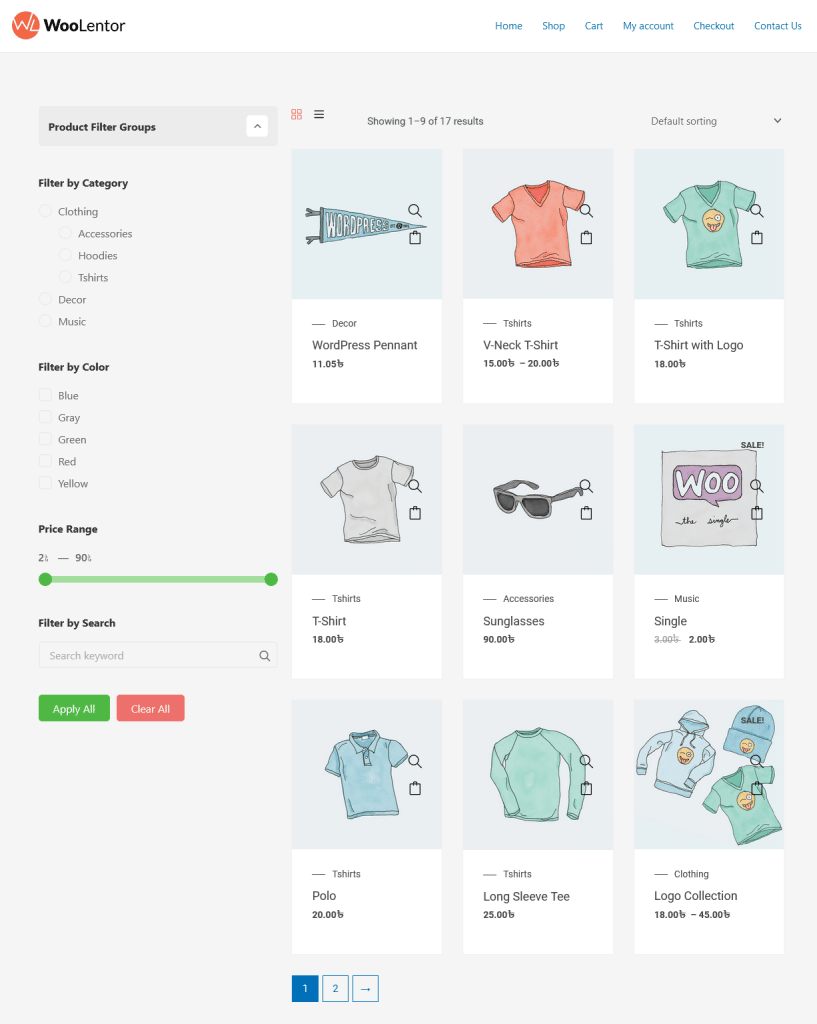
Now view the shop page, Filter has been added shop page.

View the Shop Page

Group’s Filter has been added to the shop pages
Step 4: Create an Elementor shop page that includes a product filter module using the WooLentor template builder #
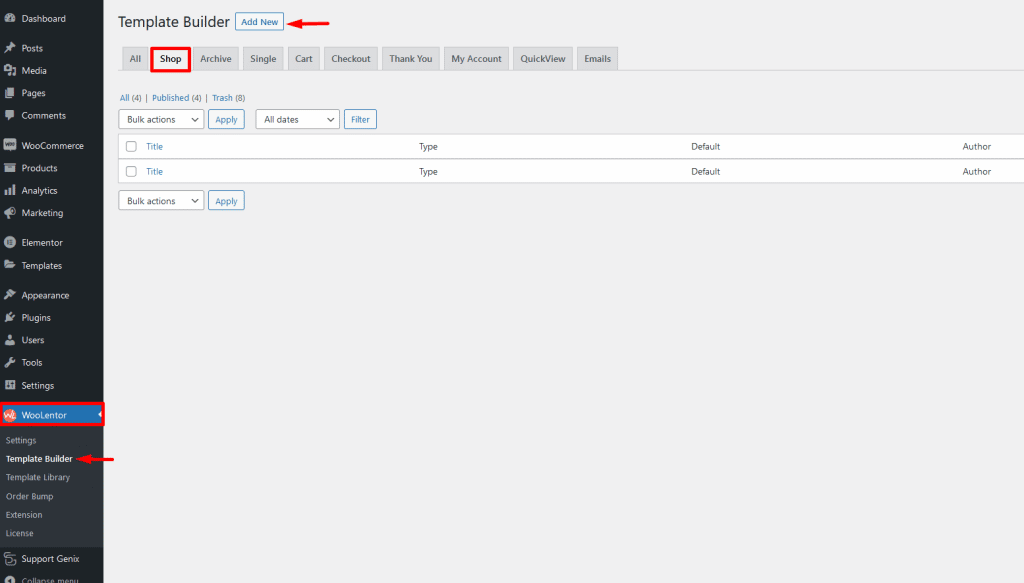
- Go to “WooLentor > Template Builder”
Select Shop from the menu tab and click on the Add New button
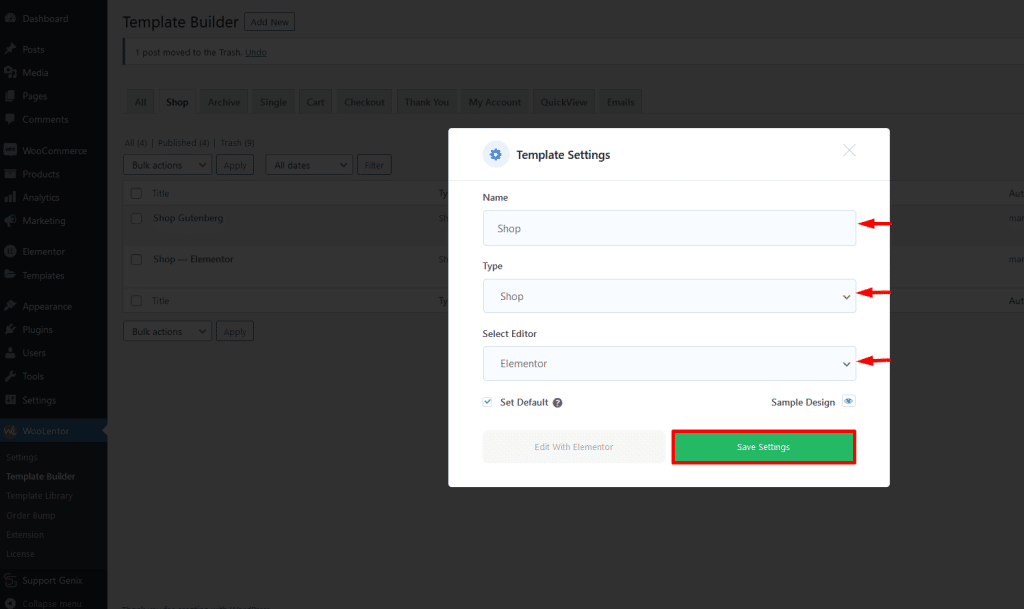
Enter the template Name
Select Template Type Shop
Select editor name Elementor
Then click the Save Settings
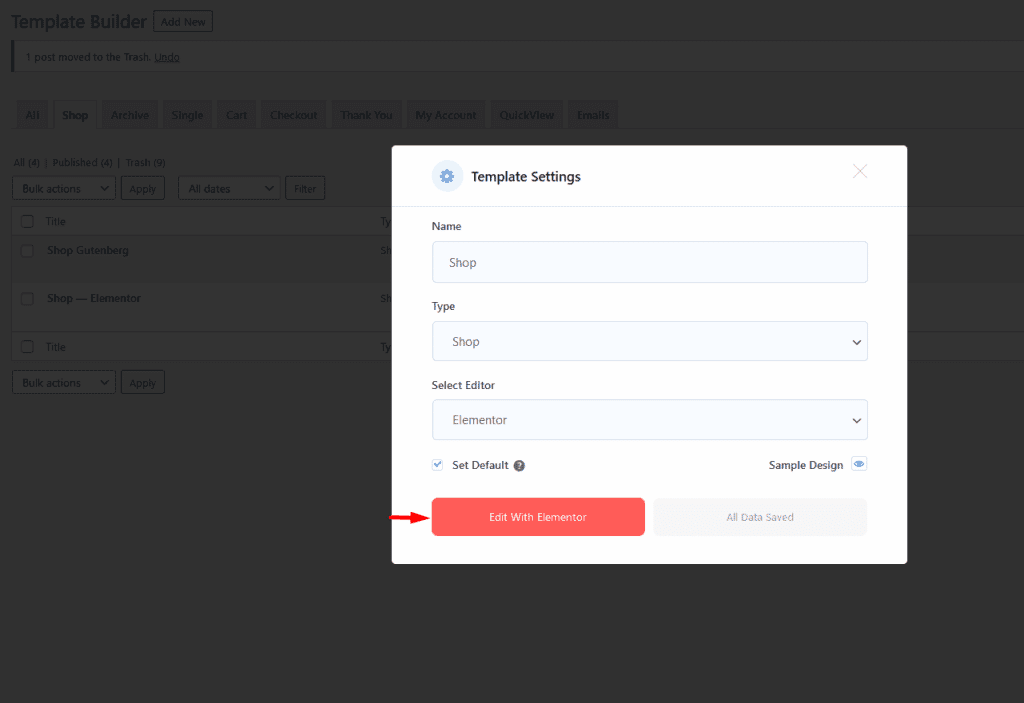
Using the product filter with the Product Archive Layout (Default) Widget
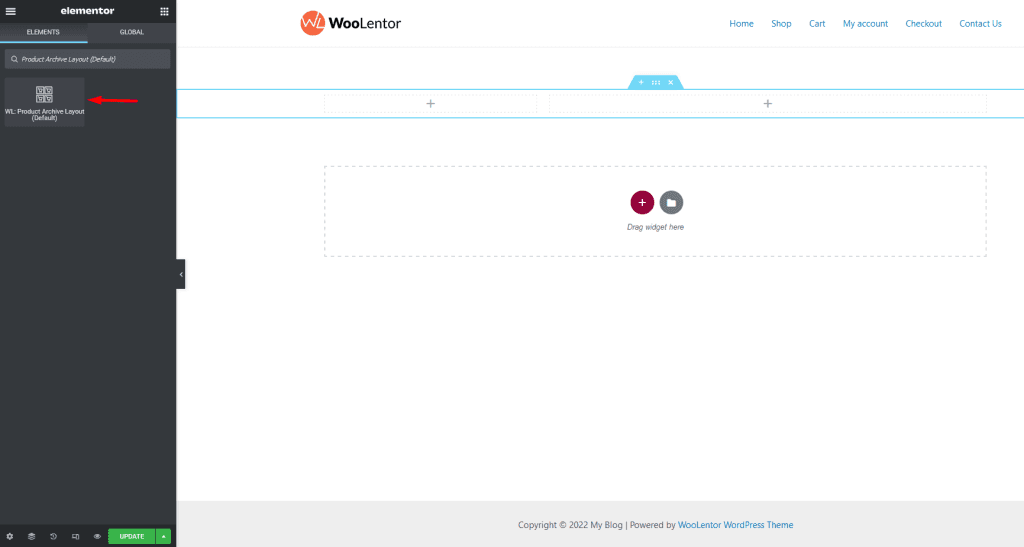
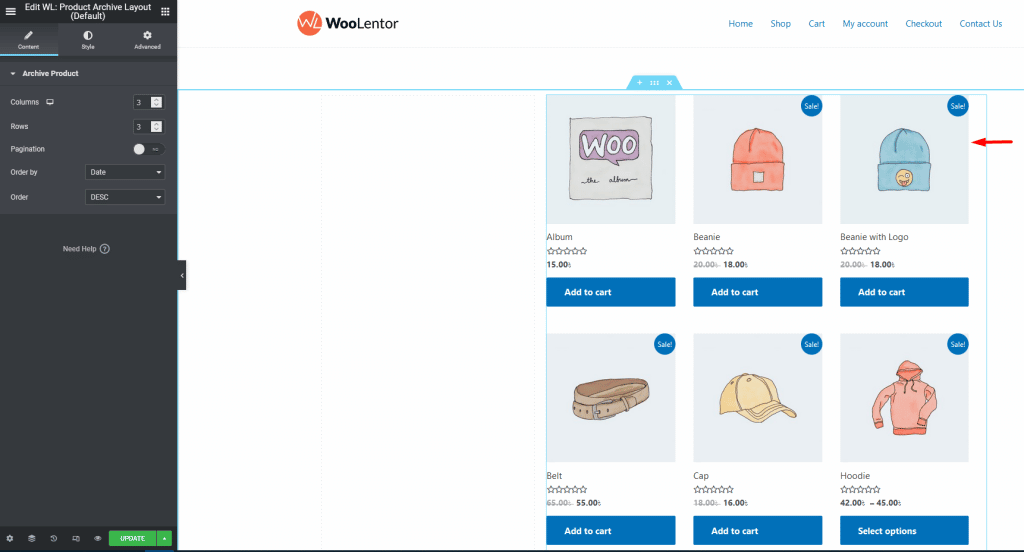
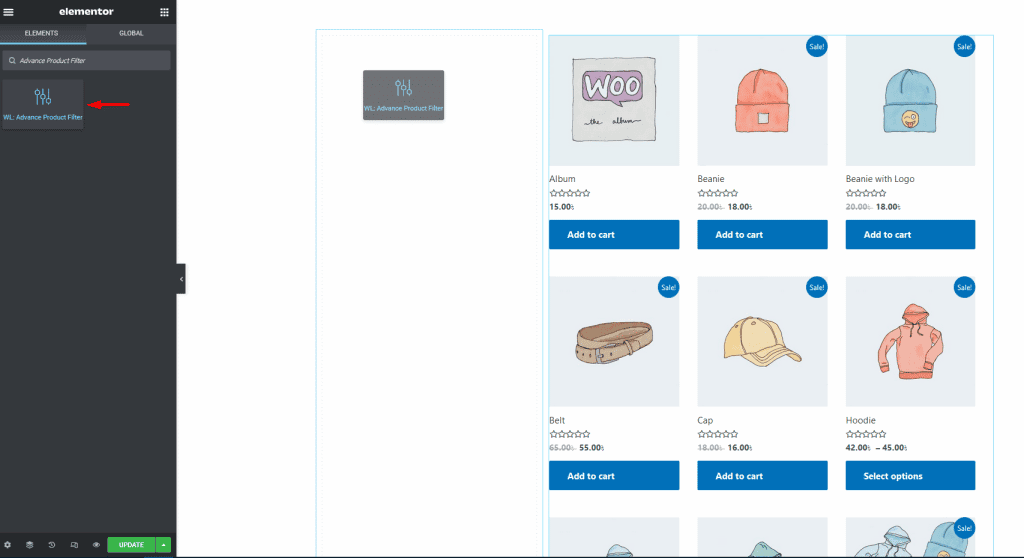
Drag and drop the Advanced Product Filter widget to place it on the shop page
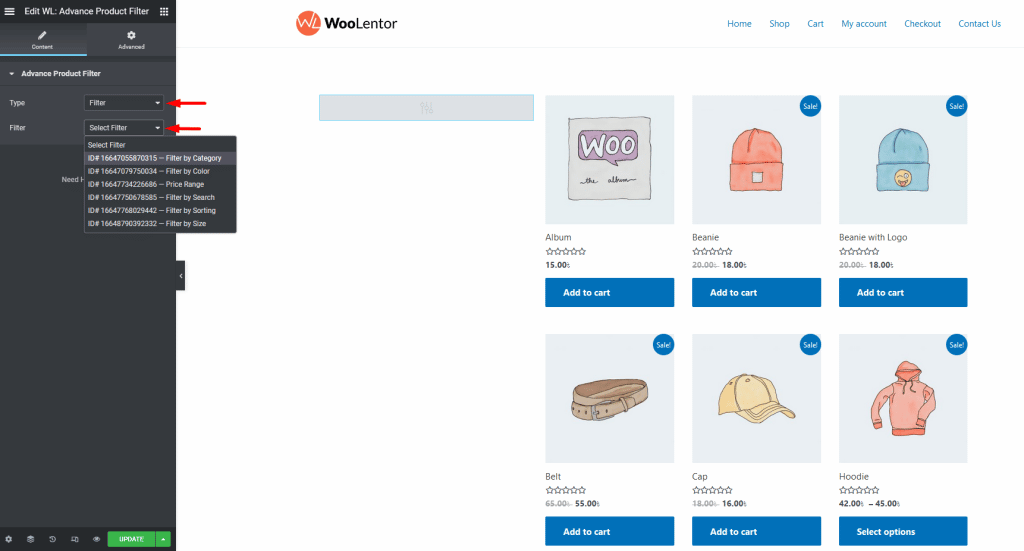
Select the as type and choose which filter to show
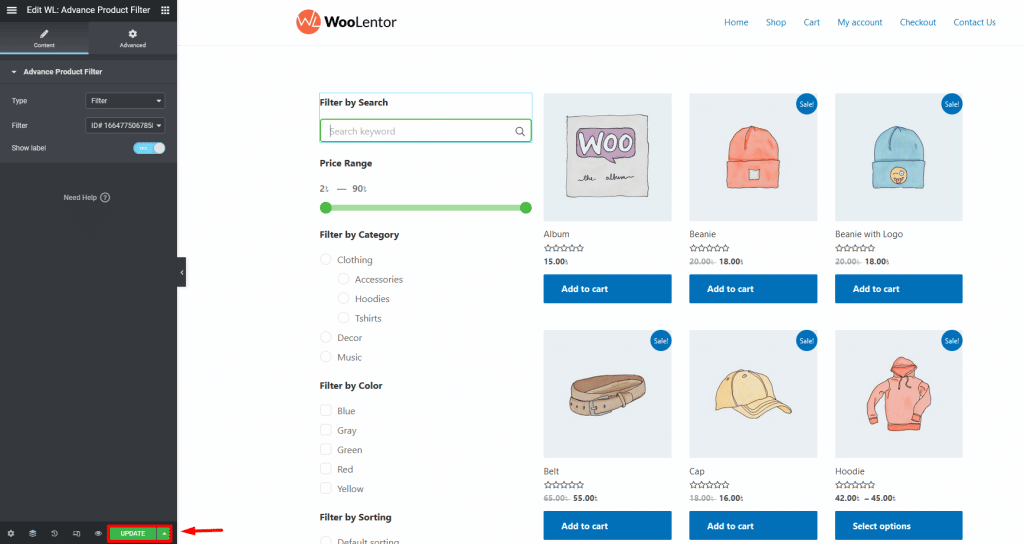
Select the filter individually or as a Group filter as needed and update the page.
Using the product filter with a Product Archive Layout (Custom) Widget
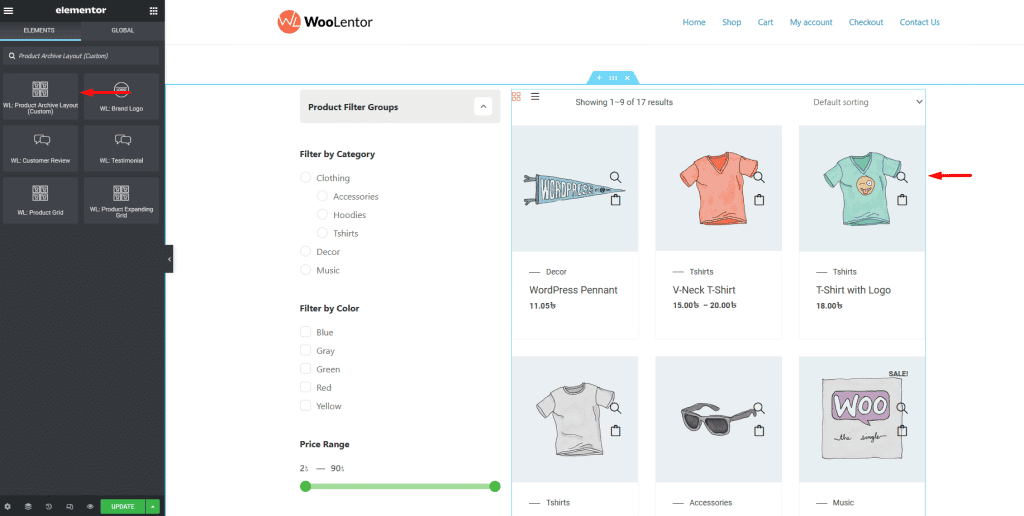
View the Elementor template shop page using the product filter
Step 5: Create a Gutenberg shop page that includes a product filter using the WooLentor template builder #
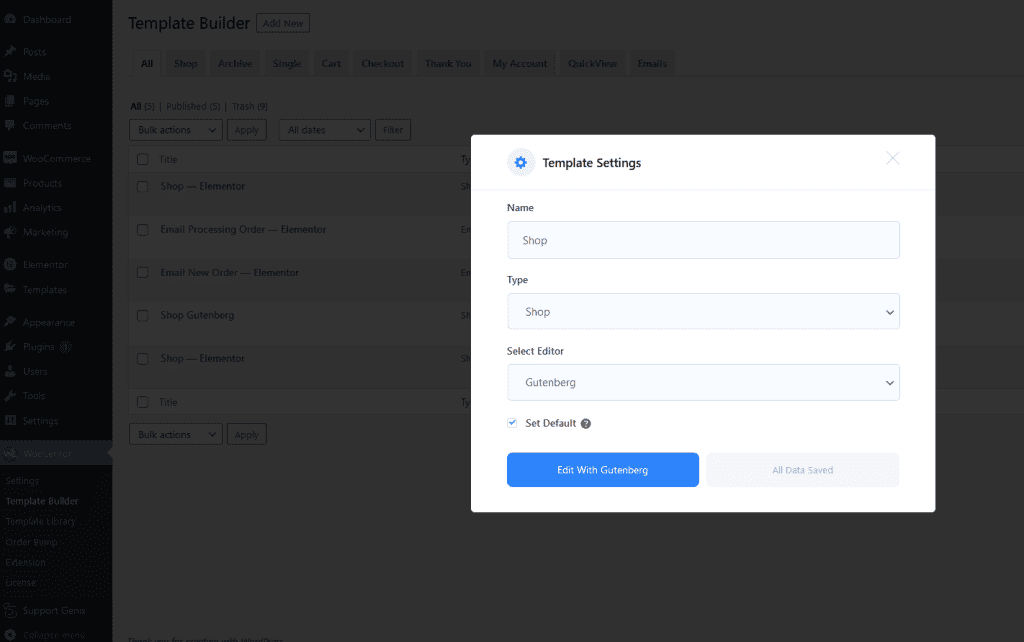
- Go to “WooLentor > Template Builder”
Select Shop from the menu tab and click on the Add New button

Enter the template Name
Select Template Type Shop
Select the editor name, Gutenberg
Then click the Save Settings

Click Edit With Gutenberg Button
Using the product filter with the Product Archive Layout (Default) Widget
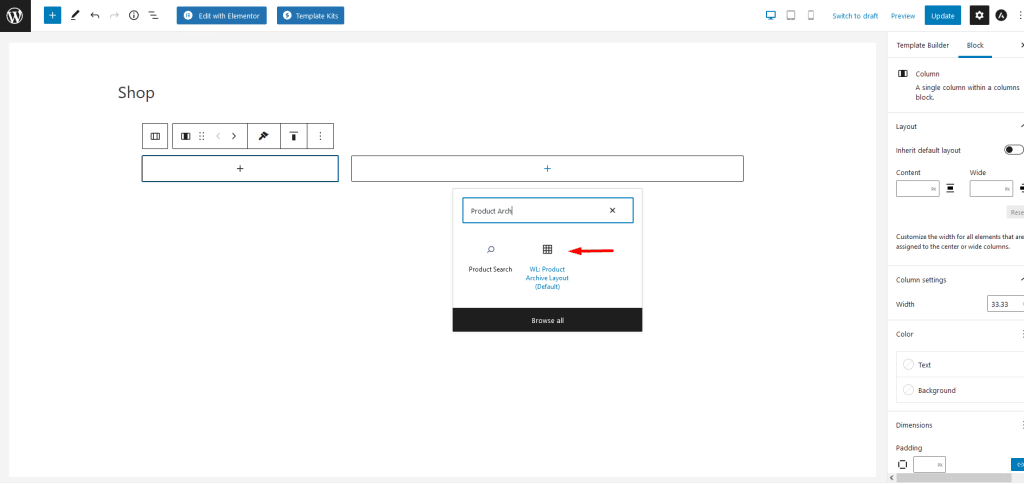
Click the Shortcode Gutenberg block
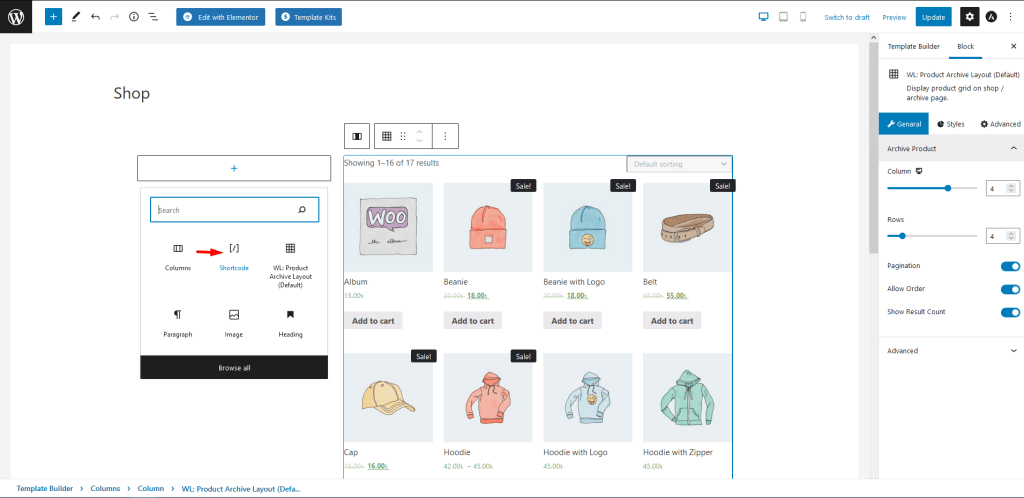
Copy the filter item Shortcode & place the Shortcode here.
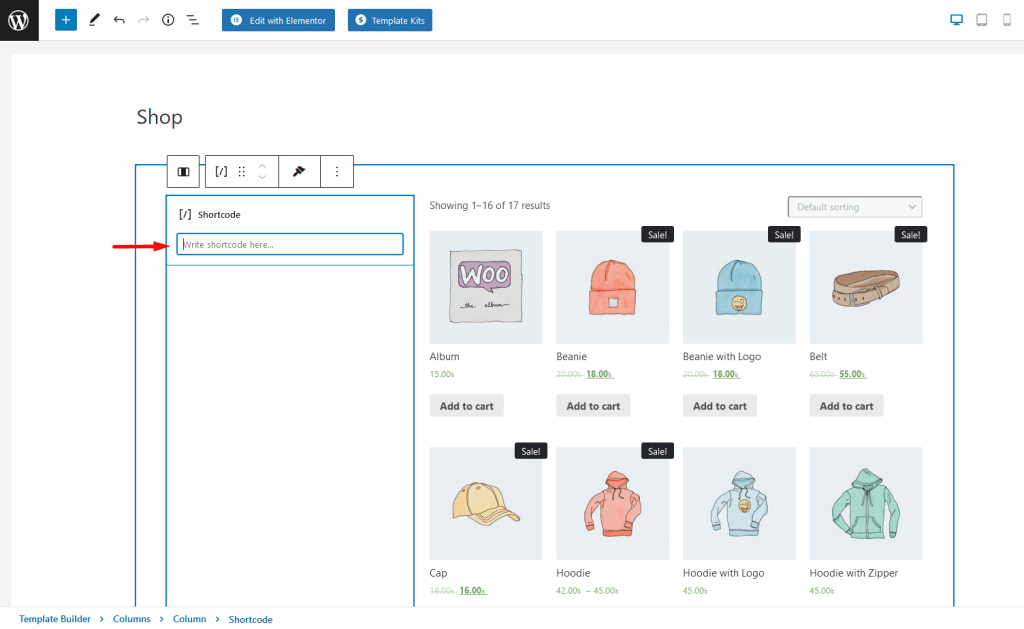
Place the shortcode here
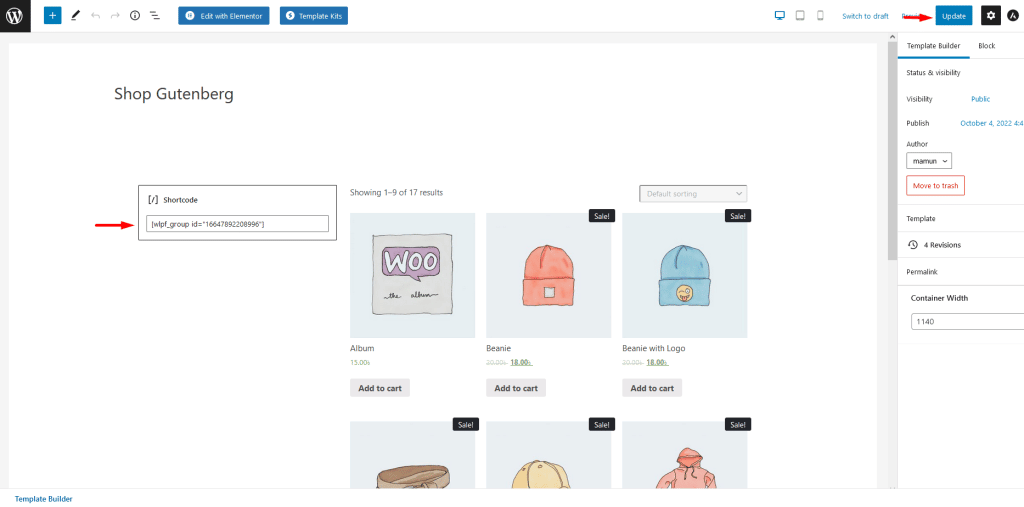
View the Product filter Gutenberg page.
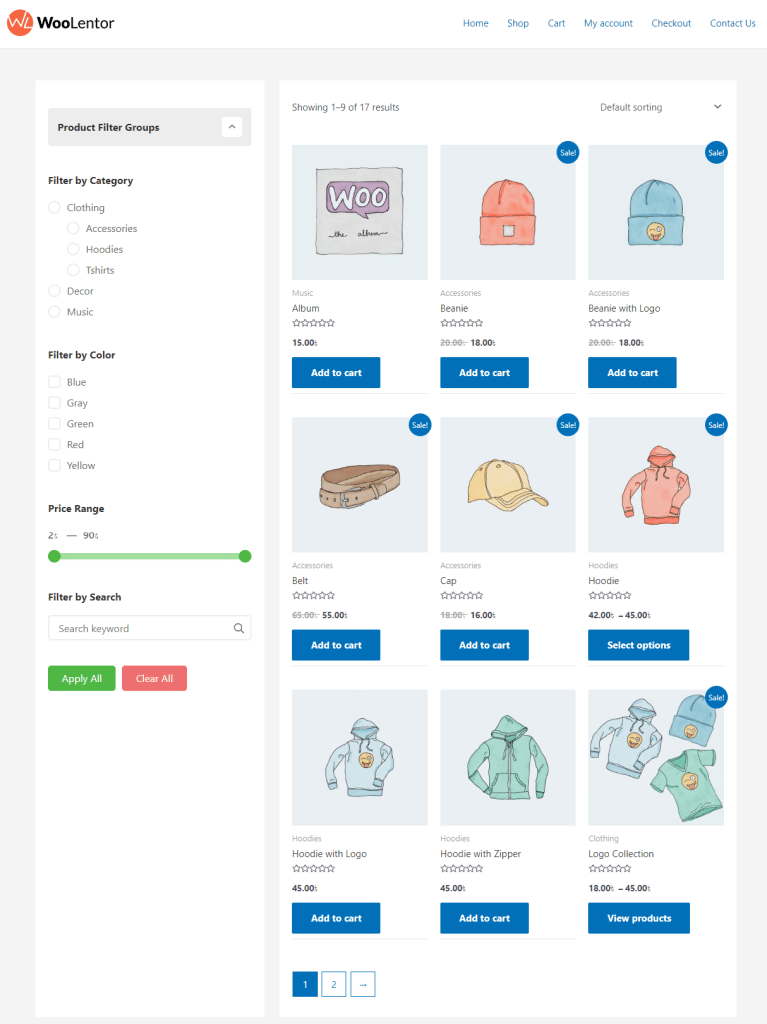
Preview the Product Filter Module #
