In this article, we’ll guide you through how to install WooCommerce on WordPress. WooCommerce is an open-source e-commerce plugin designed for WordPress, making it an ideal platform for businesses looking to set up an online store. The platform is free to use, easy to customize, and offers a range of features specifically designed for online businesses. Follow our step-by-step instructions, and you’ll have everything you need to start your eCommerce business with WooCommerce.
Table of Contents
Prerequisites
Before installing WooCommerce, you need to have a domain name, web hosting, and a working WordPress installation set up. If you haven’t already done so, we recommend purchasing a domain name from a reputable registrar, then selecting a web hosting service that meets your website’s requirements. Once your hosting is set up, you can install WordPress and start configuring your website.
List of Prerequisites
- Domain
- Hosting
- Latest version of WordPress installed on your web server
- PHP 7 or higher installed
- MySQL 5.6 or higher installed
How to purchase a domain from Cloudflare?
Purchasing a domain from Cloudflare is easy and straightforward. First, log in to your Cloudflare account and click on the Domains tab. You will be directed to the Register Domain page where you can find a list of available domains. Choose the one you want to purchase and then select your payment method. Once you confirm your purchase, your new domain will be registered with Cloudflare. Congratulations!
How to purchase hosting from Hostinger?
Purchasing hosting from Hostinger is a simple process. Here are the steps to follow:
- Go to Hostinger’s website and select a hosting plan that meets your needs.
- Enter your domain name or select one of the available domains offered by Hostinger.
- Provide your personal information such as email address, phone number, etc.
- Select the payment option and enter the credit card details or other payment methods available.
- Confirm the purchase and set up your account with Hostinger.
Installing WooCommerce
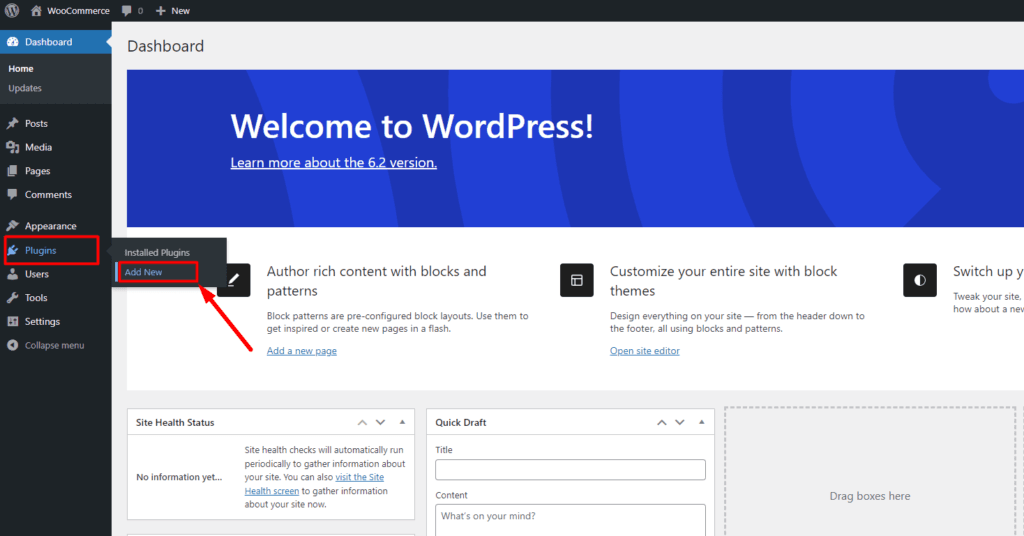
The first step in installing WooCommerce is to log in to your WordPress dashboard and select the Plugins tab from the sidebar menu. Click Add New and search for WooCommerce. Once you find it, click on the Install Now button, and when prompted, click Activate. Once you have activated WooCommerce, you will need to run through a setup wizard to configure your online store’s basic settings.


Configuring Basic WooCommerce Settings
Once you have installed WooCommerce, the next step is to configure its basic settings. The setup wizard will guide you through this process, asking you to enter information such as your store’s location, currency, shipping, and tax settings. You can also select a payment gateway. Once you’ve completed this step, you’re ready to start adding products to your online store.


Adding Products
To add a product in WooCommerce, select Products from the sidebar menu, then click Add Product. Enter product details, such as the name, description, price, and product image. You can also add other information, such as the product’s weight, dimensions, and stock levels.
Setting up Payment Gateway
WooCommerce supports multiple payment gateways, including PayPal, Stripe, and Square. To select a payment gateway, go to WooCommerce in the sidebar menu and select Settings. Then, click on the Payments tab and select your preferred payment gateway.
Customizing WooCommerce
WooCommerce offers customization options that allow you to tailor your online store to your specific needs. For instance, you can change the appearance of your online store using WooCommerce-compatible themes or add functionalities through extensions and plugins.
Conclusion
In conclusion, installing WooCommerce on WordPress is a simple process, and it’s an excellent choice for businesses looking to set up an online store. By following the steps outlined in this article, you’ll be able to customize your online store, add products, set up payment gateways, and much more. WooCommerce is an excellent platform that provides businesses with robust and scalable eCommerce functionality. So, start building your online store today using WooCommerce!
Recommended WooCommerce Plugin:
ShopLentor
ShopLentor is a game-changer for anyone looking to take their WooCommerce website to the next level. This powerful plugin for Elementor and Gutenberg gives you complete control over the design of your WooCommerce store, allowing you to create a custom shopping experience that reflects your brand’s personality and style.
With ShopLentor, you’ll have access to a wide range of WooCommerce widgets and modules, including product comparison, quick view, wishlist, flash sale countdown, email customizer, Shopify like checkout, Email automation, Product Filters and more.
Whether you’re a seasoned pro or just starting out, ShopLentor makes it easy to create a stunning and functional WooCommerce site that will stand out from the crowd. Try it out today and see the difference ShopLentor can make for your online store.

HashBar
Looking for a powerful tool to promote your products and services? Look no further than HashBar – the ultimate WordPress Notification Bar plugin. With unlimited notification bars and easy customization, you can create eye-catching messages that are sure to grab your customers’ attention.
Plus, with the option to add an email subscription form, you can build a solid subscriber list and increase your website traffic with ease. Try HashBar today and see the results for yourself!

Whols
Whols is the ultimate WooCommerce Wholesale plugin that transforms your WooCommerce store into a powerful B2B or B2B + B2C hybrid store. With Whols, you can easily set wholesale prices for your products, manage pricing, orders, and shipping, and offer bulk buyer discounts.
This plugin allows you to streamline your online store and manage both consumer and wholesale customers from a single platform. With its easy-to-use features and online registration form for wholesale customers, Whols is the perfect solution for your WooCommerce B2B store needs.
