If you’re running a WooCommerce store, you know how important it is to stay on top of the orders coming through – and email notifications are key. Not only do they make sure your customers don’t feel forgotten, but they also serve as a bulk of your customer service communications.
So, if you’ve been wondering how to set up email notifications in WooCommerce, this is the guide for you! In this post, we’ll walk through everything you need to know about setting up emails in WooCommerce so that your customers always feel taken care of.
Why Should One Use Email Notifications for Your WooCommerce Site? #
Email notifications play an integral role in your WooCommerce site’s operation. They keep both you and your customers informed about the status of orders, ensuring seamless transactions and building trust.
For the WooCommerce store owner, these WooCommerce order notifications alert you about new orders, product inventory updates, and customer reviews, allowing you to respond promptly to any changes or issues.
For customers, these WooCommerce order emails provide order confirmation, shipping details, and delivery updates, offering them a sense of security and certainty about their purchases.
Moreover, email notifications can also be a powerful email marketing tool, reminding customers about abandoned carts, introducing new products, or announcing sales and promotions. Therefore, implementing email notifications WooCommerce in your WooCommerce site can significantly enhance customer satisfaction and business efficiency.
How to Set up Email Notifications in WooCommerce #
WooCommerce provides default email notifications that can be customized to suit your online store’s needs. These notifications including email notifications for various order statuses such as new orders, canceled orders, failed orders, refunds, processing orders, and completed orders.
In this section, you will learn how to set up email notifications in WooCommerce by following these steps:
Install the WooCommerce Plugin: #
If you haven’t already, install the WooCommerce plugin on your WordPress site. You can find and install it from the WordPress plugin repository.
Navigate to WooCommerce Email Settings: #
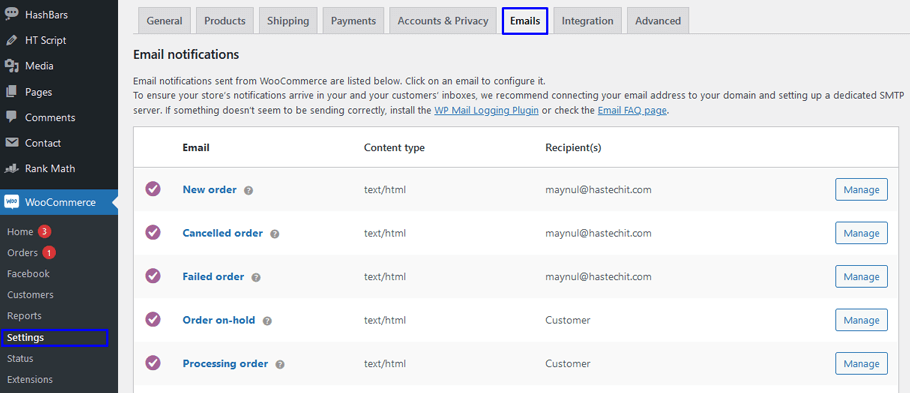
Go to your WordPress admin panel and click on WooCommerce in the sidebar. Then, navigate to WooCommerce → Settings. Click on the “Emails” tab.

Edit Email Templates: #
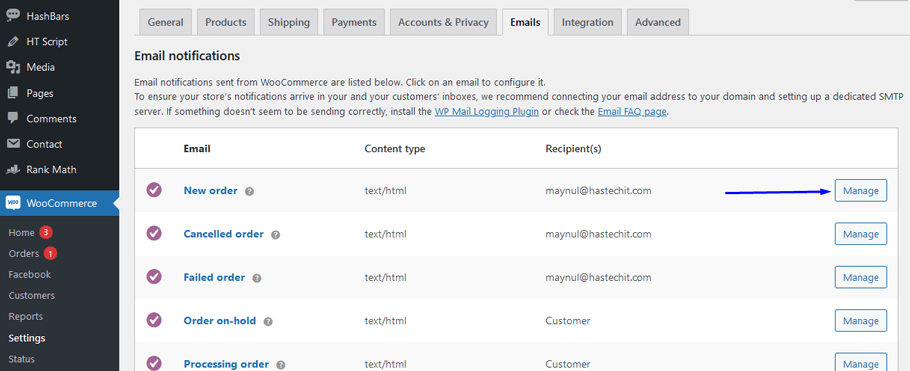
In the “Emails” tab, you’ll see a list of different email notifications that WooCommerce sends to customers and store owners. Click on the “Manage” button next to the email template you want to edit.

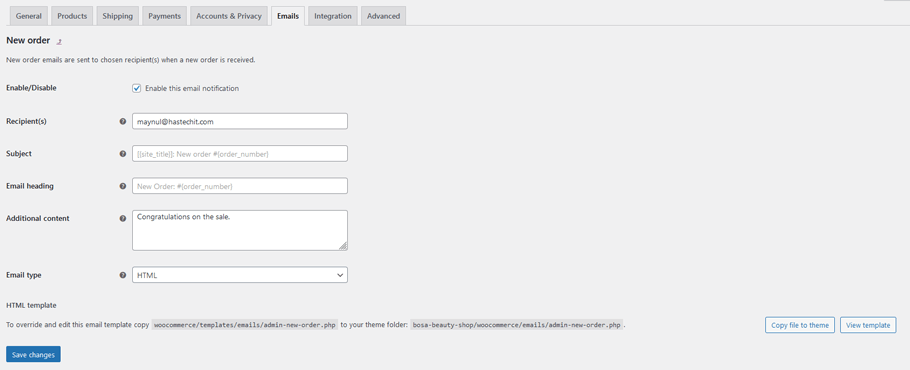
In the email template settings, you can configure the recipient address for the email. Enter the email address where you want to receive this specific type of notification.

You can also customize the email sender options. This includes setting the “From” name and “From” address for the email. This allows you to personalize the sender information to match your brand.
To further customize the email, click on the “Email template” tab. Here, you can edit the content and design of the email template using the provided visual editor. You can add your logo, change colors, and modify the text to match your branding.
Save Changes: #
After customizing the email settings and template, click on the “Save changes” button to apply the changes.
By following these steps, you can configure standard WooCommerce email notifications to suit your WooCommerce store’s requirements. However, suppose you want a more advanced WooCommerce order emails feature. In that case, there are additional methods you can explore, such as using third-party email services, implementing custom email templates, or utilizing the WooCommerce email notifications plugin that enhances email functionalities.
ShopLentor- WooCommerce Builder for Elementor & Gutenberg #
A versatile page builder to build modern and excellent online stores with more than 100k+ Active Installations.
Frequently Asked Questions #
Q: What are some essential email notifications that should be set up in WooCommerce? #
A: Some essential email notifications that you should set up in WooCommerce include:
1. New Order: Sent to the store owner when a new order is placed.
2. Order Processing: Sent to the customer when the order status is set to “Processing.”
3. Order Completed: Sent to the customer when the order status is set to “Completed.”
4. Order Cancelled: Sent to the customer when the order is canceled.
5. Order On Hold: Sent to the customer when the order status is set to “On Hold.”
Q: Can I customize the content and design of email notifications in WooCommerce? #
A: Yes, WooCommerce allows you to customize the content and design of email notifications. You can add your logo, change colors, and modify the text to match your brand’s style and voice.
Q: How do I test email notifications in WooCommerce? #
A: You can test email notifications in WooCommerce by placing a test order on your website. Use a valid email address and complete the checkout process to receive the email notifications you’ve set up.
Q: Can I add dynamic content to email notifications WooCommerce? #
A: Yes, you can add dynamic content to email notifications WooCommerce using shortcodes. Shortcodes allow you to insert dynamic information such as the customer’s name, order details, and product information into the email template.
Q: Can I use third-party email services to send WooCommerce email notifications? #
A: Yes, WooCommerce allows you to integrate with third-party email services like Email Candy Pro, Mailchimp, SendinBlue, or other SMTP plugins. Using these services can improve email deliverability and provide more advanced email marketing features.
Q: What should I do if email notifications are not being delivered or marked as spam? #
A: If email notifications are not being delivered or marked as spam, ensure that you have correctly configured your email settings in WooCommerce. Additionally, using third-party email services or SMTP plugins can improve email deliverability. Check your spam folder to see if emails are being redirected there.
Q: Can I add attachments to WooCommerce email notifications? #
A: By default, WooCommerce does not have built-in support for attaching files to email notifications. However, you can use a WooCommerce email notifications plugin or custom code to add attachment functionality to your email templates.
Q: How do I disable specific email notifications in WooCommerce? #
A: To disable specific email notifications in WooCommerce, go to WooCommerce > Settings > Emails, and uncheck the “Enable this email notification” option for the emails you want to disable. Save your changes to apply the settings.
Q: Is it possible to create a custom WooCommerce notification email? #
A: Yes, you can create custom WooCommerce order notifications email using hooks and filters or by using WooCommerce email notifications plugins that allow you to design custom email templates. Custom email notifications WooCommerce gives you more control over the content and layout of the send email notifications from your WooCommerce store.
Conclusion #
Setting up email notifications WooCommerce is a great way of email marketing to stay in touch with your customers and notify them of important changes or updates. The steps described above will help you get started with this process in WooCommerce. It streamlines the workflow for customers and vendors alike, creating a seamless and efficient customer experience.
Taking the time to learn about how to set up email notifications in WooCommerce can make a big difference in how smoothly your WooCommerce store runs and how satisfied customers are with their purchases. Fortunately, it’s easy to customize these email notifications WooCommerce with the help of the WooCommerce email notifications system. Thank you for reading!