If you’re looking for an easy way to add Facebook Pixel to your WooCommerce store, this guide is for you! With the help of this guide, you’ll learn exactly how to add Facebook Pixel to your WooCommerce store and start leveraging the power of the world’s largest social media platform for effective customer targeting.
By following these simple steps on how to add Facebook pixel to WooCommerce, you can ensure that your store is using all the features Facebook has on offer and maximize your business potential.
How to add the Facebook Pixel to WooCommerce store #
If you’re looking to boost your eCommerce business, integrating Facebook pixel into your WooCommerce store is essential. Luckily, the process is not as complicated as it may seem.
By following a few simple steps, you can effectively track your website visitors’ behavior and optimize your ads to reach the right audience.
Create pixel from Facebook Business Manager #
Before integrating the Facebook pixel on your WooCommerce store, you must create the pixel using a Facebook business account. Choose a name for the pixel that is easy for you to identify, such as the name of your store.
Install Pixel Code #
To install the pixel on your website, access the business manager of your Facebook business page and choose to continue pixel setup. Then, you will find all the available options to personalize the pixel settings for WooCommerce.
There are two ways to install the pixel: manually adding the pixel code to your website or using a partner integration.
Adding Facebook Pixel with Pixelavo Plugin: Step-by-Step Guide #
How to install the Plugin #
Discover a hassle-free way to install the plugin with our comprehensive guide. Follow our step-by-step instructions to seamlessly integrate the plugin into your WordPress platform. Elevate your website’s functionality and performance effortlessly.
Video Guide: Watch our video tutorial on how to install the plugin on your WordPress site. Our visual guide simplifies the process, ensuring you set up the plugin correctly for enhanced features and optimization.
Learn how to effortlessly install the plugin with our comprehensive guide. Follow step-by-step instructions to seamlessly integrate the tool into your WordPress website. Elevate your tracking and optimization capabilities today.
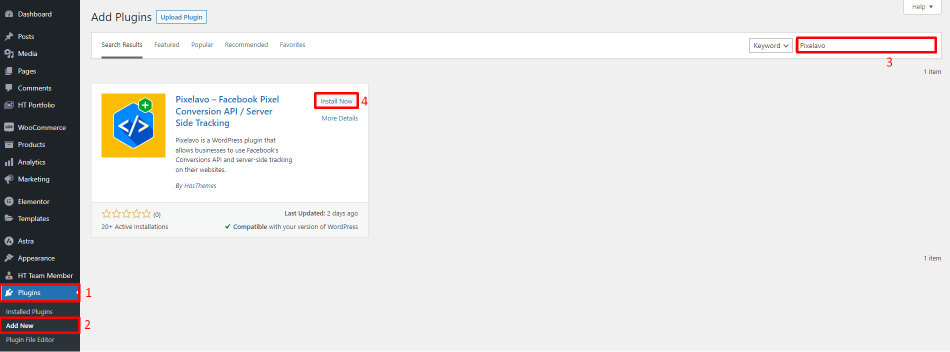
- Go to the WordPress dashboard and click on the “Plugins” menu.
- In the “Plugins” menu, click on the “Add New” submenu.
- In the search bar, type “Pixelavo” and press Enter.
- Click on the “Install Now” button for the “Pixelavo” plugin. Once the plugin is installed, click on the “Activate” button to activate it.
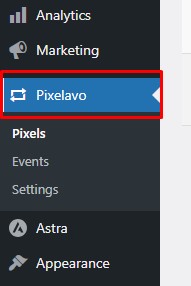
After activating the “Pixelavo” plugin you will get a new menu called “Pixelavo”.
HOW TO ADD A NEW FACEBOOK PIXEL #
Discover the easy steps to add a new Facebook Pixel through our detailed documentation. Follow our clear instructions to set up and integrate your Pixel with your website, enabling accurate tracking for improved marketing insights.
Step One:
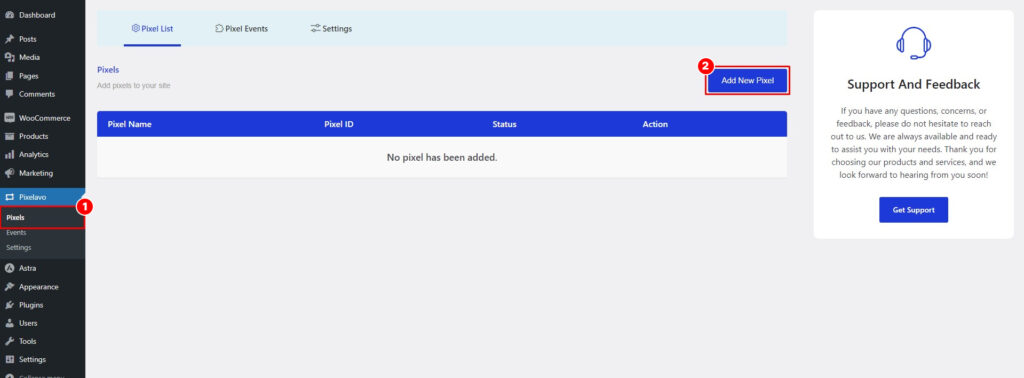
- Navigate to the WordPress dashboard and click on the “Pixelavo” menu or the “Pixels” submenu under the “Pixelavo” menu.
- Click the ‘Add New Pixel’ button to open a popup form for adding a Pixel.
Step Two:
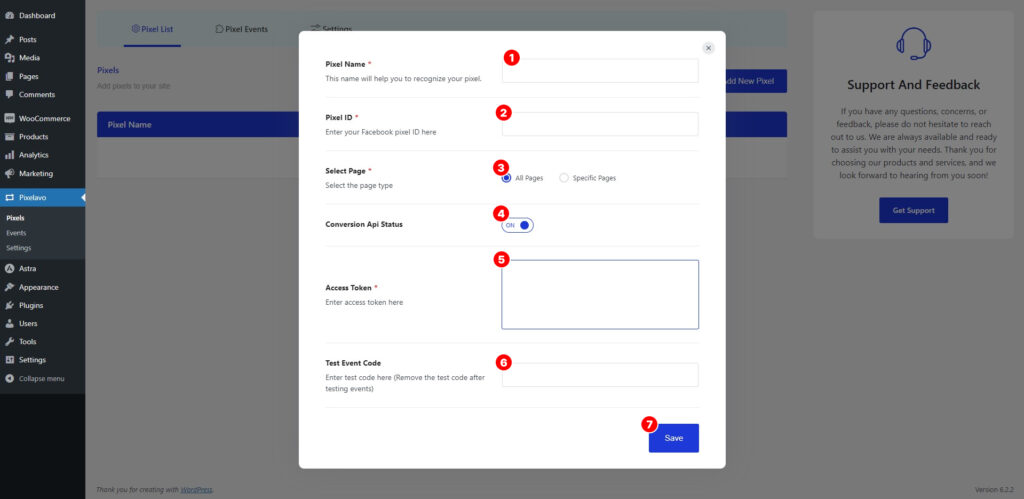
- Provide a name for your pixel.
- Enter your pixel ID.
- Choose the page(s) where you would like to run this pixel. By default, it will run on all pages, but you can also select specific pages for the pixel to be active.
- Set the Conversion API status to “Active” in order to enable the addition of Conversion API.
- Enter your conversion API access token here.
- Enter the event test code here to test the events.
- Click the “Save” button to save the pixel.
WHERE TO FIND FACEBOOK PIXEL ID #
Uncover the location of your Pixel ID effortlessly with our informative documentation. Navigate through our user-friendly guide to locate your Pixel ID within your Facebook Ads Manager. Simplify the process of integrating your Pixel for precise tracking.
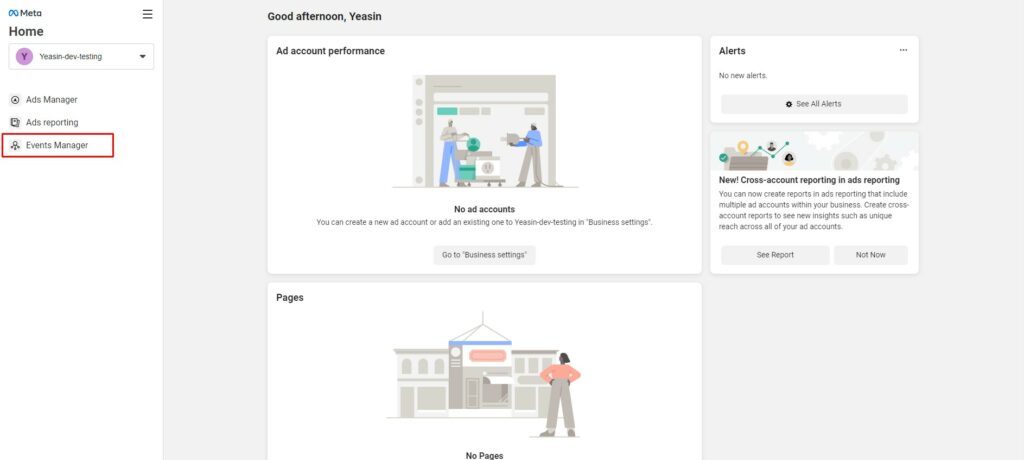
Access your Facebook business account and select the “Events Manager” option from the left-side menu.
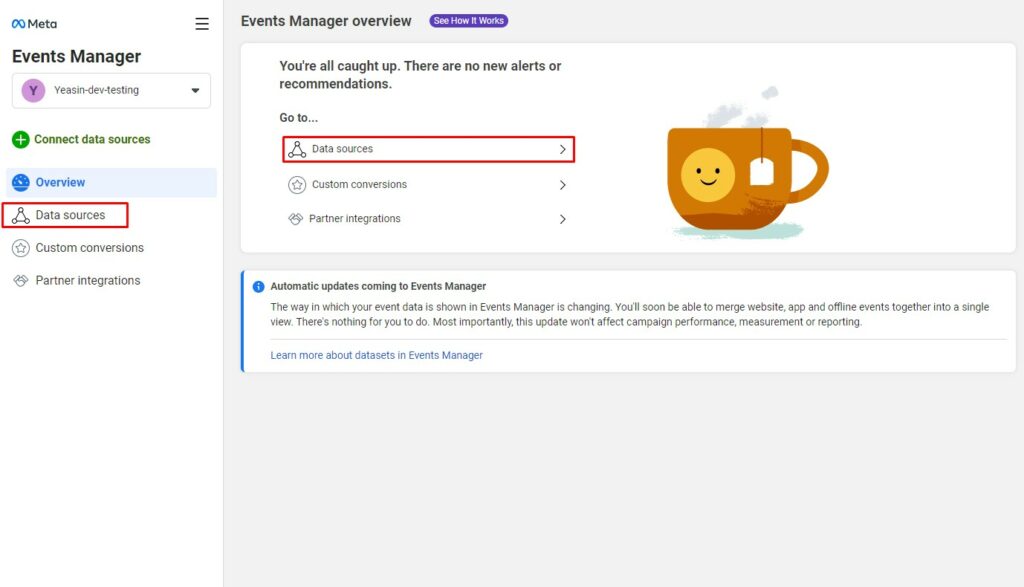
Choose the “Data Sources” option from either the left-side menu or the card in the content area.
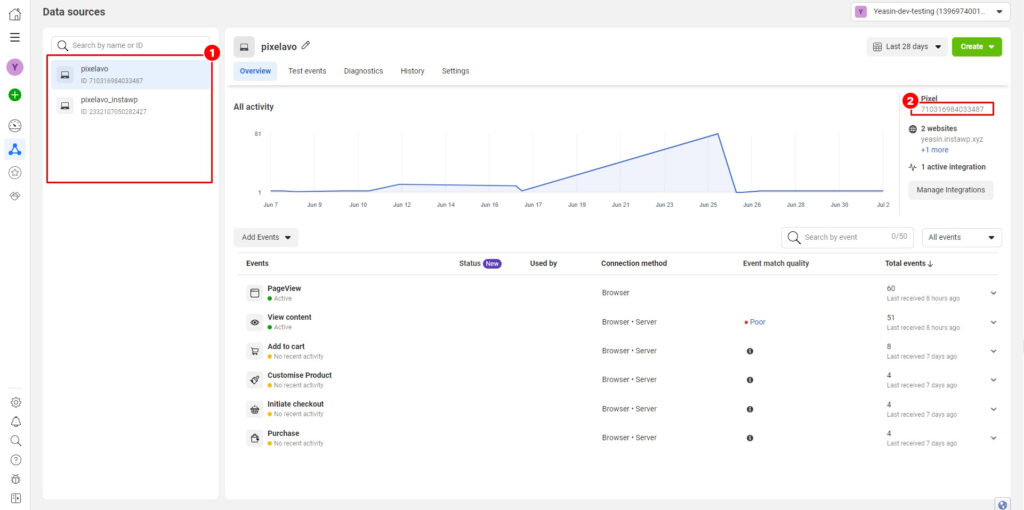
Follow this step:
1. Select the desired pixel from the left side to access its details.
2. On the right side, you can locate and copy the Pixel ID.
WHERE TO FIND CONVERSION API ACCESS TOKEN #
Accessing your Conversion API Access Token is made simple with our detailed documentation. Follow our step-by-step guide to easily locate and generate your Access Token within your Facebook Business account.
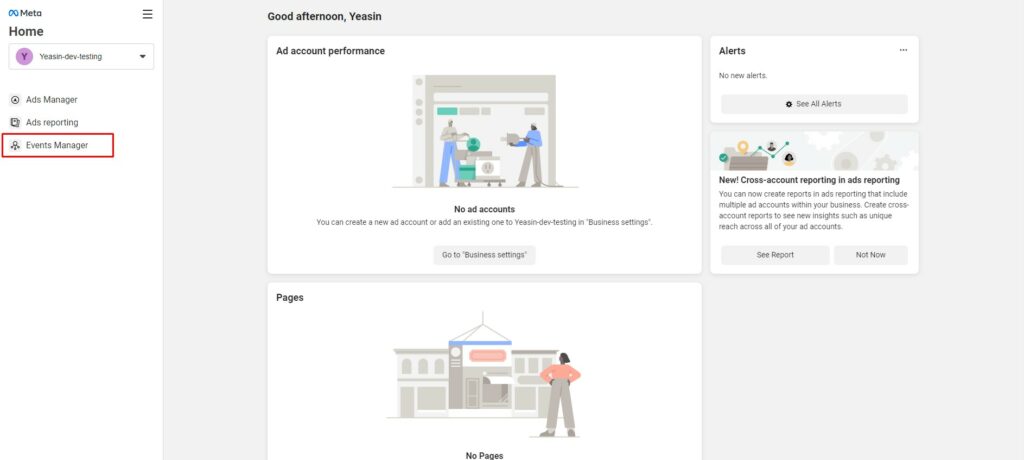
Access your Facebook business account and select the “Events Manager” option from the left-side menu.
Choose the “Data Sources” option from either the left-side menu or the card in the content area.
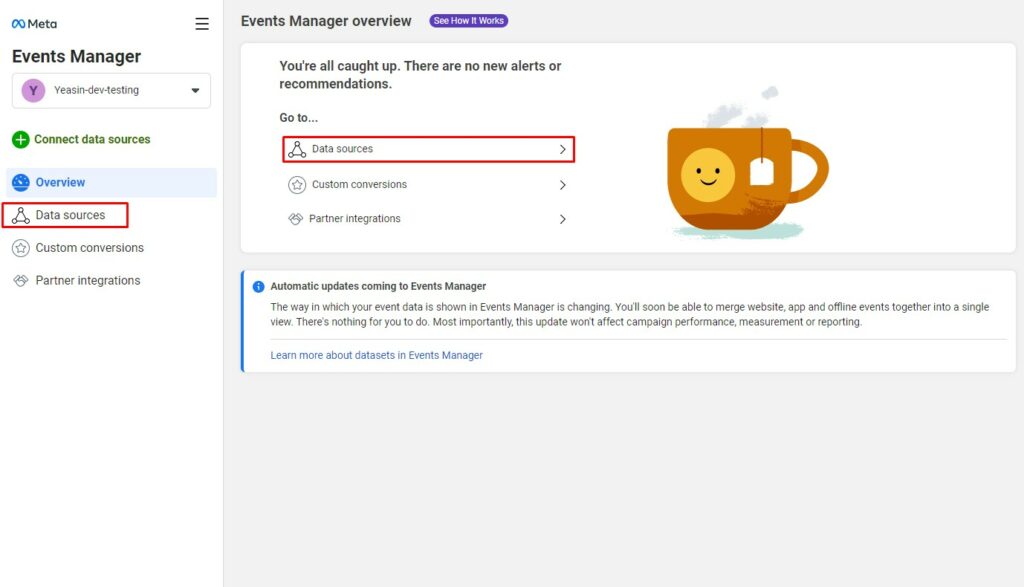
Following step:
1. Select the desired pixel from the left side to access its details.
2. Access the pixel settings by clicking on the settings menu.
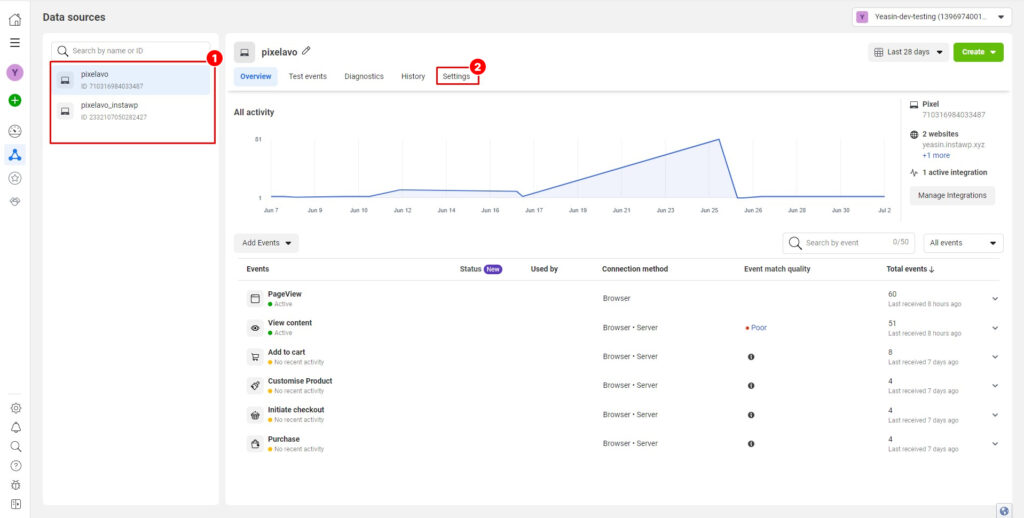
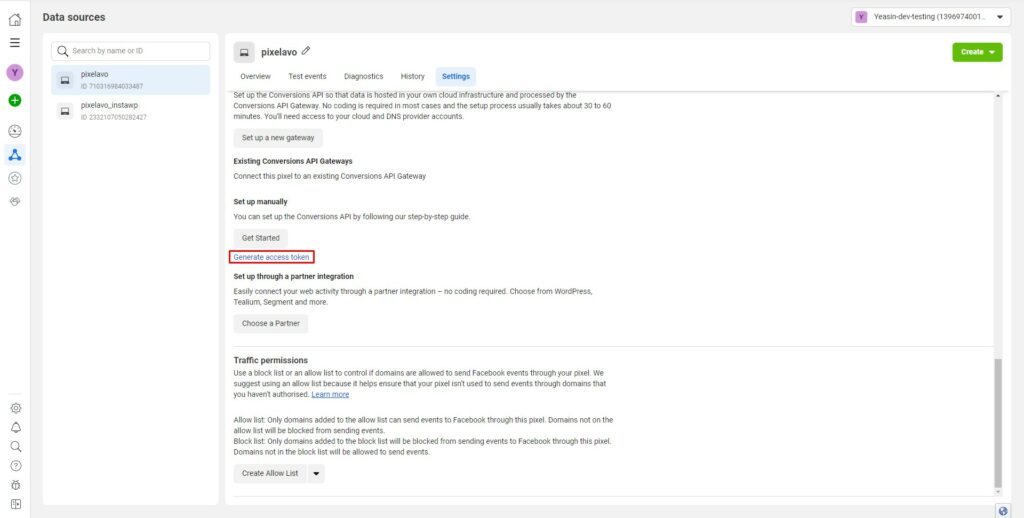
Scroll to the bottom of the page and locate the “Generate access token” button. Click on it to generate an access token.
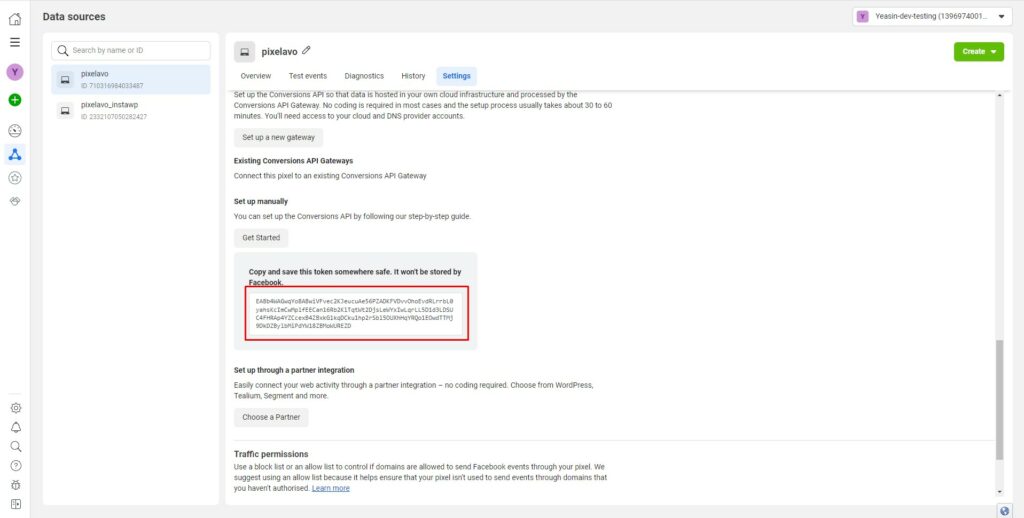
After clicking the “Generate access token” button, an access token will be generated for you to use.
E-COMMERCE EVENTS #
Explore a detailed guide on setting up and optimizing essential e-commerce events like purchases, cart additions, and checkouts using Pixelavo.
- Navigate to the WordPress dashboard and click on the “Events” submenu under the “Pixelavo” menu.
- To enable or disable all events at once, you can click either the “Disable All” or “Enable All” button located at the top.
- Alternatively, you can enable or disable events individually by clicking on the switch button located on the right side of each event.
- Click the “Save Settings” button to save all the changes.
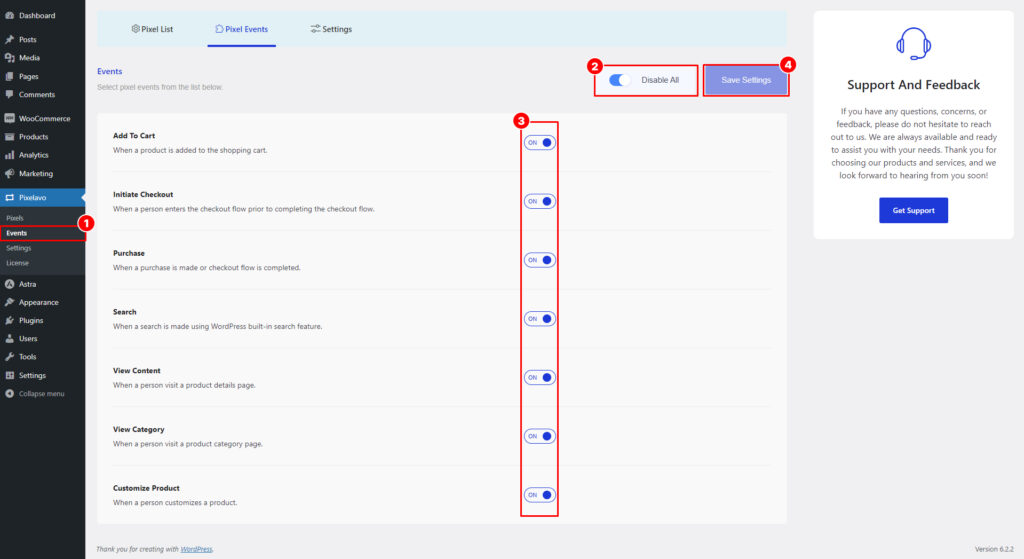
Events Details:
1. Add To Cart: The “Add to Cart” event is triggered when a user adds a product to their cart. This event is valuable for tracking customer behavior and understanding their purchase intent. By analyzing this event, you can optimize your product offerings, pricing, and promotions to boost conversions and maximize revenue.
2. Initiate Checkout: The “Initiate Checkout” event is triggered when a user begins the checkout process. This event allows you to track the number of users who initiate the checkout and identify the percentage of users who abandon their carts. By analyzing this data, you can identify any barriers or friction points in the checkout process and implement improvements to enhance the overall purchase experience.
3. Purchase: The “Purchase” event is triggered when a user completes a purchase. This event is essential for tracking sales, revenue, and other key metrics related to successful transactions. By monitoring this event, you can gain valuable insights into your business’s performance and make data-driven decisions to optimize your marketing strategies and improve overall profitability.
4. Search: The event “Search” is triggered when a user performs a search using WordPress’s built-in search feature. This event allows you to track user searches and gain insights into the keywords and search behavior of your website visitors. By analyzing this data, you can optimize your search functionality, improve the relevance of search results, and enhance the overall user experience on your website.
5. View Content: The “View Content” event is triggered when a user views a product page. This event enables tracking of popular products and user interactions with your product pages. By analyzing this data, you can gain insights into the popularity of different products, understand user engagement and behavior, and make informed decisions to optimize your product offerings and improve the overall user experience.
6. View Category: The “View Category” event is triggered when a user views a category page. This event allows you to track the popularity of different categories and observe user navigation patterns on your site. By analyzing this data, you can gain insights into the most popular categories, understand user preferences and browsing behavior, and optimize your site’s category structure and content to enhance the user experience and drive engagement.
7. Customize Product: The “Customize Product” event is triggered when a person customizes a product. This event allows you to track and capture the customization actions taken by users on your products. By monitoring this event, you can gain insights into the level of product customization, popular customization options, and user preferences. This data can be used to personalize product offerings, improve the customization process, and enhance the overall shopping experience for your customers.
ADVANCE SETTINGS #
This guide will walk you through each step, providing clear instructions on configuring intricate settings within Pixelavo.
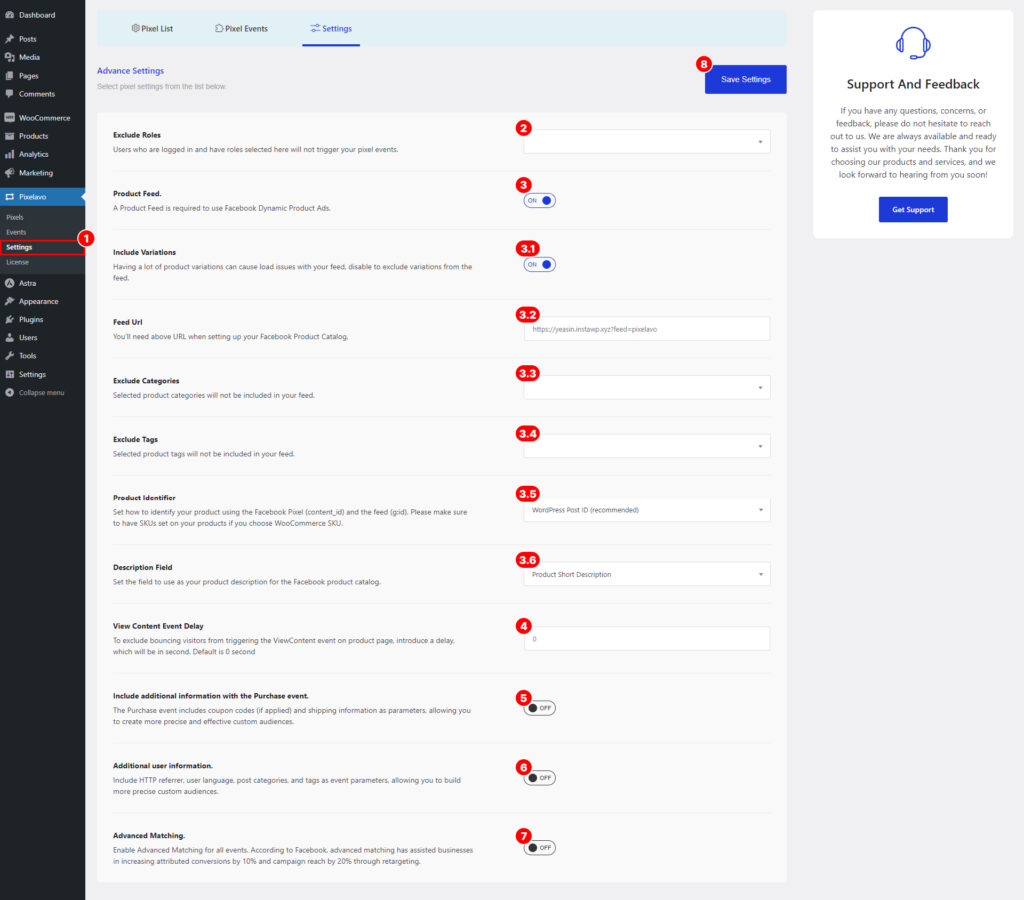
1. Navigate to the WordPress dashboard and click on the “Settings” submenu under the “Pixelavo” menu.
2. Exclude Roles: To exclude certain user roles from triggering your pixel events, such as administrators and editors who are not potential customers, users who are logged in and have roles selected here will not trigger the pixel events. This allows you to focus your pixel tracking on relevant user actions and avoid unnecessary event triggers from non-targeted user roles.
3. Product Feed: Enabling the option for a Product Feed is necessary to utilize Facebook Dynamic Product Ads. Once enabled, additional settings related to the Product Feed will become available for configuration.
3.1. Include Variations: Disabling product variations in the feed can help prevent load issues caused by having a large number of variations. By disabling variations, they will be excluded from the feed, ensuring smoother performance and optimization of the feed loading process.
3.2. Feed URL: You will need the URL mentioned above when setting up your Facebook Product Catalog. This URL serves as a reference or link to your product catalog and is essential for integrating and synchronizing your product data with Facebook’s advertising platform.
3.3. Exclude Categories: The selected product categories will be excluded from your feed. By specifying which categories to exclude, you can control which products are included in your feed and tailor it to your specific needs. This allows you to focus on specific product categories or exclude irrelevant ones from being included in your feed.
3.4. Exclude Tags: The selected product tags will be excluded from your feed. By specifying which tags to exclude, you can control which products are included in your feed and customize it based on your requirements. This feature allows you to filter out specific product tags that are not relevant or desired to be included in your feed.
3.5. Product Identifier: Set how your product will be identified using the Facebook Pixel (content_id) and the feed (g: id). If you pick Woo Commerce SKU, make sure that the products have SKUs.
3.6. Description Field: Specify the field to be used as the product description for your Facebook product catalog.
4. View Content Event Delay: To prevent bouncing visitors from triggering the ViewContent event immediately upon landing on a product page, you can introduce a delay. By default, the delay is set to 0 seconds, meaning the event will be triggered instantly. However, you can customize the delay duration in seconds to ensure that the ViewContent event is only triggered after the visitor has spent a certain amount of time on the page. This helps exclude visitors who quickly bounce off without engaging with the content.
5. Include additional information with the Purchase event: The Purchase event includes additional parameters such as coupon codes (if applied) and shipping information. By capturing this data, you can create more precise and effective custom audiences for your marketing campaigns. This information provides valuable insights into customer behavior, allowing you to tailor your advertising strategies and offers based on their purchase patterns. With coupon codes and shipping information as parameters, you can refine your targeted audience and deliver more personalized and relevant messaging to enhance your marketing efforts.
6. Additional user information: Include HTTP referrer, user language, post categories, and tags as event parameters to enhance your ability to build precise custom audiences. By capturing and utilizing this information, you can gain deeper insights into user behavior and preferences. The HTTP referrer helps identify the source from which the user arrived, providing context for their actions. User language allows you to segment and target users based on their preferred language. Additionally, post categories and tags provide valuable categorization and tagging information, enabling you to create more specific and targeted custom audiences for your marketing campaigns.
7. Advanced Matching: Enable Advanced Matching for all events to leverage its benefits. According to Facebook, enabling Advanced Matching has helped businesses achieve a 10% increase in attributed conversions and a 20% boost in campaign reach through effective retargeting strategies. By enabling this feature, you can enhance the accuracy and effectiveness of your tracking and targeting efforts, leading to improved campaign performance and better results.
8. Click the “Save Settings” button to save all the changes
Installing Facebook Pixel Code Manually #
You have two options to install the pixel for your WordPress or WooCommerce site. If you select the “Choose Manually” option,
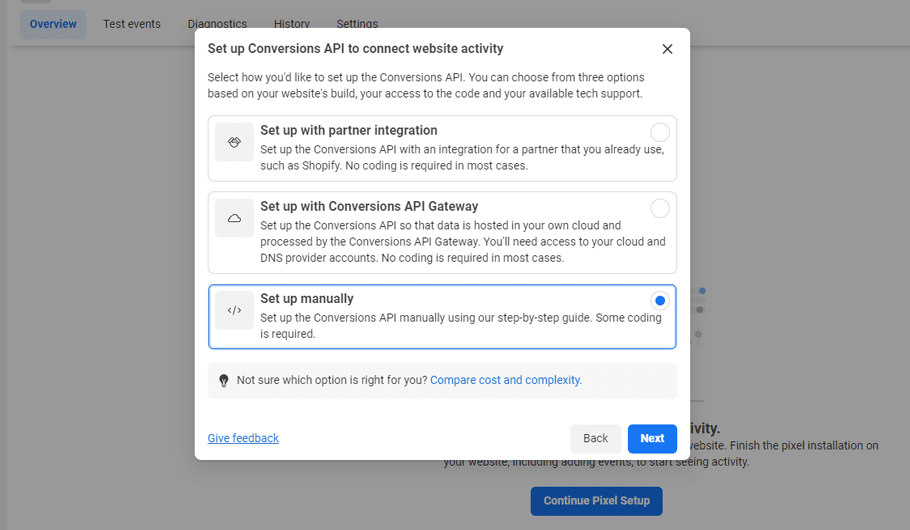
You will receive the pixel code that you need to integrate into your website. Simply copy the code and paste it into the bottom of the header section, just above the </head> tag.
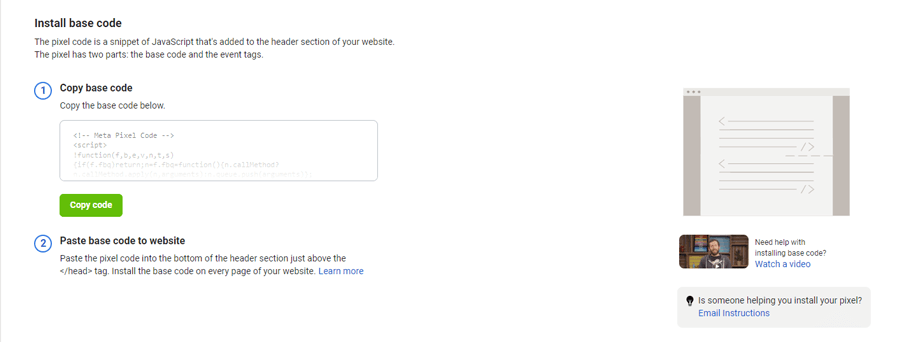
To track your page audience, copy and paste the code into the </head> tag of every page. If manual insertion is a challenge, try using WordPress header footer editor plugins such as Insert Headers and Footers Code – HT Script.
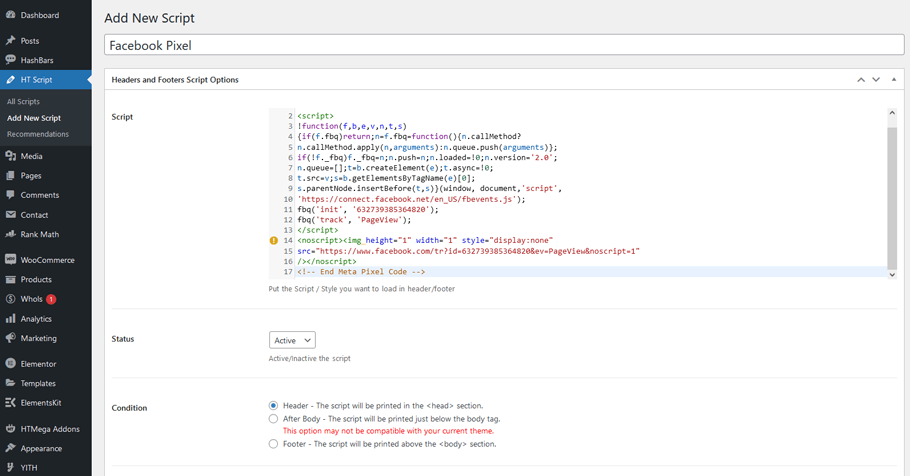
The Insert Headers and Footers Code plugin allow you to add custom codes such as Facebook Pixel, Google Analytics, custom CSS, custom HTML, and JavaScript codes to your site’s header and footer without modifying your theme. This simplifies the process, saves time, and eliminates the risk of damaging your site’s theme during updates.
Top Recommended Blog for You
👉 What is WooCommerce and How Does It Help Your Business?
👉 Discover the Power of Woocommerce Features: Unlock Its Full Potential
👉 The Most Reliable WordPress Hosting Providers on the Market
Installing Pixel with ‘Use a partner integration #
To customize your Pixel without editing your website code, you can connect to a Partner Platform like WooCommerce, Magento, Shopify, Wix, and more. Follow the step-by-step instructions provided here to learn how to add Meta Pixel on Shopify.
Step 1: #
To connect with a partner, click the “Connect Partner Platform” button
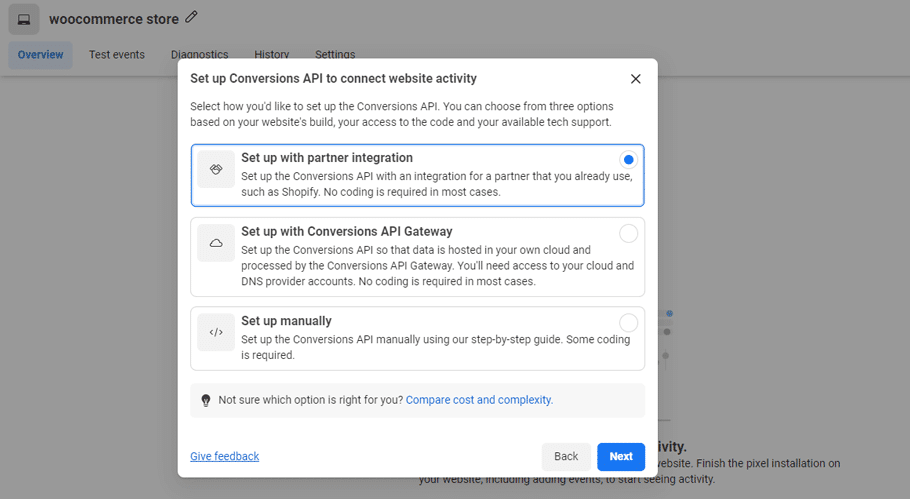
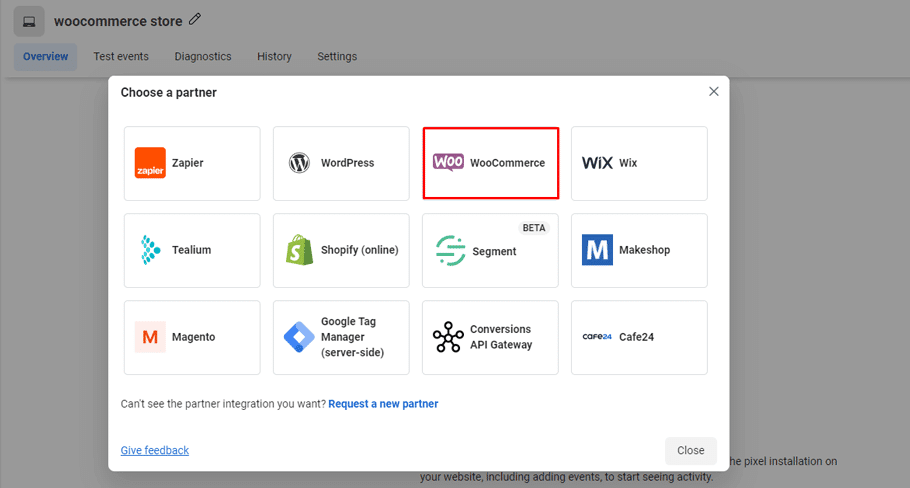
and select “WooCommerce”. The following window will provide instructions for downloading the Facebook Pixel Extension to your account.
Step 2: #
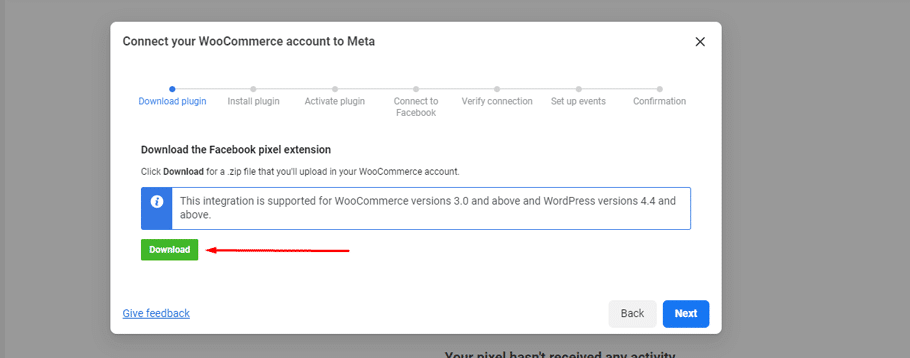
To download the Facebook Pixel Extension, click on the “Download” button. Once you do this, a .zip file will be downloaded to your computer. After that, click on “Continue”.
Step 3: #
Now go to the dashboard of your WooCommerce store and select ‘Plugins’. Then, choose the option of ‘Add New’.
Click on “Upload Plugin”
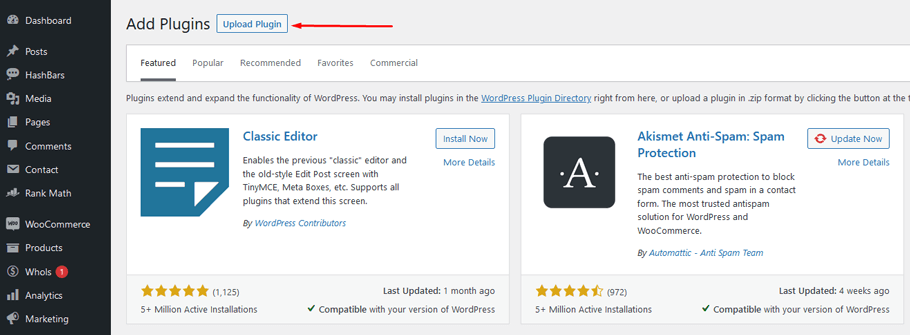
and select the .zip file from your computer. Afterward, click on “Install Now”.

Once you have downloaded and installed the plugin, click on “Activate Plugin”.

Step 4: #
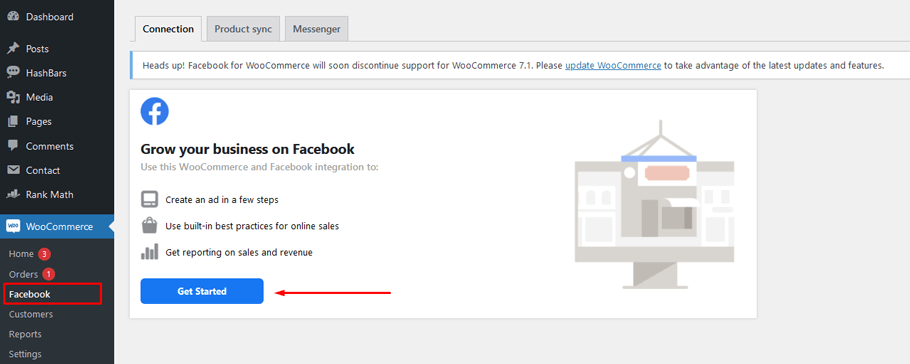
To proceed, please return to the WooCommerce dashboard, select “WooCommerce,” then “Facebook,” and click on “Get Started.”
Step 5: #
Once you open the screen, a welcome window will pop up. You should then click on “Next”. After that, you should choose your WooCommerce store and click on “Next”.
Congratulations, the installation of Facebook Pixel is complete.
Benefits of Using Facebook Pixel on WooCommerce #
By integrating Facebook Pixel with WooCommerce, you gain access to powerful conversion-tracking capabilities that enable you to track the success of your ads with ease. This valuable tool shows you exactly how your ads are driving sales, providing you with important data to help you optimize your ads and achieve better results. This, in turn, can help you get more out of your advertising budget and gain a better understanding of your customers’ needs.
Using the Facebook pixel for Woocommerce can benefit you in several ways:
Conversion Tracking #
You can use Facebook Pixel to monitor conversions on your WooCommerce website. This information can help you improve your ad performance and boost sales. Examining the data can highlight your ad campaign’s strengths and weaknesses, allowing you to make changes that will optimize your marketing strategies.
Audience Targeting #
Using pixel data can help you reach potential customers who are more likely to make a purchase on your WooCommerce store. By gaining insights into your customers’ behaviors and preferences through pixel data, you can target your ads more effectively and present your products to the right audience at the right time. This can increase the chances of making a sale and improve your returns on investment.
Retargeting Ads #
To effectively advertise, you must tailor your approach to the specific audience and type of advertisement. By using WooCommerce Facebook pixel data, it’s possible to target individuals based on their behavior and buying habits. Sometimes, people are not actively looking to make a purchase when browsing products. Even if they see something great, they may not buy it immediately.
However, by retargeting these same individuals with personalized ads on Facebook, it’s possible to increase the chances of making a sale. This is where the Facebook pixel comes in handy, as it simplifies the process of running retargeting campaigns.
Lookalike Audience #
The most fascinating ad system on Facebook is the lookalike audience. It allows you to target audiences similar to those who have visited your website. However, the system requires you to install Facebook pixel WooCommerce on your website or WooCommerce store.
Using Facebook Pixel WooCommerce allows you to get more out of your advertising budget, better understand customer needs, and optimize your store for maximum results. With the help of this tool, you can track conversions, target your ads more effectively, and create custom audiences to re-target customers who have already visited your store.
Tips for Maximizing Facebook Pixel’s Potential on WooCommerce #
Merely adding the WooCommerce Facebook pixel to your store won’t be very effective. To improve your WooCommerce sales, you must utilize the pixel data and leverage it for running ad campaigns.
Here are some tips to enhance your WooCommerce sales.
Customize your Pixel #
You can customize the Facebook pixel WooCommerce for more data-driven, targeted campaigns. Create a custom audience and use dynamic product ads to retarget customers on their previous visits. This helps you reach out to your potential customers with relevant messages and offers.
Use Events #
You can include multiple events like page view, add-to-cart action, and checkout initiated in your WooCommerce store. It will help you understand user actions better and optimize the content based on their activities.
Run A/B Tests #
To improve the effectiveness of your campaigns and ads, use A/B tests. Test different versions of the same ad to see what resonates better with your audience. This can be done by installing WooCommerce Facebook pixel WordPress on various pages and conducting A/B testing with multiple ad sets.
Test Different Ad Formats #
Test different ad formats to see which ones are more effective. Consider trying video and carousel ads, as they tend to perform better than static images. You can also use dynamic product ads to showcase recommended products and boost sales.
Frequently Asked Questions: How to Add Facebook Pixel to WooCommerce #
What is a Facebook Pixel? #
A Facebook pixel is an analytics tool that allows you to measure the effectiveness of your advertising by understanding the actions people take on your website. It helps you track conversions from Facebook ads, optimize ads based on collected data, build targeted audiences for future ads, and remarket to qualified leads.
How do I add a Facebook Pixel to my WooCommerce store? #
There are multiple ways to add Facebook pixel, which include manual addition, integrating with a partner, or using a plugin. To add pixels manually, you first need a Facebook Pixel ID, which can be found in Events Manager. Once you have the Pixel ID, simply paste it into your website’s HTML code and you’re ready to go.
If you want to use a plugin for integration, there are several plugins available on the WordPress repository that allow easy installation of the Facebook Pixel. Finally, if you want to use a partner integration, there are several third-party integrations available that allow you to quickly and easily add your pixel without any coding required.
What are the benefits of adding a Facebook Pixel? #
Adding a Facebook Pixel to your WooCommerce store provides multiple benefits. First, it helps you track customer interactions on your website and allows you to optimize ads for those customers.
Additionally, Facebook Pixel can help you build audiences based on customer behavior and create lookalike audiences to reach new customers that are similar to the ones who have already interacted with your store. Finally, it provides detailed analytics about user activity on your website.
In which section of WooCommerce can I find Meta Pixel? #
The Meta pixel has been incorporated into the header section of your WooCommerce website’s platform.
Conclusion #
With the ever-increasing amount of competition between businesses today, learning how to add Facebook Pixel to WooCommerce is essential for the success of a business. By understanding what it is and how it works, together with the relatively easy steps to install and configure this activity tracking tool on your eCommerce website, you’ll be in a better position to leverage the power of Facebook Ads and optimize your online store.
Knowing your target audience will also allow you to design more valuable campaigns. Be sure to stay up to date on new ways you can make use of advanced tools like this if you want to maximize engagement and conversions.
So don’t wait any longer – remember that implementing Facebook Pixel in WordPress is an important factor in developing a successful online store strategy. Start taking action today, and follow our simple guide on how to add Facebook Pixel to WooCommerce!