Redirect to Checkout is a module in WooCommerce that allows you to redirect your customers to the checkout page after adding products to their cart. This can be useful for increasing your conversion rate and getting more sales! In this article, we will show you how to use REDIRECT TO CHECKOUT and how it can benefit your business.
What is the Redirect to Checkout Module in WooCommerce and what does it do?
The Redirect to Checkout module allows you to redirect customers to the checkout page after adding a product to their cart. This can be useful if you want to reduce the number of steps required to complete a purchase or if you want to encourage customers to complete their purchase without having to go through the cart page.
Giving your visitors a clearer path to completing their purchases can help keep them engaged and increase revenue. This makes the purchase process simpler and reduces shopping cart abandonment. The Redirect To Checkout Module is an easy way of improving both the user experience on your website as well as increasing sales for your company!
However, it is important to note that Redirect to Checkout only applies to products with a “buy now” button. For products that require customization or have options (such as size or color), customers will still be taken to the cart page so they can make their selections.
How do you set up Redirect to Checkout in WooCommerce?
In order to set the Redirect to Checkout module in WooCommerce, we are using a special WooCommerce page builder plugin here named WooLentor.
If you want your customers to be able to complete their purchases without having any trouble, then WooLentor will be the perfect plugin to give them an easy experience.
When you are using WooLentor to add redirects in your WordPress plugin, here is a quick guide for doing so.
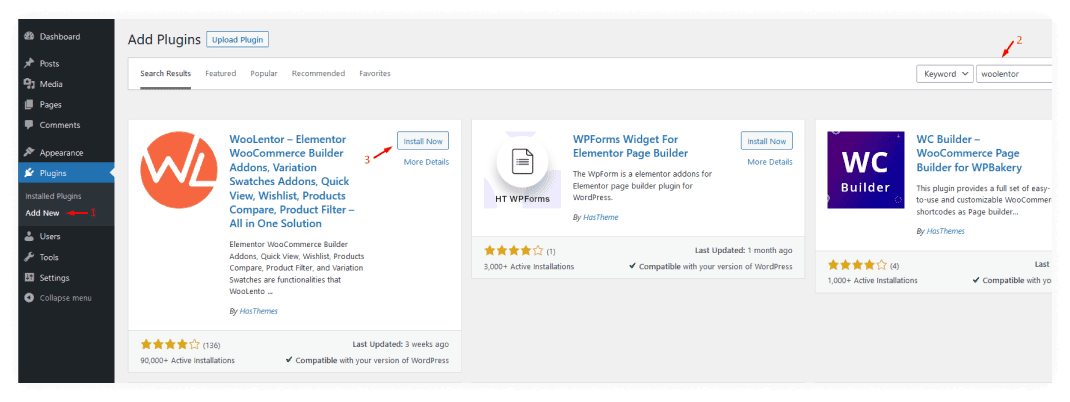
Step 1: Install the WooLentor plugin on your WordPress site.

To begin, you must install the WooLentor plugin on your WordPress site. It’s simple and quick to do!
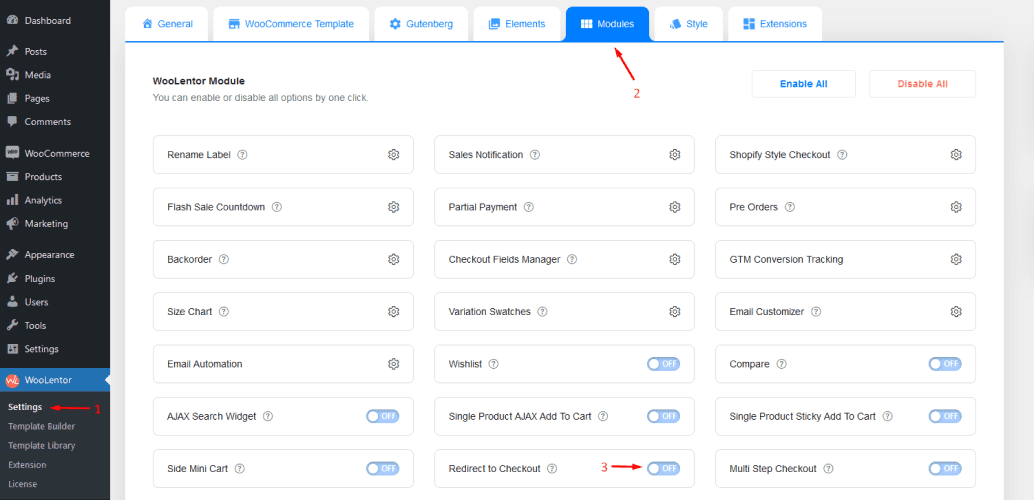
Step 2: Enable the Redirect to Checkout on Add to Cart Module

Once you have it installed, head over to Settings > Modules. Then enable the Redirect to Checkout on Add to Cart Module.
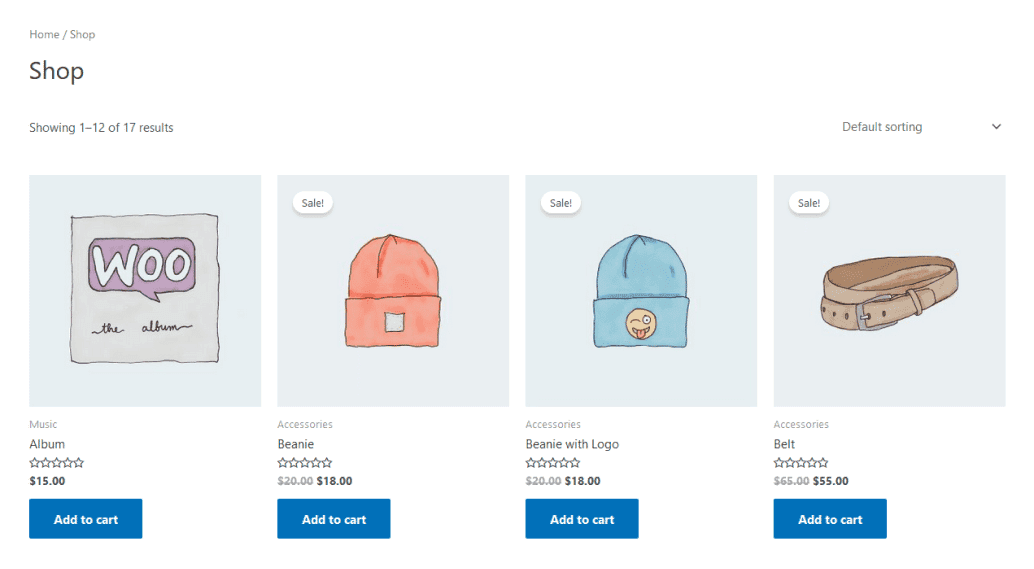
Step 3: Visit the Shop/Store

Next head over to the Shop/Store page and click Add to Cart Button to see the difference.
What if WooLentor’s redirect to the checkout module doesn’t work for some reason?
If the Redirect to Checkout on Add to Cart module does not function, follow these simple actions to resolve the problem.
- Start by going to the WordPress Dashboard > WooCommerce > Settings > Product Tab.
- Select “Add to cart behavior” from the dropdown menu in step 2.
- Afterward, look for the first checkmark that says “Redirect to the cart page after successful addition”.
What are some of the benefits of using Redirect to Checkout in WooCommerce?
If you’re looking for a way to increase your conversion rate and reduce shopping cart abandonment, Redirect to checkout is a great option to consider.
The following are some advantages of utilizing the WooCommerce direct checkout feature.
- It can increase your conversion rate by reducing the steps required to complete a purchase.
- Redirect to checkout can also help reduce shopping cart abandonment, allowing customers to bypass the cart page altogether.
- Redirecting to checkout can also help improve your customer’s experience by providing a more streamlined purchase process.
- Redirecting customers to checkout might help boost your sales by making it simpler for them to buy.
Frequently Asked Questions
Question 1: What is Redirect to Checkout in WooCommerce?
Answer: Redirect to Checkout feature allows your customers to be redirected to the checkout page from the single product page when they click on the “Add to Cart†button.
Question 2: What are the benefits of using Redirect to Checkout in WooCommerce?
Answer: Redirect to Checkout can help increase your conversion rate by reducing the number of steps required to complete a purchase. It can also help reduce shopping cart abandonment by making it easier for customers to complete their purchases without having to go through the cart page.
Question 3: How do I add Redirect to Checkout in WooCommerce?
Answer: To add this feature you need a plugin such as WooLentor which has Redirect to Checkout on Add to cart Module that allows you to automatically redirect customers to the checkout page after they click the “Add to Cart” button on your site.
Question 4: How do I set up Redirect to Checkout in WooCommerce?
Answer: To set up Redirect to Checkout in WooCommerce, install the WooLentor Plugin and then go to the settings page and select the “Modulesâ€. Then, enable the “Redirect to Checkout on Add to Cart†option.
Question 5: What are the requirements for using Redirect to Checkout in WooCommerce?
Answer: Redirect to Checkout requires WooCommerce 2.3 or higher. Redirect to Checkout will also not work if you have guest checkout disabled.
Question 6: Is the “Redirect to Checkout†module compatible with all WooCommerce themes?
Answer: Redirect to Checkout is compatible with all WooCommerce themes. However, we recommend that you test REDIRECT TO CHECKOUT with your theme before enabling it on your live site.
Final Thoughts
The “Redirect to Checkout on Add to Cart†Module of the WooLentor Plugin is an excellent solution for keeping your consumers on track and assuring a trouble-free checkout procedure.
This component allows you to redirect clients who click the add-to-button to the checkout page of your site so they can finish their purchase quickly and simply. You may keep your consumers pleased and make sure that their shopping experience is a positive one by having this module active.
Redirecting visitors to the checkout page guarantees that they don’t get lost on your website or abandon their cart, and it also makes the checkout process quicker and simpler. If you want to improve your website’s user experience and boost sales, then the WooLentor Redirect to Checkout Module is definitely worth considering.