Adding products to your WooCommerce store is a pretty straightforward process, but there are a few things you need to know in order to do it correctly. In this article, we will walk you through the steps involved in adding products to your store. We’ll also show you how to add product images, set up product variations, and more! Let’s get started!
Step by Step Process to Add Products in WooCommerce
Adding products in WooCommerce is a simple and straightforward process. In just a few steps, you can add new products to your online store.
Let’s take a look at how to add products in WooCommerce one step at a time.
First, log into your WordPress Dashboard and go to the ‘Products’ section. From there, you should see an ‘Add New Product’ button. Click on that to start adding your product.
follow these steps to configure everything:
Add Title and Description to the Products
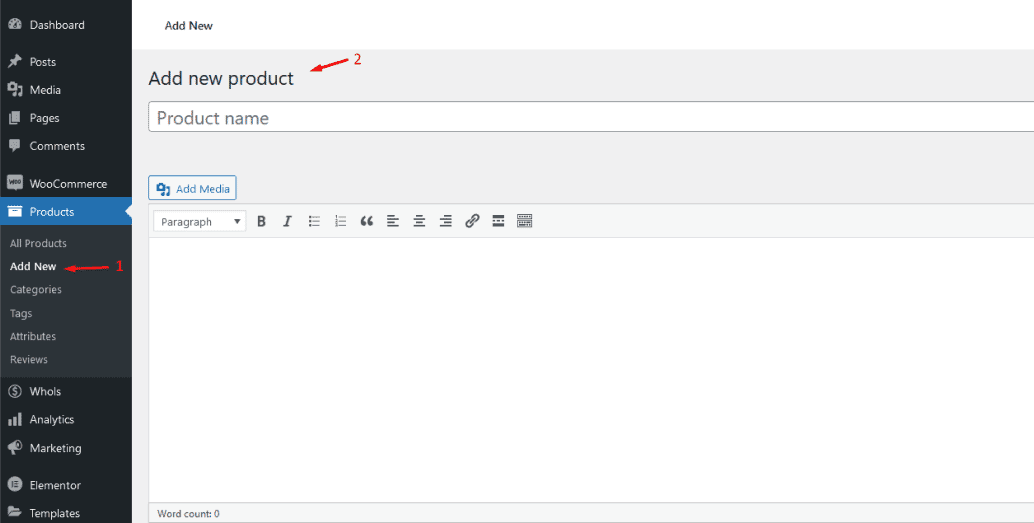
Please put the name of your product in the title area. Next, complete the description for your product. Include organic keywords in your title and description to help improve your ranking. If you want to use semantic keywords, add them to the long description.
Product descriptions are very important in product marketing because they give customers an idea about what your products offer. A good description should include all the details that would make their decision easier, such as the benefits and features of a certain item or service. You may use bullet points to make this section more readable.
Set The Product Types
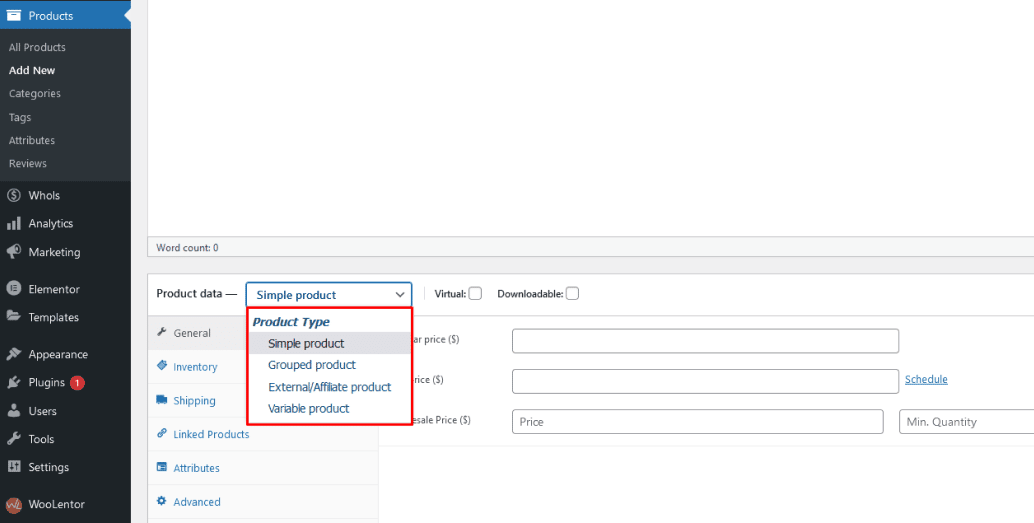
WooCommerce has a variety of product kinds available, depending on the product you’re selling. You have four basic products types to pick from:
Simple Product
A Simple Product is a physical product that is shipped to customers and does not have any options or variations, such as size or color. It is the most common. This kind of product is very popular among WoCommerce store owners. For example, free-sized T-Shirts.
Grouped Product
A grouped product is a bundle of simple products, such as a 5-pack of t-shirts. Grouped products are a great way to save money. Customers can save money by buying in larger quantities.
External Product
Some people like to use this option if they have a dropshipping business or an affiliate-based store because it lets them link the “Add To Cart” button on their site directly with another one.
Variable Product
If you have a physical product with options or variations, such as size or color, you would Add a Variable Product. A Variable Product has options, such as size or color, which can be selected by the customer when they Add the product to their cart. For example, a t-shirt that has five different sizes available in blue or black color options.
The four core product types can be modified with two additional options:
Virtual Product
Virtual products are intangible products like services or memberships. Because these products are digital, there is no shipping required.
Downloadable Product
Downloadable products are files that can be downloaded after purchase, like PDFs or audio files.
For both types of products, you’ll need to enter some additional information, such as file URLs for downloadable products or delivery timeframes for virtual products.
To choose this option, simply use the drop-down and checkboxes in the Product data box, which appears just below the WordPress editor where you added your product description.
We’ll use a Simple product for this tutorial. The process is similar for other product types; you’ll just have a few more options.
Fill in the Product Data Box
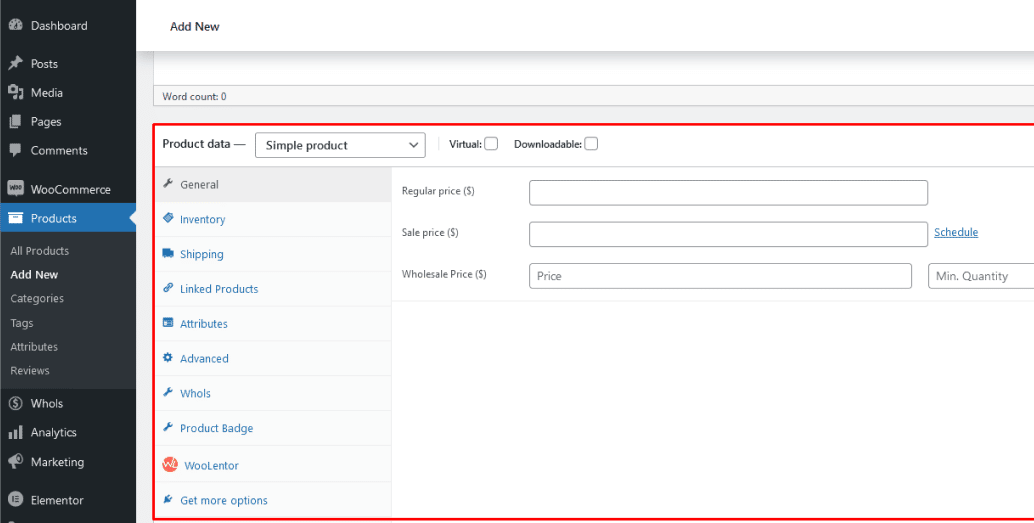
After you’ve chosen your product type, continue by filling out the additional information in the Product Data section. Utilize the tabs on the left to move between different sections.
Explore Different Tabs and Configure
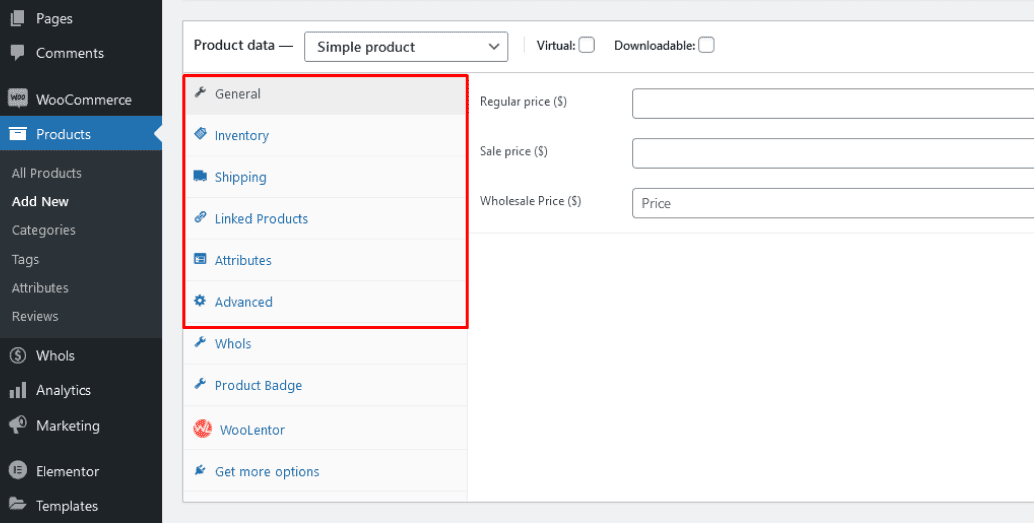
WooCommerce Add Products has different tabs for each type of data that you can enter for a product. Depending on the product type that you’ve selected, some of these tabs may not be relevant.
Each of these tabs has different options that you can configure. Let’s look at each of them one by one.
General Tab
Select the General tab and fill in the price for regular and sale items. The sale price is used only when you want to run a promotion. Otherwise, customers would see the standard price.
You can also choose whether or not products are taxable by entering their tax status under this setting; If it is taxable, please also select the corresponding tax class.
Inventory Tab
The Inventory tab is a great way to keep track of your stock. You’ll see the SKU, stock status, and other options there by default. If you don’t see it though, no worries! Head over to WooCommerce > Settings > Products > Inventory and enable the stock management option.
SKU is a number that identifies each product or service. This distinguishes the items and reduces inventory management complexity. You may manually assign the SKU or utilize a WordPress plugin to generate distinctive SKUs.
If you have enabled the stock management system, you will see a box that reads “stock management on product level.” If you haven’t checked it, you’ll have to manually update the stock. However, if you check the box, WooCommerce’s stock management system will automatically display the product for you.
To keep track of your inventory, enter the number of pieces available in the stock quantity field and it will auto-update. If a product is being manufactured and will be available soon, you can allow backorders. The low stock threshold will send you an alert when the product’s inventory is running low.
Shipping Tab
The Shipping tab allows you to manage vital information about a physical product that needs to be shipped. For example, you can enter the weight and dimensions of the product.
The shipping class option is the way to group products together based on weight limits in order to get different shipping rates for each group. Grouping similar products into groups will help you save money and time. For example, in a shipping class that weighs 15 ounces or less each can go on one shipment service while heavier ones require another type of mailing method accordingly.
Linked Product Tab
The goal of the product page itself is to make money for the store. To do so, you can link similar items on the product page that your customers would like (cross-sells) or suggest more expensive products with better features, such as adding extra value to the item (upsells). On top of that, you may add upsells on the checkout page as well.
Attributes Tab
Attributes are what make a product unique to you and your business. They allow you to personalize things like color options, sizes, and more. For example, if you wanted your customers to be able to choose between different colors for their product then they can select from a dropdown menu of available options or even create something custom themselves! Attributes and variations are closely related.
Advanced Tab
The Advanced tab can help you add a purchase note that appears after placing an order. You are able to select the custom ordering position for this item, enable customer reviews and check off any other options desired!
Write Product Short Description
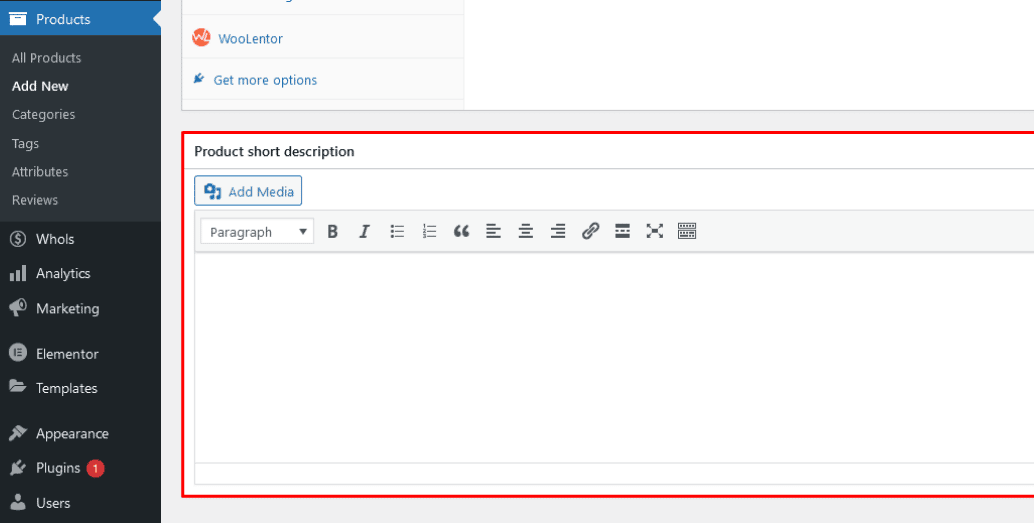
An engaging short description for your product can help you rank higher in search engines and increase conversions. After filling out the Product data box, scroll down to the next section called Product Short Description. This is usually a summary of what is in the longer description you just entered, and it will appear in a prominent spot on your product page.
Having a short description of your WooCommerce store is important for SEO purposes. Optimize your copywriting and include keywords to ensure that your store comes up more often in searches.
Add Product Image
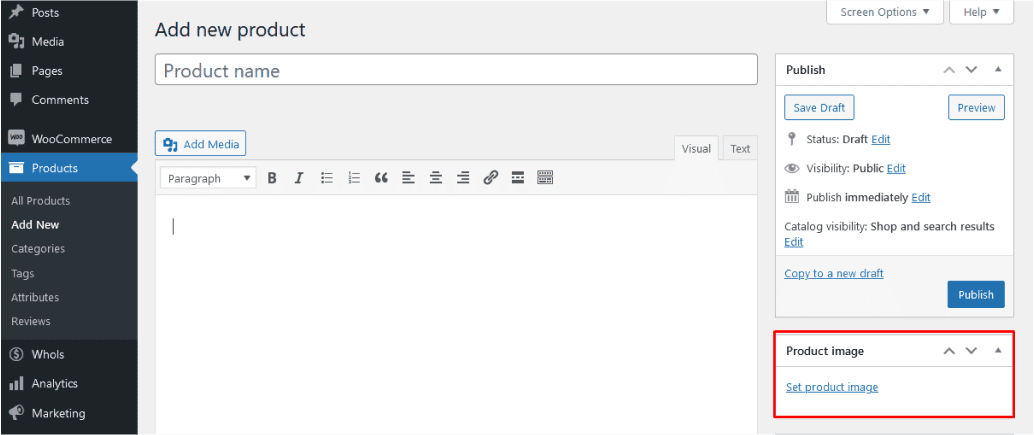
It’s time to show off your product! This is the main image that will appear on every single page of this catalog as well as in our online store. Make sure it looks good and captures all its features accurately, so potential buyers can find what they are looking for easily
Set Product Categories and Tags
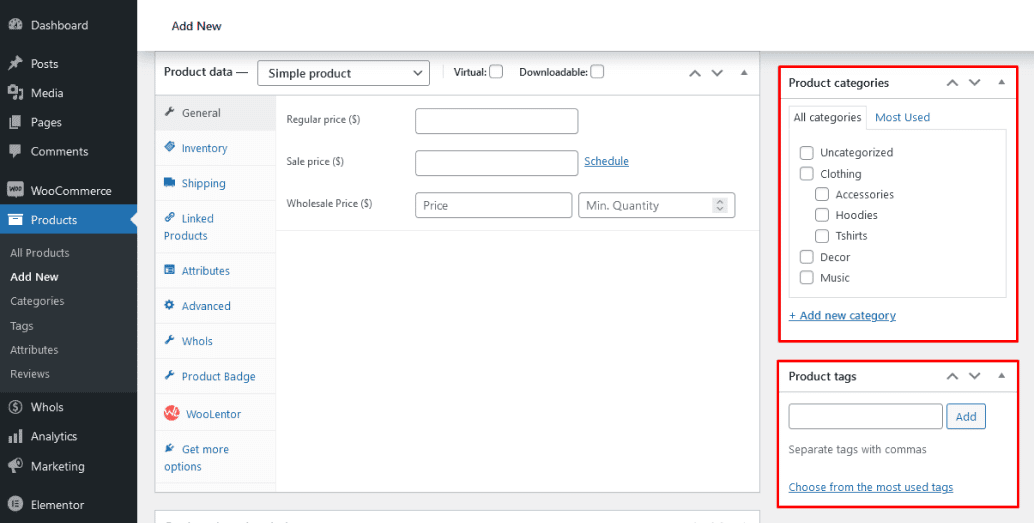
Customers find items much faster on the front end of your store if they have been properly categorized and tagged. Categories and tags help you manage your inventory. Customers will also be able to utilize categories and tags on the front end of your shop to locate what they’re looking for. Make them make sense and be beneficial to the people you want buying from you.
Publish the Product
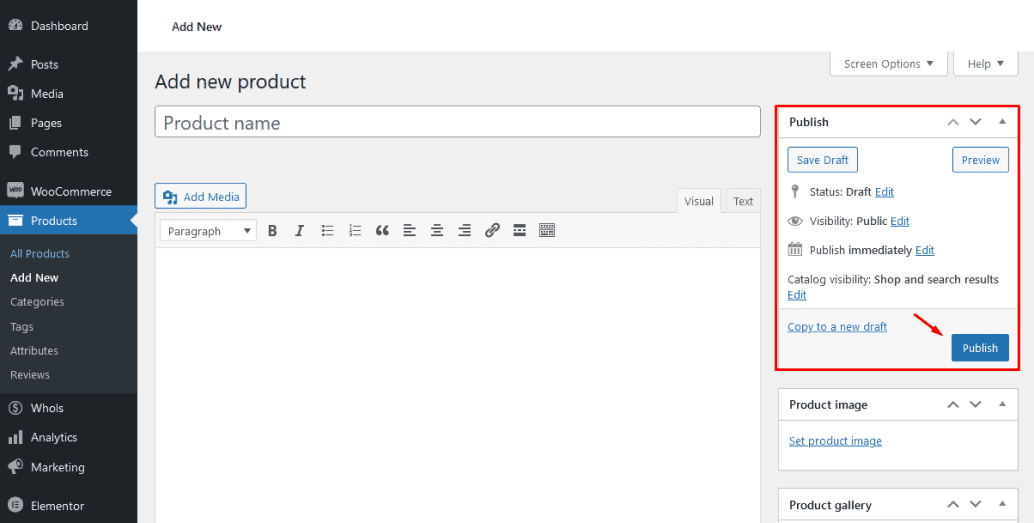
After you confirm that all product information is accurate, click Publish to make your product available on the site.
You may reuse the same template for subsequent products after you’ve established one. On the right sidebar, click the Copy to a New Draft link below the publish box.
Frequently Asked Questions
Q1. What is WooCommerce?
WooCommerce is a WordPress plugin that allows you to sell products and services online. With WooCommerce, you can sell physical and digital products, as well as offer product discounts, manage shipping and taxes, and much more.
Q2. How do I add products to my WooCommerce store?
There are two ways to add products to your WooCommerce store:
- Add a product manually: You can add products one at a time by going to WooCommerce > Add New Product.
- Add products in bulk: You can add multiple products at once by going to WooCommerce > Products > Add New and selecting the “Upload files†option.
Q3. How do I manage my WooCommerce products?
You can manage your WooCommerce products by going to WooCommerce > Products. From here, you can add new products, edit existing products, and delete products that you no longer sell.
Q4. What are the product types in WooCommerce?
WooCommerce offers four product types: simple products, variable products, grouped products, and external/affiliate products.
- Simple products are single, standalone items that can be added to your cart.
- Variable products are items that come in multiple variations, such as size or color.
- Grouped products are collections of individual items that are sold together.
- External/affiliate products are products that you don’t physically sell, but that you promote on your website.
Q5. What information do I need to include when adding a product?
When adding a product, you will need to include the product name, price, description, and images. You can also specify additional information such as product attributes, inventory, shipping, and more.
Q6. Can I offer discounts on my WooCommerce products?
Yes, you can offer discounts on your WooCommerce products by creating a coupon code. To create a coupon code, go to WooCommerce > Coupons and click on the “Add New Coupon†button.
Q7. How do I set up shipping for my products?
Shipping can be configured in the WooCommerce settings. You can specify flat rates, free shipping, or calculate shipping based on weight and/or location.
Q8. How do I add taxes to my products?
Tax settings can be configured in the WooCommerce settings. You can specify tax rates for specific countries and states/provinces.
Final Thoughts
WooCommerce is a powerful eCommerce platform that allows you to sell online. With WooCommerce, you can easily add products, track orders, and process payments. If you are looking for an easy way to sell online, then WooCommerce is the solution for you.
Adding products in WooCommerce is easy once you know what information you need to include and where to configure shipping and taxes. Once you have added products to WooCommerce, you can start selling them online.
By following these steps, you can get your store up and running in no time! Thanks for reading!