Are you looking to start accepting payments from customers on your WooCommerce store? If so, you’ve come to the right place! This guide will show you how to configure payment gateways in WooCommerce, step-by-step.
It’s an easy process, and with the proper setup, your customers can securely purchase your products or services without any hassles. So let’s get started!
Table of Contents
Overview of Payment Gateways in WooCommerce
With the rise of e-commerce, it’s no surprise that Payment Gateways in WooCommerce have become an essential part of online payments. These payment gateways work like intermediaries between credit card companies and WooCommerce, ensuring that transactions are secure, smooth, and hassle-free.
WooCommerce offers a range of payment gateway options suitable for various business models, such as PayPal, Square, and WooCommerce Stripe payment gateways. These payment gateways allow you to enjoy flexible payment options and accept recurring payments.
These payment gateways offer security and convenience, making it easy for businesses to manage transactions from customers anywhere in the world.
Step-by-Step Guide to Configure Payment Gateways in WooCommerce
Configuring payment gateways in WooCommerce can be daunting, especially if you need to be tech-savvy. However, it’s a vital step in creating a seamless customer shopping experience. By enabling payment gateways in WooCommerce, your customers can make purchases using various payment methods, including credit cards.
This Step-by-Step Guide aims to simplify gateway WooCommerce setup and accept recurring payments. It’s essential to ensure that your customers have a smooth payment experience to retain their loyalty to your online store. Keep reading to learn how to configure payment gateways in WooCommerce, step-by-step.
How to Add Check Payments
To add Check payments to your WooCommerce store, follow these simple steps:
Step 1: Go to your WordPress admin dashboard, navigate to WooCommerce, and click “Payments.”
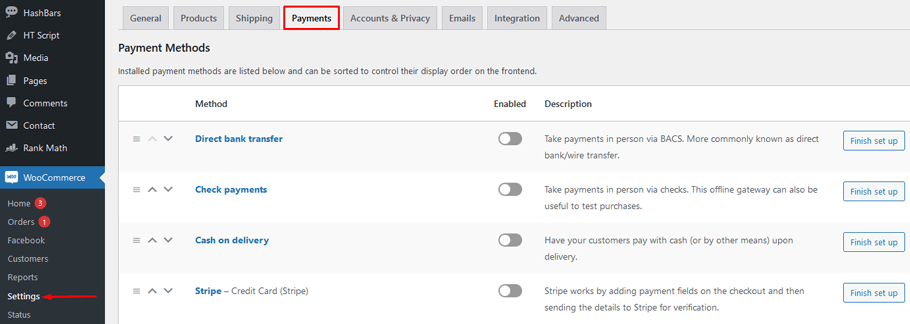
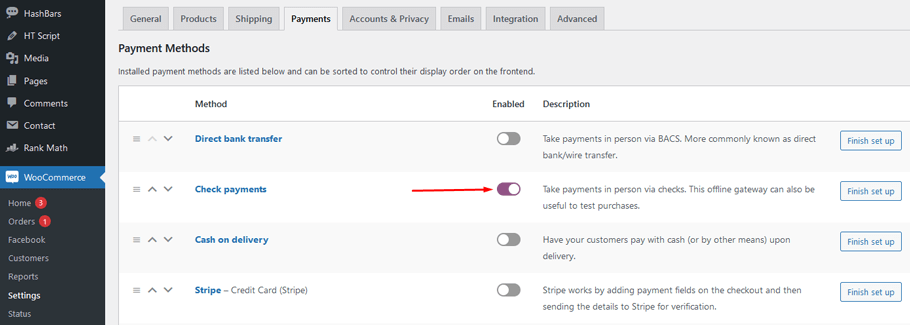
Step 2: Look for “Check Payments” in the list of available payment methods and enable it.
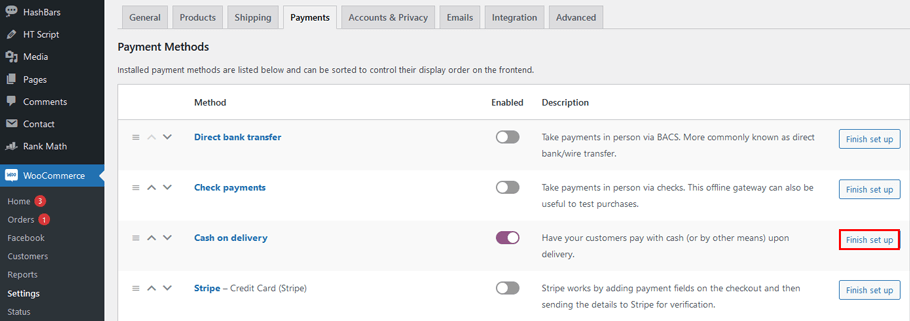
Step 3: After enabling Check payments, click the “Set up” button to configure the payment method.
Step 4: In the Check payment settings, you have the following options:
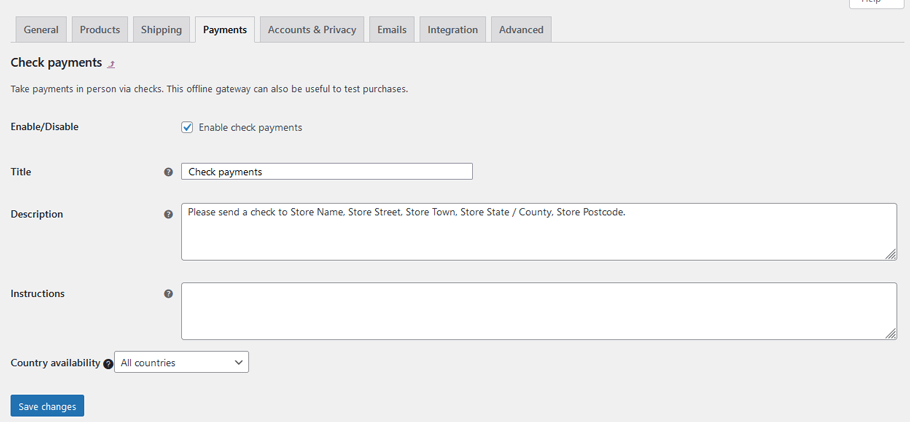
- Enable/Disable: Toggle the switch to turn on or off. Check payments as a payment option.
- Title: Enter the title displayed to customers on the Checkout page, such as “Pay by Check.”
- Description: Provide details or instructions that will be shown to customers when they choose the Check payment option during checkout.
- Instructions: Include specific instructions or guidance on how customers should pay using a check.
Step 5: Once configuring the Check payment settings, click “Save changes” to apply your settings.
Now, Check payments will be available as an option for your customers during checkout. When they choose this method, they will see the title, description, and instructions you provided to guide them on proceeding with the payment using a check.
ShopLentor- WooCommerce Builder for Elementor & Gutenberg
A versatile page builder to build modern and excellent online stores with more than 100k+ Active Installations.
How to Add Direct Bank Transfer
To add Direct Bank Transfer (BACS) as a payment option in your WooCommerce store, follow these steps:
Step 1: Access your WordPress admin dashboard and navigate to Wooommerce >> Payments.

Step 2: Locate “Direct Bank Transfer (BACS)” in the list of available payment methods and enable it.
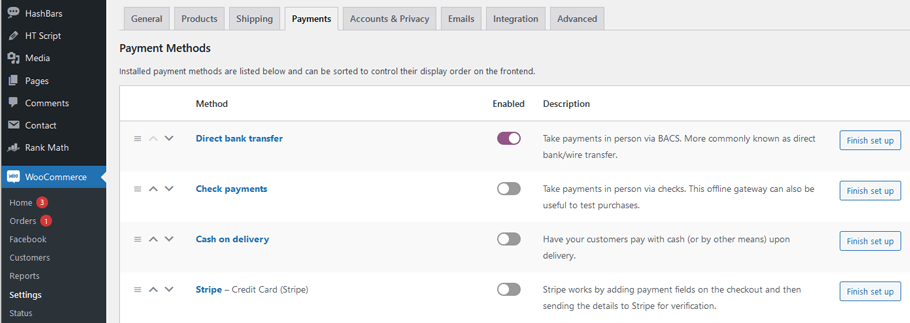
Step 3: Click “Set up” to configure the Direct Bank Transfer settings.
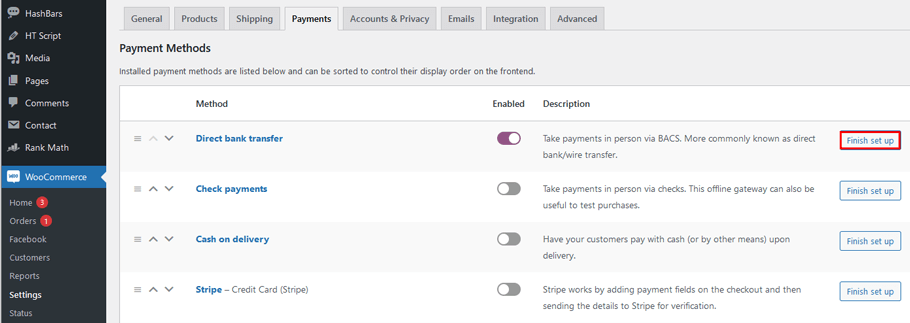
Step 4: In the Direct Bank Transfer settings, you have the following options:
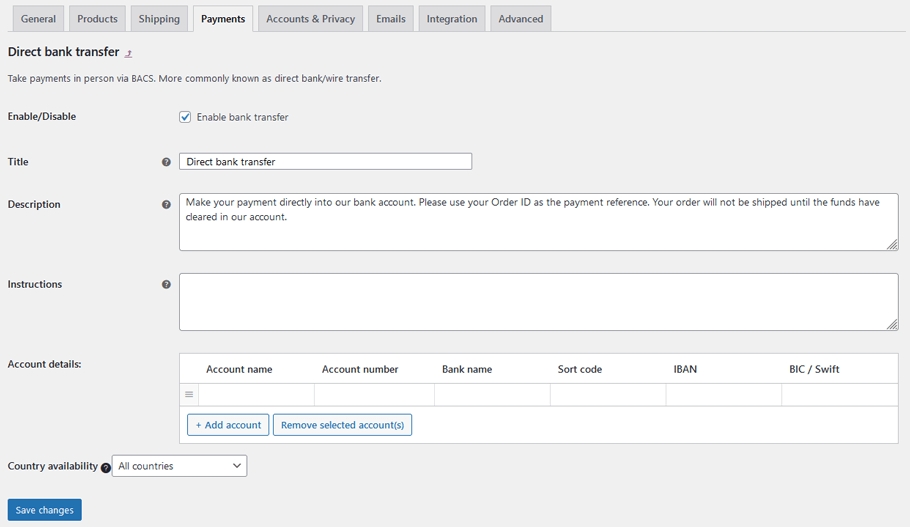
- Enable/Disable: Toggle the switch to turn the Direct Bank Transfer option on or off.
- Title: Choose a title for the payment method that will be displayed to customers during checkout, such as “Direct Bank Transfer” or “BACS.”
- Description: Add relevant information to be shown to customers if they choose Direct Bank Transfer as their payment option.
- Instructions: Provide clear instructions on how customers can pay to your bank account(s) using Direct Bank Transfer.
- Account Details: Enter the account name and number, bank name, routing number, IBAN, and SWIFT/BIC numbers. These details will be displayed to customers on the Order Received page and in Order emails after they check out.
Step 5: After configuring the Direct Bank Transfer settings, click on “Save changes” to save the settings.
Step 6: Check the Checkout page on your website to ensure that the Direct Bank Transfer option is now available for customers to select during the payment process.
Once a customer places an order and selects Direct Bank Transfer as the payment method, the relevant bank account details will be provided along with the order ID. It allows customers to make the payment directly to your bank account using the provided instructions and details.
How to Add Cash on Delivery
To add the Cash on Delivery payment option to your WooCommerce store, follow these steps:
Step 1: Access your WordPress admin dashboard and go to WooCommerce >> Payments.

Step 2: Locate “Cash on Delivery” in the list of available payment methods and enable it.
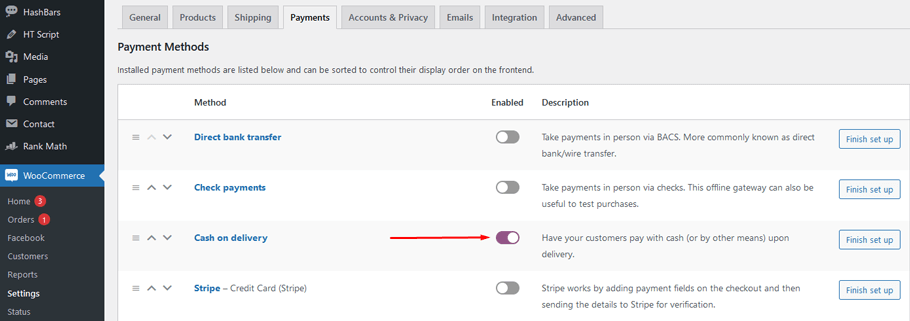
Step 3: Click on “Set up” to configure the Cash on Delivery settings.

Step 4: In the Cash on Delivery settings, you have the following options:
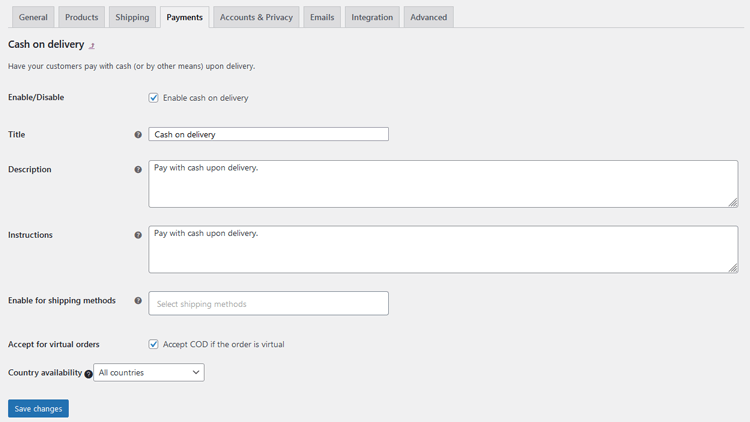
- Enable COD: Toggle the switch to enable or disable Cash on Delivery as a payment option.
- Title: Choose a suitable title to be displayed to customers during checkout, such as “Cash on Delivery” or “Pay on Delivery.”
- Description: Add any necessary information to be shown to customers when they select Cash on Delivery as their payment method.
- Instructions: Provide clear instructions on how customers can make the payment using Cash on Delivery for their orders.
- Enable shipping methods: Choose which shipping methods and rates will offer Cash on Delivery as a payment option.
- Accept for virtual orders: Tick this box to allow Cash on Delivery for virtual products as well.
Step 5: Once you have configured the Cash on Delivery settings, click on “Save changes” to save the settings.
Now, when customers proceed to the checkout page, they will see the option for Cash on Delivery as a payment method. They can select this option to pay for their order upon delivery.
When customers choose Cash on Delivery and complete the checkout process, you will receive their order, and they will pay the total amount in cash when the delivery is made.
How to Add Additional Payment Methods (e.g., Stripe, PayPal)
To add other payment gateway options like Stripe, Authorize.net, Amazon Pay, PayPal, etc., to your WooCommerce store, follow these steps:
Step 1: Install the Payment Plugin Search for and install the particular payment gateway plugin that meets your store’s requirements. You can find various payment gateway plugins available for Stripe, Amazon Pay, Authorize.net, PayPal, and more. Once you’ve chosen the desired payment gateway plugin, download and install it on your WooCommerce store.
Step 2: Enable the Payment Plugin. After installing the payment gateway plugin, navigate to WooCommerce >> Payments and enable the plugin for your store. For example, if you installed the Stripe payment gateway plugin, you will see the option to enable it in the Payments settings.
Step 3: Configure the Plugin Settings. Click on “Manage” for the corresponding payment plugin to access the settings that need to be configured for your WooCommerce store. The plugin settings will typically include fields to enter API keys for both the Test and Live environments.
For example, if setting up Stripe Payment, the settings will include options like this:
- Enable Payment Gateway: Toggle this switch to enable the payment gateway.
- API Keys: Obtain and use the API keys provided by the payment gateway provider for both the Test and Live environments. The Test environment is for testing purposes, while the Live environment is for actual transactions.
To obtain the API keys, you’ll need to sign up with the respective payment gateway provider and complete the registration process. Once registered, you’ll receive the API keys, which should be added to the plugin settings accordingly.
Step 4: Save the Settings After configuring the plugin settings and adding the API keys, save the changes to apply the settings to your WooCommerce store.
Step 5: Payment Gateway Display on Checkout Once everything is set up, you will see the payment gateway option displayed on your Checkout page. Customers can now select their preferred payment method from the available options during the checkout process.
Tips for Optimizing the Checkout Process and Increasing Conversion Rates
Optimizing the checkout process is crucial for increasing conversion rates and reducing cart abandonment on your e-commerce website. A smooth and user-friendly checkout experience encourages customers to complete their purchases and can significantly impact your overall sales. Here are some tips for optimizing the checkout process and boosting conversion rates:
- Minimize Steps: Keep the checkout process as short and straightforward as possible. Reduce the number of steps to complete the purchase to avoid overwhelming customers and reduce the chances of abandonment.
- Guest Checkout Option: Offer a guest checkout option so that customers can complete their purchases without the need for registration. Many shoppers prefer a quick and hassle-free checkout process.
- Clear Call-to-Action (CTA): Use clear and prominent CTAs like “Proceed to Checkout” or “Buy Now” to guide customers to the next step in the process.
- Optimize Form Fields: Only ask for essential information during checkout. Minimize the number of mandatory fields, and use auto-fill or drop-down menus wherever possible to make data entry faster.
- Progress Indicators: Include progress indicators so that customers know how many steps are left in the checkout process. This reduces uncertainty and encourages them to continue.
- Trust and Security: Display trust symbols, SSL certificates, and secure payment logos to build trust with customers and reassure them that their information is safe.
- Mobile Responsiveness: Ensure that your checkout process is mobile-friendly and responsive, as an increasing number of customers shop on mobile devices.
- Clear Shipping and Tax Information: Display shipping costs and taxes clearly early in the checkout process to prevent any unexpected surprises at the final step.
- Multiple Payment Options: Offer a variety of payment methods to cater to different customer preferences. This can include credit cards, PayPal, Apple Pay, Google Pay, and more.
- Abandoned Cart Recovery: Implement abandoned cart recovery strategies, such as sending reminder emails to customers who leave items in their cart without completing the purchase.
- Clear Error Messages: If a customer encounters an error during checkout, provide clear and helpful error messages with instructions on how to resolve the issue.
By implementing these checkout optimization strategies, you can create a seamless and efficient buying experience for your customers, leading to increased conversion rates and ultimately higher sales for your e-commerce business.
ShopLentor- WooCommerce Builder for Elementor & Gutenberg
A versatile page builder to build modern and excellent online stores with more than 100k+ Active Installations.
Frequently Asked Questions
Q: What is a payment gateway in WooCommerce?
A payment gateway is a service that processes online payments securely between a customer and the online store. In WooCommerce, payment gateways facilitate transactions by connecting the store to the payment processor and handling the exchange of payment information.
Q: How do I access payment gateway settings in WooCommerce?
To access payment gateway settings in WooCommerce, log in to your WordPress admin dashboard, go to “WooCommerce” in the left sidebar, click on “Settings,” and then navigate to the “Payments” tab.
Q: Which payment gateways are supported by WooCommerce by default?
WooCommerce supports several popular payment gateways by default, including PayPal, Stripe, and offline methods like Direct Bank Transfer and Cash on Delivery. Additionally, there are numerous payment gateway extensions available to integrate with other payment processors.
Q: How do I enable a payment gateway in WooCommerce?
To enable a payment gateway, go to the WooCommerce settings, click on the “Payments” tab, and find the gateway you want to enable. Click on it to access its settings, then check the box labeled “Enable” or similar, and save your changes.
Q: What information do I need to configure a payment gateway?
The information required for configuring a payment gateway varies depending on the gateway. In general, you will need account credentials provided by the payment processor, such as API keys, merchant IDs, and secret keys. Make sure to read the documentation of the specific gateway you’re setting up to find the necessary information.
Q: Can I use multiple payment gateways on my WooCommerce store?
Yes, WooCommerce allows you to use multiple payment gateways simultaneously. Customers can choose their preferred payment method during the checkout process, as long as the enabled gateways support it.
Q: How do I set up PayPal as a payment gateway in WooCommerce?
To set up PayPal as a payment gateway, you will need to create a PayPal business account and obtain the necessary API credentials. In the WooCommerce settings, enable PayPal, enter your API credentials, and configure other settings according to your preferences.
Q: How do I set up a Stripe payment gateway in WooCommerce?
To set up Stripe, you need to create a Stripe account and obtain API keys. In WooCommerce settings, enable Stripe, enter your API keys, and configure additional settings like payment methods and currency.
Q: Is it safe to use payment gateways in WooCommerce?
WooCommerce follows industry standards for security, and popular payment gateways have their own security measures in place. However, it’s essential to keep your WooCommerce store and all its plugins updated and use secure hosting to minimize potential risks.
Q: What do I do if customers encounter issues during the payment process?
If customers encounter issues during the payment process, you should monitor your payment gateway settings for any error messages. Additionally, check your WooCommerce system status for any potential conflicts or errors. Providing prompt customer support can help resolve issues and improve the overall shopping experience.
Wrapping Up – Final Thoughts on How to Configure Payment Gateways in WooCommerce
Providing multiple payment gateways increases the flexibility and accessibility of your store, leading to a better shopping experience for your customers. As you can see, configuring payment gateways in WooCommerce is a straightforward process. It allows merchants to accept payments from customers and provides added security for the customer while giving the merchant control over how they process payments.
However, it is important to understand all the necessary steps involved in setting up payment gateways before attempting to do so. With that understanding, you should be able to create an account with each gateway and configure your WooCommerce store accordingly. Moving forward, keep in mind that there are many different options available when it comes to processing payments as technology continues to develop and evolve.
By understanding what is available and doing some research on what works best for your store now and down the road, you can maximize your earning potential with a world of opportunity at your fingertips! So don’t hesitate any longer – start learning How to Configure Payment Gateways in WooCommerce today!