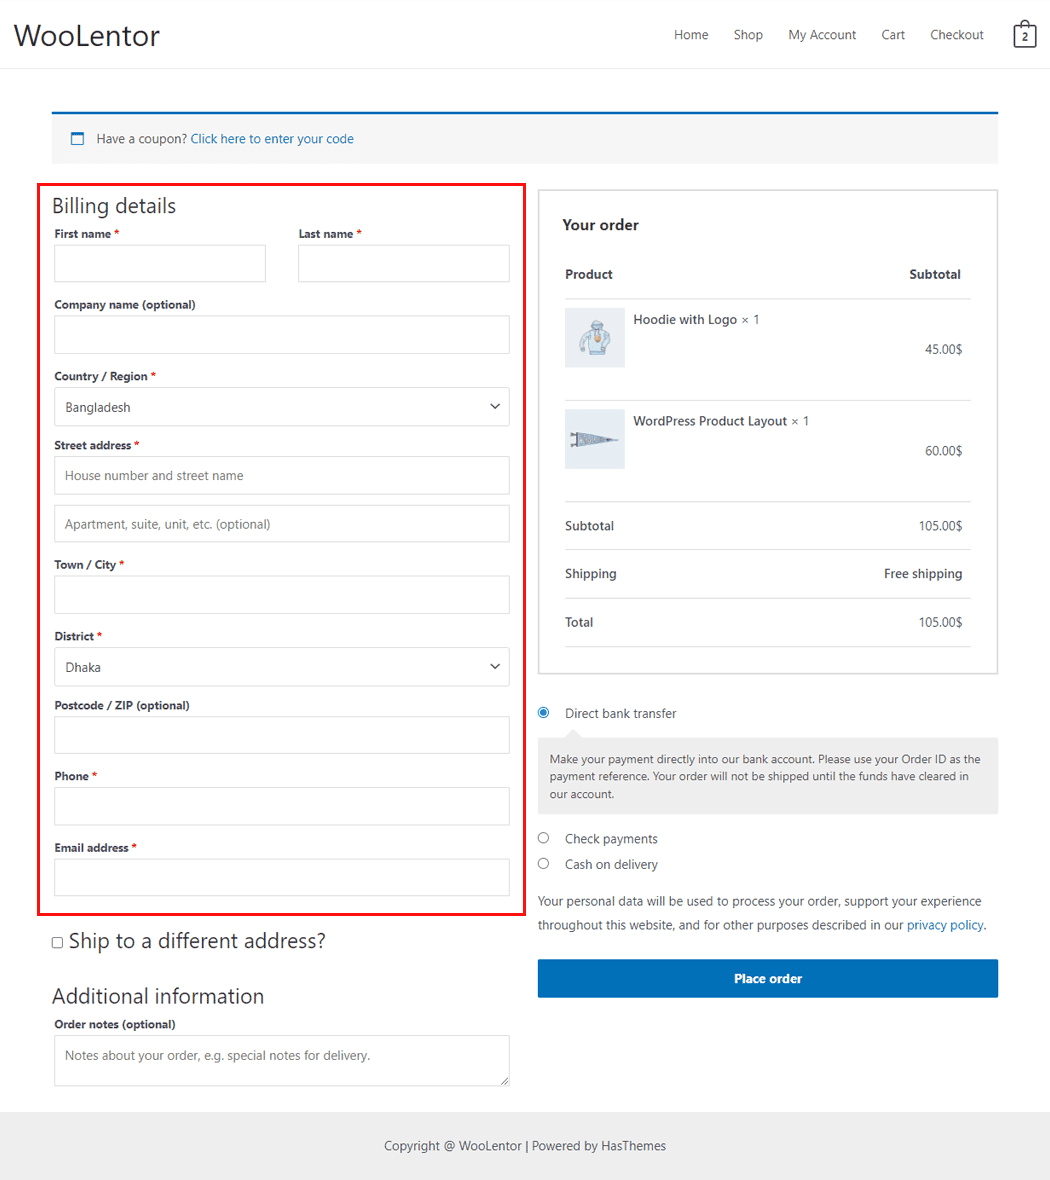
If you run a WooCommerce store, then you’ll need to know how to edit your billing details. This can be a bit confusing, but we’re here to help! In this step-by-step guide, we’ll show you how to edit billing details in WooCommerce checkout process. For this purpose, we are going to use a popular, feature-rich, and exclusive WooCommerce page builder plugin named ShopLentor (Formerly WooLentor).
What are WooCommerce billing details and why do you need to update them? #

WooCommerce billing details refer to the specific information that is required to process payments such as calculating taxes and billing shipping fees for WooCommerce orders. This includes things like the customer’s name, email address, shipping address, and credit card number.
WooCommerce billing details are used to generate invoices and track payments. It’s important to keep your WooCommerce billing details up to date so that you can ensure that payments are processed smoothly without any issues and that you are able to receive the correct amount of money.
Accurate billing details are also important for customer service purposes. If a customer has a question about an order, the WooCommerce team can use the billing details to look up the order and provide assistance. For these reasons, it is important to keep WooCommerce billing details up-to-date.
Steps to Follow to Edit Checkout Billing Details #
The ShopLentor (Formerly WooLentor) checkout addon for WooCommerce is an easy way to keep your billing details information updated. You can take full advantage of everything this plugin has to offer in only a few minutes!
The WooCommerce Checkout Billing Form Widget makes it simple to change billing details.
Here’s how it works:
To start the process, you must first install the ShopLentor WooCommerce Checkout plugin on your WordPress site. This WooCommerce checkout field editor plugin allows you to easily add custom fields and edit billing details WooCommerce in the WooCommerce Checkout Process.
Then log into your WordPress Dashboard and go to ShopLentor > Settings > Elements. The “Checkout Billing Form” widget should be switched on from the list of Elements.
- You’ll need the “Checkout Billing Form” widget from the WooCommerce Checkout Page Template.
- To add a Checkout Billing Form widget to your page, locate the “WL: Checkout Billing Form” widget in the list of options and drag it onto the Checkout Page Template.
- You can simply modify the form’s Title and Create an account label as needed.
How to edit billing details in WooCommerce – a step-by-step guide #
Enable Checkout Billing Form Widget #
Go to ShopLentor’s Settings section. From the list of Elements, enable the checkout billing form widget.
Edit Checkout Page Template from Template Builder #

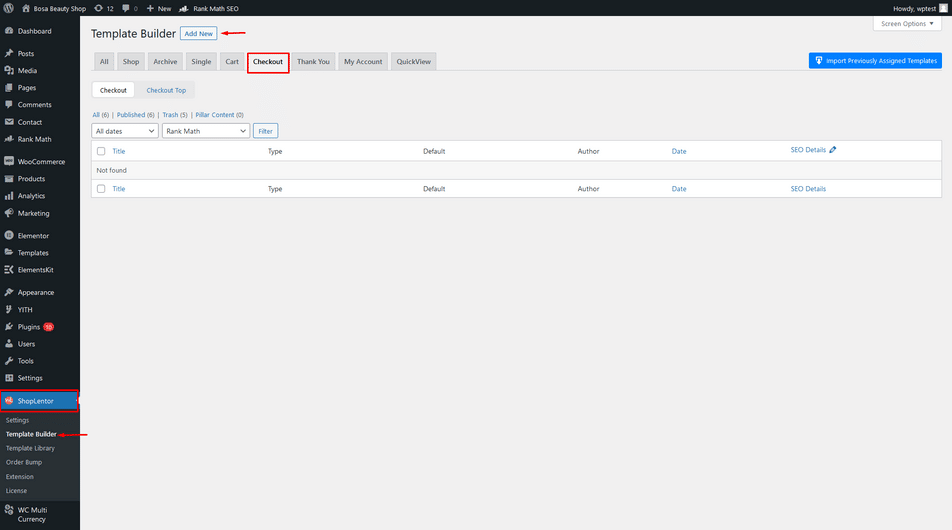
To create a Checkout Page Template go to the Dashboard, then ShopLentor, and choose “Template Builder.” Now click the “Add New” button.
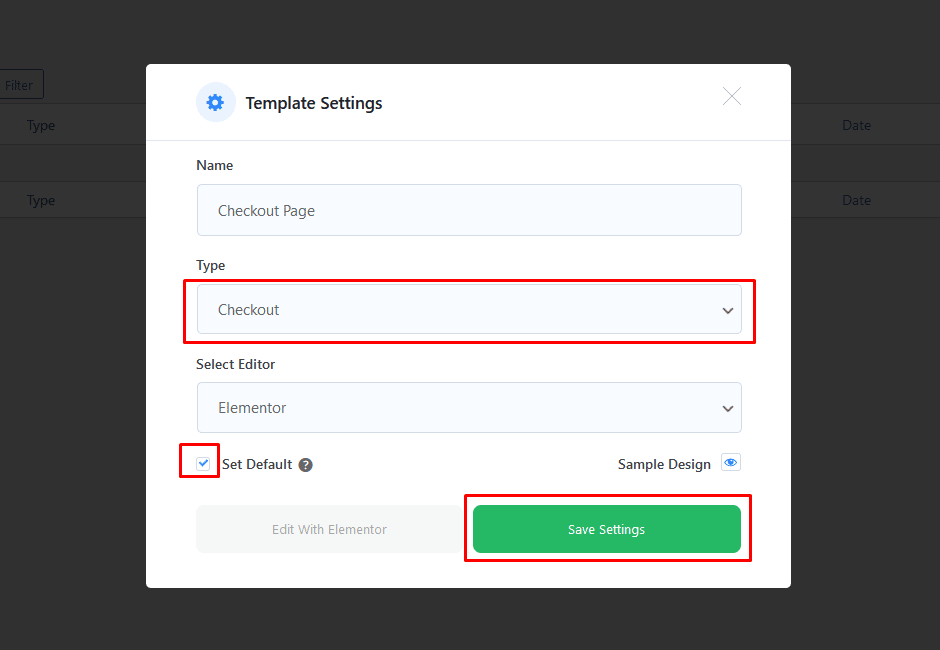
First, choose a name for your template in the popup box for template settings. Select Single from the dropdown list of type options. Then pick an editor from the dropdown menu. There are two choices to select from Elementor and Gutenburg.

After that, select a template from the options available. You may also choose a default sample design from the “Sample Design” button.
After you’re done, click the “Save Settings” button.
Customize Checkout Billing Form Widget #
Click the “Edit with Elementor” button to modify the Checkout Page Template. Search for and select the ShopLentor “Checkout Billing Form” widget that has the “WL Badge.” Drop it onto the Checkout page template.
Heading: You may modify the WooCommerce Checkout Billing Form Heading style as needed.
Label: You may alter the WooCommerce Checkout Billing Form Heading style as required.
Input Box: You can alter the Checkout Billing Form Heading style as necessary.
To make things more organized and user-friendly, the field settings have been moved to ShopLentor > Settings > Modules > Checkout Fields Manager.
Turn ON the Modify Billing Field widget from the Elements.
Test the Site #
Preview the WooCommerce Checkout Page template.
FAQs about editing WooCommerce billing information #
1. How can I edit WooCommerce billing details for my store? #
As a WooCommerce store owner, you have the ability to change the billing details associated with your store. To do this, simply download ShopLentor Plugin and enable the checkout billing form widget. Now you can customize your billing details according to your need.
2. I have more than one WooCommerce store. Do I need to update my billing details for each store? #
Yes, you’ll need to update your billing details for each WooCommerce store that you have.
3. Can I change my WooCommerce billing details if I’m using a payment gateway? #
Yes, you can change your WooCommerce billing details if you’re using a payment gateway. To do this, simply go to WooCommerce > Settings > Billing and enter the new information into the appropriate fields. Your changes will take effect immediately.
4. What WooCommerce billing information can I edit? #
The WooCommerce billing information fields that can be edited are:
- First Name
- Last
- Company
- Country
- Address 1
- Address 2
- City
- State/Province
- ZIP/Postcode
- Email Address
- Phone Number
5. I need to change my WooCommerce billing phone number. How do I do that? #
If you need to change your WooCommerce billing phone number, you can use the Checkout Billing Form Widget by ShopLentor. From there, you can update your phone number.
6. I’m having trouble updating my WooCommerce billing details. Who can I contact for help? #
If you’re having trouble updating your WooCommerce billing details, the ShopLentor support team would be happy to assist you. Simply contact them and they’ll help you get the problem sorted out.
Final Thoughts #
Updating your WooCommerce billing details is important because it helps to ensure that your payments are processed correctly. In order to sell products or services on WooCommerce, businesses need to provide accurate billing details.
Fortunately, there’s a plugin called ShopLentor that can help with this. ShopLentor is a WooCommerce plugin that allows you to easily update your WooCommerce billing details. It provides a simple interface for managing your billing information.
ShopLtor is a great way to keep your WooCommerce billing details up-to-date, and it can save you a lot of time and hassle.