Adding WooCommerce pages to your WordPress site is a great way to improve your eCommerce store. In this article, we will show you How to Add WooCommerce Pages in WordPress and how to configure them for your shop. We will also go over some tips on how to create effective WooCommerce pages that will help you increase sales and conversions. Let’s get started.
Table of Contents
Why Create Different Pages for Your WooCommerce Store
If you have a WooCommerce store, you might be wondering why you need to create different pages. After all, your products are already displayed on your shop page, so why bother with additional pages? The answer is that different pages can provide a more immersive shopping experience for your customers and help you to achieve your business goals.
For example, a separate page for your shipping policy makes it easy for customers to find the information they need without having to search through your entire website. Similarly, a dedicated contact page provides a simple way for customers to get in touch with you if they have any questions or concerns.
By creating different pages for your WooCommerce store, you can make it easier for customers to find what they’re looking for and encourage them to complete a purchase.
How to add WooCommerce pages in WordPress site
There are a few different ways you can create WooCommerce pages. The best way depends on your needs and preferences. You can use the WooCommerce Settings, shortcodes, or a page builder plugin like Elementor or ShopLentor.
Each method has its pros and cons. The WooCommerce Settings is the easiest way to add WooCommerce pages, while shortcodes are great if you’re looking to save time. Page builder plugins like ShopLentor offer more versatility and easy customization options.
Ultimately, the best way to add WooCommerce pages to your WordPress site is whichever method works best for you. Here, we’ll show you each method so that you can make an informed decision about which one to use.
Creating Pages from WooCommerce Settings
Creating WooCommerce pages on WordPress is a simple process that can be completed with just a few clicks from the dashboard.
First, go to WooCommerce and then Click on Status. Under the Tools tab, you will then see the option to Create Default WooCommerce pages.
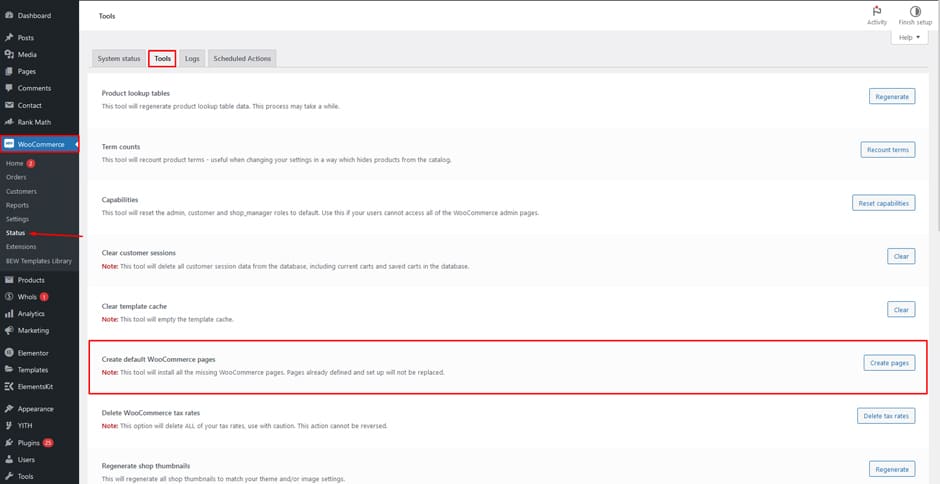
To add these necessary pages to your store, simply click on Create Pages. For example, let’s say you have an online store with Shop, Cart, and Checkout pages but are missing a My Account page. When you select Create Pages, only the My Account page will populate. The rest of the desired pages will remain blank.
And there you have it! You now know how to add all necessary WooCommerce pages to your store.
NOTE: You will only create the pages that are missing from your shop; you will not change the default pages that are already there.
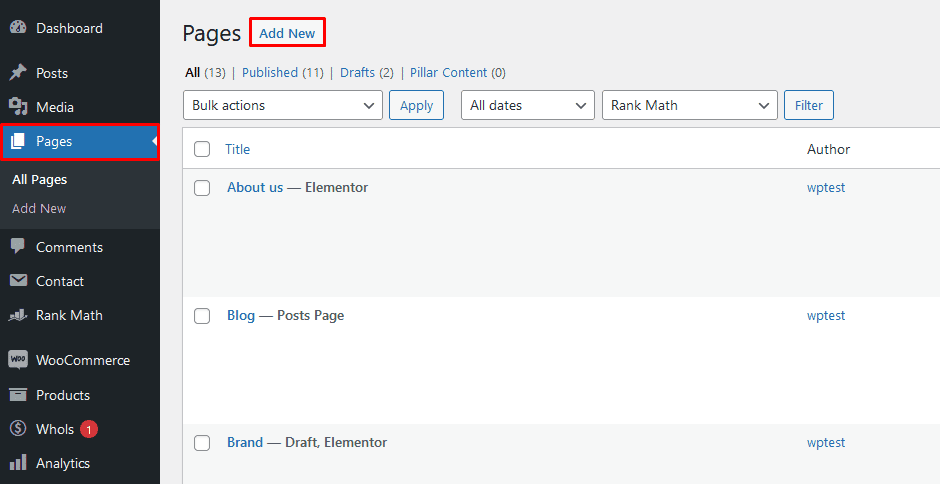
To create a Shop page, go to Pages and then select Add New. Enter the title Shop and then hit Publish button. To make this the designated WooCommerce shop page, select the Products tab under WooCommerce Settings on your WordPress dashboard.
Choose the newly created Shop page from the dropdown menu and then click save changes by selecting the Shop page option.
After you complete these steps, confirm everything is set up correctly by taking a preview of your new shop page- all products included in your online store should now appear here.
Creating Pages using Shortcodes
Although it is easy to create WooCommerce pages from the built-in settings, there exists another way to program store pages: shortcodes. Shortcodes are code snippets that let you display text or add features without having to write lengthy scripts.
To use them, go to Pages > Add New,
enter the page title, and insert the correct shortcode. For example:
1. Cart Page
To create a new cart page, follow these steps:
- Create a page called “Cart.”
- Add the shortcode “[woocommerce_cart]” to the page and publish it.

- Navigate to WooCommerce > Settings
- and select Advanced from the drop-down menu.
- Under Cart Page, choose the Cart page you just created and save your changes.
2. Checkout Page
To generate the WooCommerce standard checkout page, create a new page and title it “Checkout.”
After that, add the given shortcode “[woocommerce_checkout]” to the page and publish.

Navigate back to WooCommerce > Settings,
this time selecting the Advanced tab. Next, find the checkout page you just generated under Checkout Page Options and save your changes. Although the default checkout page is functional, if you want to increase conversions, you should personalize it.
3. My Account Page
To create a WooCommerce My Account page, simply construct a new page, name it “My Account,†and insert the shortcode “[woocommerce_my_account]” into it.

Finally, to finish and save your changes, navigate to WooCommerce > Settings
and select the newly created My Account page as the option for the My Account page from the drop-down menu.
So, that is how to use shortcodes to generate WooCommerce pages.
Creating Pages with ShopLentor WooCommerce Page Builder Plugin
ShopLentor WooCommerce is a page builder plugin created specifically for building WooCommerce custom shop pages. It’s designed to be easy to use and offers a variety of features that make it a powerful tool for creating custom shop pages.
ShopLentor WooCommerce Page Builder Plugin is compatible with both Elementor and Gutenberg editors. Elementor is a drag-and-drop page builder that enables you to create custom pages without having to code. It is an essential tool for any store owner who wants to create unique and customized pages.
Here we will show you how to Create WooCommerce pages with these editors.
How to Create WooCommerce pages with ShopLentor and Elementor
If you’re looking to create custom WooCommerce pages with Elementor, then ShopLentor is the perfect solution for you. With our easy-to-use interface, editing your shop pages has never been easier. Let us show you how to edit a WooCommerce shop page with Elementor.
Enter the Template Builder
To begin, go to Template Builder.
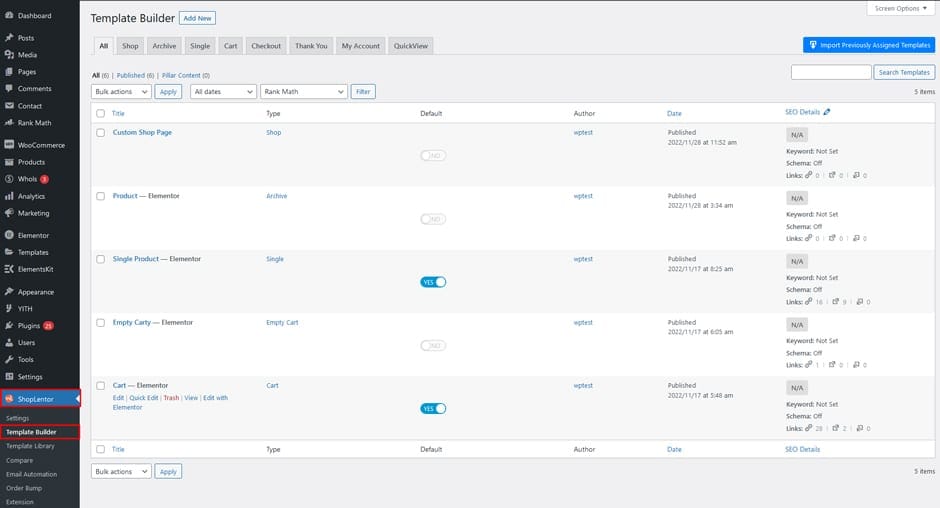
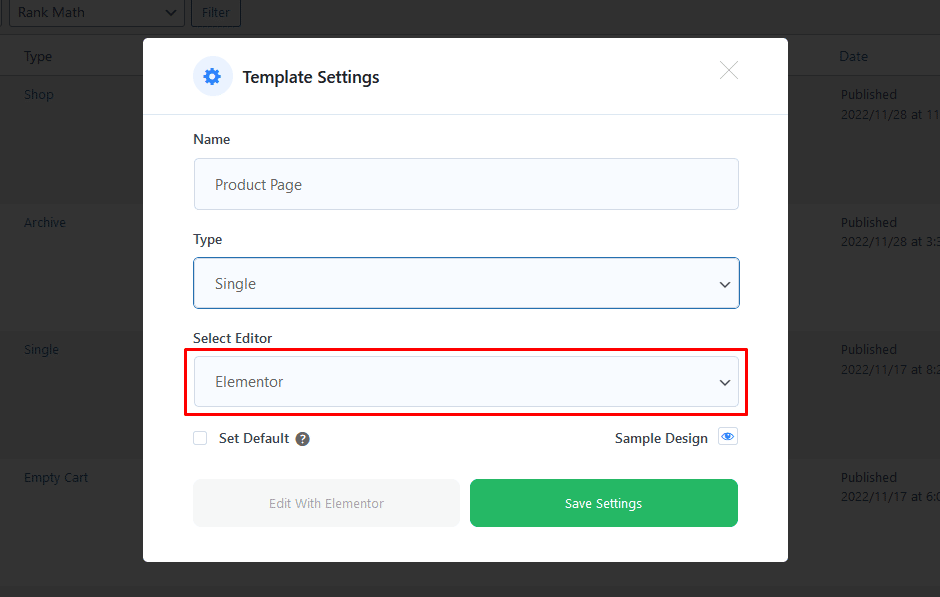
To set a page template, go to Template Builder and select Elementor as the editor
From the Template Settings menu, you need to set up your particular WooCommerce page template, for example, it could be a shop page, checkout page, my account page, or anything. Choose Elementor as the editor, and you will find plenty of pre-made Elementor page templates. You can use any of them or create a custom template by further editing with Elementor.
If you want the Page Template you are editing to be the default shop page for your WooCommerce store, tick the Set Default checkbox.
Edit using Elementor
Once you have installed and activated the Elementor plugin, you can start editing your store to create a unique look using its drag-and-drop interface and various widgets.
With ShopLentor, you can use widgets to enhance your Elementor WooCommerce pages with product filters, search boxes, and more.
Preview the page to see how it looks
Now that you have completed the WooCommerce page test it to make sure everything is in working order.
How to Create WooCommerce pages with ShopLentor and Gutenberg
With ShopLentor’s Gutenberg Block, you can quickly and easily customize the blocks on your customer’s WooCommerce shop pages to give them a tailored shopping experience. You can add different types of content and change its colors or styles with just a few clicks.
Navigate to the Template Builder
Start by going to the ShopLentor menu and selecting Template Builder.
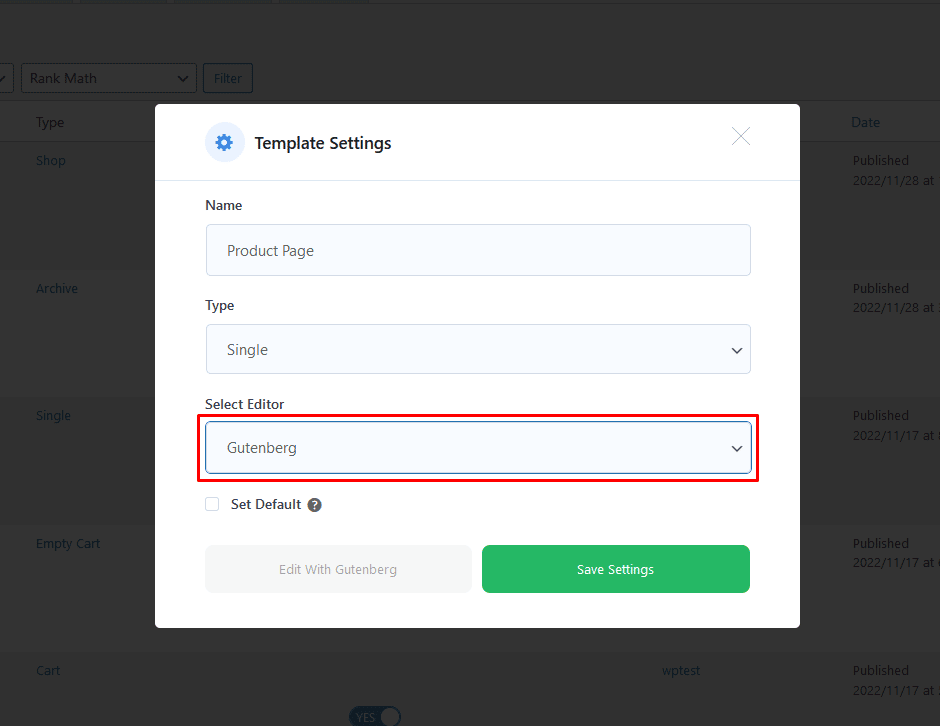
To set a page template, go to Template Settings and select Gutenberg as the editor
To create a page template, go to “Template Settings” and select “Gutenberg” as your desired Editor.
With Gutenberg Blocks, edit the template
ShopLentor provides you with 35+ WooCommerce Gutenberg blocks so that you can easily create custom layouts for your WooCommerce pages. All you need to do is drag and drop the blocks into the editor.
Preview the Page
Test your page after you finish creating it to ensure everything works according to plan.
Tips for creating effective WooCommerce pages
If you’re running a WooCommerce store, you want to make sure that your pages are effective in order to convert visitors into customers. Here are some tips for creating effective WooCommerce pages:
- Make sure your pages are well-designed and user-friendly. This means having a clean and organized layout, easy-to-find buttons and links, and clear and concise text.
- Use high-quality images that accurately represent your products.
- Offer discounts and coupon codes. Including special offers on your pages can help increase conversion rates. Just be sure not to overdo it, as too many discounts can devalue your products.
- Use relevant and targeted keywords throughout your pages, including in the titles, product descriptions, and meta tags.
- Optimize your pages for search engines so that potential customers can easily find your store when they search for relevant keywords.
- Include customer testimonials. Customer testimonials can be powerful in convincing visitors to make a purchase. Make sure to include them prominently on your pages.
By following these tips, you can create WooCommerce pages that are both effective and appealing to potential customers.
ShopLentor- WooCommerce Builder for Elementor & Gutenberg
A versatile page builder to build modern and excellent online stores with more than 100k+ Active Installations.
Frequently Asked Questions
Q1: How do I add WooCommerce pages to WordPress?
A: To add WooCommerce pages to your WordPress site, you will need to install and activate the WooCommerce plugin. Once activated, it will create several new pages that are necessary for running an online store. These include a Shop page, Cart page, Checkout page, My Account page, and more. You can add these pages to your WordPress site either manually or through the WooCommerce setup wizard.
Q2: What happens if I don’t add the pages?
A: If you don’t add the necessary WooCommerce pages to your WordPress site, then it won’t be able to serve its purpose. Without the Shop, Cart, and Checkout pages, customers won’t be able to add products to their cart or make purchases from your store. The My Account page is also crucial for allowing customers to manage their account details like shipping addresses and payment methods.
Q3: Are there any other pages I should add?
A: There are a few other pages that you may want to add to your WordPress site. These include an About Us page, Contact page, and Privacy Policy page. These pages provide customers with more information about your business and let them know how you handle their personal data. They also help build trust and encourage customers to make a purchase from your store.
Q4: Are all WooCommerce pages necessary?
A: It depends on the type of WooCommerce store you’re running. For example, if you don’t plan to add products for sale, then there’s no need to add a Products page. However, it’s important to add pages like Cart, Checkout, and My Account so customers can access them when they initiate a purchase from your store.
Q5: Are there any tips for adding WooCommerce pages to my WordPress site?
A: Yes. Before adding a page, think about how it will fit into your overall store layout and customer journey. Make sure that the content of the page is clear and concise, add relevant images or videos if needed, and add shortcodes or widgets as necessary. Additionally, add the page to your main menu (if desired) so that customers can easily access it. Finally, make sure that you add any other pages required by WooCommerce to ensure your store functions correctly.
Q6: How can I add specific features to WooCommerce pages?
A: You can add specific features to WooCommerce pages by using shortcodes or widgets. For example, if you want to add a list of products on your Products page, add the “Products” widget to the page. Similarly, if you want to add a customer login form on your My Account page, add the “[woocommerce_customer_login]” shortcode. This way, customers can easily access your store’s features. You can take the help of a plugin like ShopLentor regarding this.
Q7: Can I add WooCommerce pages without using WordPress?
A: No. WordPress and WooCommerce are designed to be used together. If you want to add WooCommerce pages, you’ll need to use WordPress. Additionally, the best way to add WooCommerce pages is by using the WooCommerce plugin for WordPress. This will ensure that all of your store’s features are integrated and working correctly.
Final thoughts
Depending on your preference, you can add WooCommerce pages in different ways. The most common way to do this is by using a plugin, of which there are many available options. If you want an easy and convenient solution, ShopLentor is the best option as it helps you efficiently add WooCommerce pages to your WordPress site. By installing this plugin, customers will be able to enjoy the product, category, checkout, and cart pages that create a fun shopping experience overall.
ShopLentor makes it easy for anyone to add WooCommerce pages to their WordPress site with just a few clicks. The drag-and-drop interface is simple and straightforward, so you can get started selling products or services online quickly and easily. With ShopLentor, you can create the perfect eCommerce experience for your customers.