Adding attributes to products in WooCommerce is a great way to give your customers more options when buying products from your store. It also allows you to provide additional information about the item, such as its size or color. In this article, we’ll show you how to add attributes and variations in WooCommerce so that your customers have all the information they need when making their purchases. So let’s get started!
Table of Contents
Definition of Attributes and Variations in WooCommerce
If you want to maximize the potential of your eCommerce store, it’s important that you understand how to add attributes to products in WooCommerce. Attributes are a fundamental element for organizing and managing your online shop effectively – once you understand what are WooCommerce product attributes and how to manage WooCommerce product attributes, everything else will fall into place.
Characteristics that are connected with a product, such as color, size, or material, are referred to as attributes. Variations come into play when there is more than one possible choice for every product attribute. Take t-shirt sales for product attributes examples; the size attribute can have variations of small, medium, and large sizes available.
These elements let shoppers refine their searches and find exactly what they need. WooCommerce makes it easy to create product attributes and variations. With just a few clicks, shoppers can narrow down their search results by choosing from options like color or size in order to make a more informed decision.
Benefits of Adding Attributes to Products
Businesses can increase customer engagement and encourage more purchases by customizing product attributes. By tailoring products to the needs of customers, businesses can create a dynamic shopping experience that turns browsers into buyers.
There are numerous benefits of adding attributes to products, such as:
1. Improves the Customer Shopping Experience:
Adding product attributes can make customers’ shopping experiences easier and more enjoyable. Customers can quickly and easily find the products they are looking for, based on custom product attributes such as size, color, material, etc.
2. Allows for Product Segmentation:
Custom product attributes allow businesses to segment their products into smaller categories. This makes it easier for customers to find the right product and helps businesses increase their sales.
3. Highlight Key features:
By adding products attributes, businesses can highlight specific features that make them stand out from other similar products in the market. This increases visibility and encourages customers to purchase those items, resulting in higher sales.
4. Decreases Maintenance Time:
Businesses can reduce the amount of maintenance time required to keep track of their products. Products attributes save both time and money for businesses.
5. Provides More Information:
With custom products attributes, businesses can provide more information about a product to their potential customers. This helps customers make decisions about purchasing that product.
6. Helps to Optimize Inventory:
Products attributes can be used to optimize inventory levels. This allows businesses to ensure that they have the right products in stock, while also monitoring which items are selling well and which items may need a boost in sales.
Step-by-Step Guide how to Add Attributes to Products in WooCommerce
Adding attributes to products in WooCommerce can seem like a daunting task, but with the right step-by-step guide, it can be an easy and efficient process.
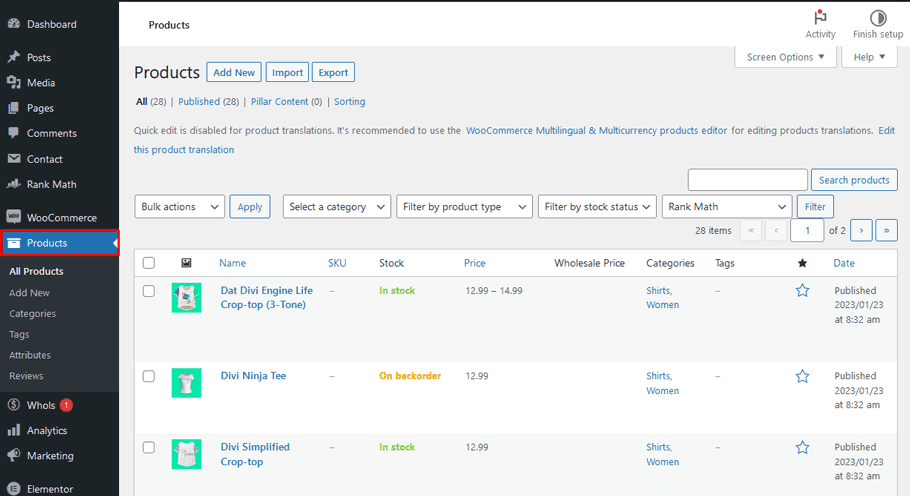
Log into Your WordPress Dashboard, then Access the Products Section of WooCommerce
To get started, simply log into your WordPress Dashboard and navigate to the Products section of WooCommerce.

Edit or Create a Product and scroll down to the Product Data Section
Now create or edit a product, then scroll down below and explore the Product Data Section.

Head Towards Attributes Section
If you’ve just started running your eCommerce store, no attributes have been set by default; However, to get started running, you must create it by yourself.
To comply with the regulations, you must fill in your name and a slug (optional) – a URL-friendly version of the attribute label. Additionally, this slug will determine how attributes can be searched for. Furthermore, you have to pick from various types such as:
- Enable Archives: If activated, you can see a page with all products that hold the attribute.
- Default sort order: You have the option to order by name(numeric), term ID, or customize your list and drop products into whatever preferred order you like!
Now to create a new attribute, click the “Add Attribute” button.

Create Product Attributes
Now that you have created the attribute, it is time to create several different styles for each one. As an example, we crafted an attribute called ‘Styles’; now let’s enter all of our terms into the “Terms” column in the table. To do this, simply click on “Configure Terms” and add your custom attributes quickly and easily.
After you have selected the attribute, your screen will display a table prompting you to add its corresponding styles.
When selecting product attributes, you can add as many features as desired. After reaching your desired number of features, be sure to click “Add New Materials” to save them.
If you want to include more, go back to the “Attributes” tab and choose the relevant “Configure terms” for your selected attribute.
Add an Attribute
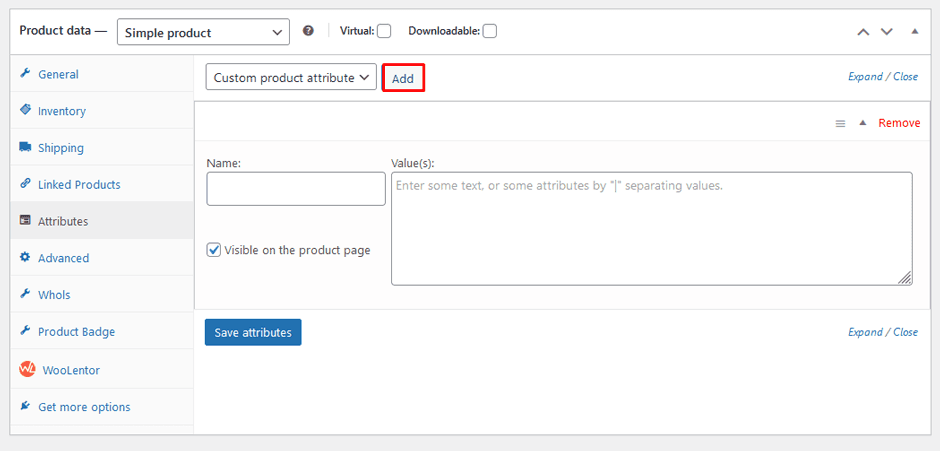
It’s time to showcase the attributes on your product table. Head over to Products > Add Product where you can choose between creating a new product or editing an existing one. Then, navigate down to the ‘Product Data’ section and add all of your desired attributes.
Navigate to the “Attribute” menu for further instructions.
Below, you will find a dropdown menu that reads “Custom product attribute”. To select your newly added attribute, simply click the ‘Add’ button next to it and you are all set.
By doing this, you’ll add the attribute to your product. As you create a new Attribute, ‘Name‘ will refer to the name of your attribute while ‘Value(s)‘ is intended for terms associated with that attribute. Be sure to fill out both fields in accordance with the instructions provided. Additionally, when adding attributes on the left-hand side of this page, ensure “Visible on the product page” is checked. Otherwise, customers won’t be able to view it.
Save Your Changes and Publish the Product
Once you’re done making edits, make sure to save your changes and publish the product.
Frequently Asked Questions
Q: What is a custom product attribute?
A: A custom product attribute is an additional data field that stores information about products. It can be used to store anything from size, color and material type for apparel products, to different levels of features for software or services. By setting up custom attributes in WooCommerce, you can make it easier for customers to find the exact product they’re looking for.
Q: How do I add custom product attributes in WooCommerce?
A: In your WordPress Dashboard, go to Products > Attributes. From there you’ll be able to create custom attributes using the “Add Attribute” button. Enter a name and custom values that you’d like associated with the custom product attribute. You can also choose whether to make the custom attribute visible or not on your store’s front end.
Q: Can I add custom attributes to individual products?
A: Yes, you can! Go to the product edit page and click on the “Attributes” tab. Here you’ll be able to select custom attributes that have already been set up, or add new custom attributes. Once you’ve selected the custom attribute and its associated values, click “Add”.
Q: How do I make custom product attributes searchable in WooCommerce?
A: To make custom product attributes searchable, you’ll need to tick the “Visible on the product page” checkbox when setting up custom attributes. This will make custom attributes display on your store’s front end, and enable customers to filter their search results by custom attributes.
Q: Can I add custom product attribute variations?
A: Yes, custom product attribute variations can be added to WooCommerce. To add custom product attribute variations, go to Products > Attributes and click on the custom attribute you’d like to modify. Then, select “Used for variations” and click “Save Attribute”. You’ll then be able to add custom variation values under the Variations tab when editing individual products.
Conclusion
Now that you know how to add attributes to products in WooCommerce, you can begin setting up your product pages. Remember to take your time when creating attributes and terms, as this will ensure that your customers have a smooth and easy experience when shopping on your site.