If you’re an eCommerce business owner, you know how important it is to be able to quickly and easily filter WooCommerce products by custom attributes. Filtering is a key way to optimize customer experience on your site, helping them find exactly what they are looking for without wasting time.
In this step-by-step guide, we’ll show you how to filter WooCommerce Products by custom attribute and provide everything you need to get started.
- What are Custom Attributes
- Benefits of filtering products by custom attributes
- Step-by-step guide to filtering WooCommerce products by custom attribute
- Frequently Asked Questions
- Q. How do I create custom attributes in WooCommerce?
- Q. How do I enable filtering by custom attributes on the front end?
- Q. Can I use multiple custom attribute filters simultaneously?
- Q. Are there any plugins or extensions that can help with filtering by custom attributes?
- Q. Can I customize the appearance and styling of the attribute filters?
- Final Thoughts
What are Custom Attributes #
Custom attributes are product data points that can be used to filter and customize products in an online store. For example, a fashion store might use custom attributes such as size, material, color, pattern, etc. to create specific product filters or let customers search for products with specific characteristics.
Benefits of filtering products by custom attributes #
Filtering products by custom attributes offers several benefits for both the customers and the e-commerce store. Here are some of the advantages:
1. Improved Product Discovery: #
Custom attribute filters enable customers to easily narrow down their product search based on specific criteria. By selecting desired attributes, such as size, color, material, or any other relevant attribute, customers can quickly find products that match their preferences. This enhances product discovery and saves time, leading to a more efficient shopping experience.
2. Enhanced User Experience: #
Custom attribute filters provide a user-friendly interface for navigating through product options. Customers can refine their search results by selecting multiple attributes simultaneously, allowing them to find products that meet their exact requirements. This improves the user experience by eliminating the need to manually browse through numerous product pages.
3. Personalized Product Recommendations: #
Filtering products by custom attributes enables personalized product recommendations. By tracking customer selections and preferences, the e-commerce store can analyze patterns and suggest related or similar products that align with the selected attributes. This helps customers discover relevant products they might not have found otherwise, increasing the chances of making additional purchases.
4. Targeted Marketing and Promotions: #
Custom attribute filters provide valuable insights into customer preferences and behaviors. E-commerce businesses can leverage this information to create targeted marketing campaigns and promotions. By understanding which attributes are most popular or frequently filtered, businesses can tailor their messaging, offers, and advertisements to better resonate with their target audience.
5. Streamlined Inventory Management: #
Filtering products by custom attributes can also benefit e-commerce store owners by streamlining inventory management. By categorizing products based on attributes, such as size, color, or material, it becomes easier to track inventory levels for each variation. This allows for more efficient inventory management, ensuring that the right products are available to meet customer demand.
By leveraging custom attribute filters, e-commerce stores can enhance the overall shopping experience, improve product discovery, increase conversions, and gain valuable insights into customer preferences. Implementing effective filtering options can help differentiate your store, drive customer satisfaction, and ultimately contribute to business growth.
Step-by-step guide to filtering WooCommerce products by custom attribute #
As an online store using WooCommerce, you may find yourself needing to filter products by custom attributes but don’t know where to start. With our simple step-by-step guide, you’ll be able to know how to filter WooCommerce products by custom attributes whatever you need.
By following these three methods, you’ll be able to quickly and easily sort through your inventory, making it easier for your customers to find the products they want.
Adding a New Attribute #
To add a new attribute in WordPress, follow these steps without using third-party plugins or tools. Log in to your WordPress, create attributes, and assign them to the product under Products > Attributes. You can find all the available options there.
If you don’t already have an attribute, you can make one by using the section on the left-hand side of the page.
Method-1: Default Method in WooCommerce #
Configure and Display Product Filter Widget #
To begin, navigate to the WP Admin Dashboard and select Appearance > Widgets.

Within the widget section, locate the WooCommerce sidebar widget area. You have to add the “Filter Product by Attribute” widget to this area. Add the widget to the widget area located on the sidebar.
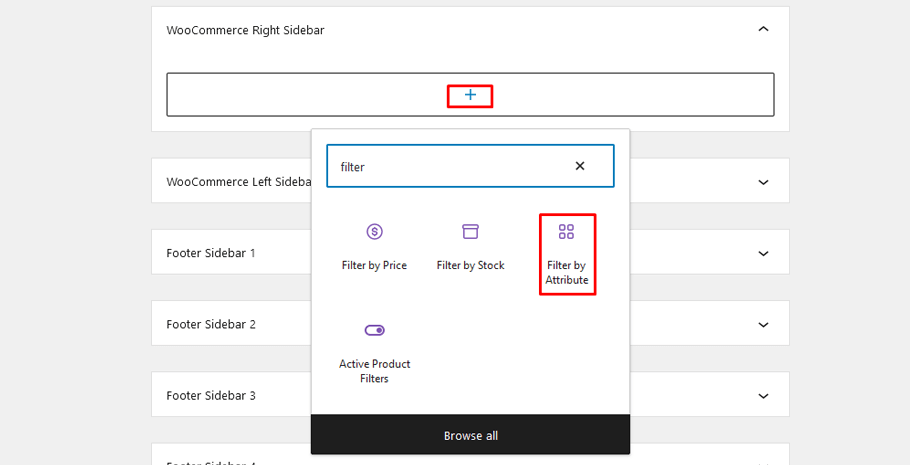
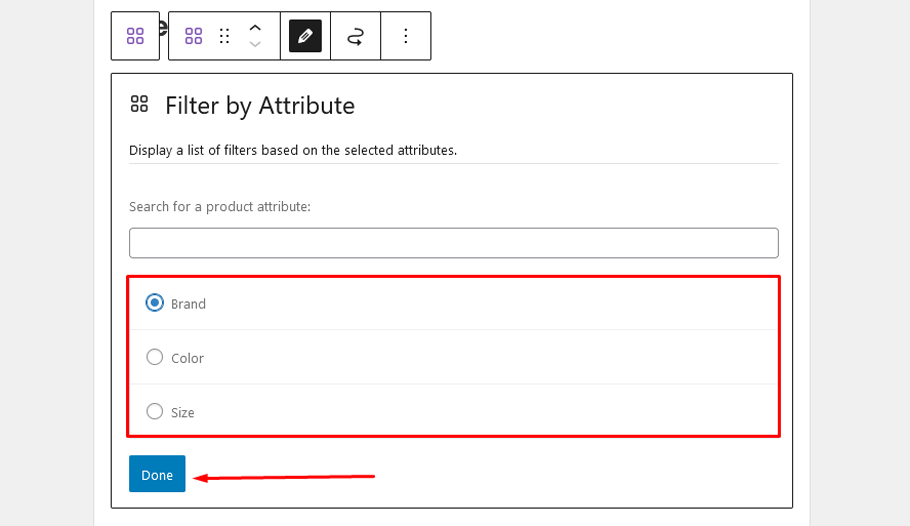
To configure the widget, you just need to choose a product attribute from the ones available in your WooCommerce store. The widget will display all available attributes, which in our case are color and size.
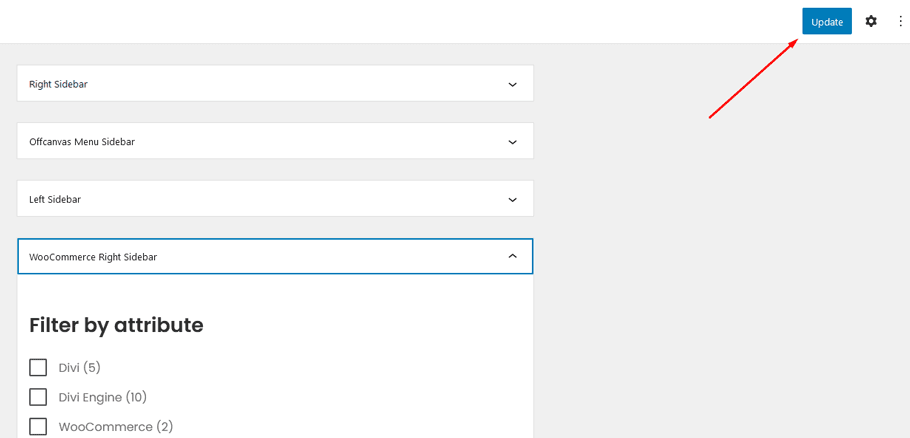
After making changes to the widget, you can view the block configuration on the right side of the page and then update the settings.
To find the filters on the front end of your website, go to the store/shop page. The filters that are visible will depend on how you have customized them.
Note that if you have added a new attribute to the store and want to add it to the widget area, you will need to go back to the widget and select the new attribute to update it. After reconfiguring the widget, the new filter will appear on the front end.
When you or your customer chooses attributes, the shop result will change based on the selection.
ShopLentor- WooCommerce Builder for Elementor & Gutenberg #
A versatile page builder to build modern and excellent online stores with more than 100k+ Active Installations.
Method-2: Using ShopLentor WooCommerce Plugin #
ShopLentor is a unique WooCommerce builder plugin that allows you to customize your WooCommerce store effortlessly and effectively. It has numerous modules including a special Product Filter module.
Here are some reasons why you should consider using ShopLentor to filter WooCommerce products by custom attribute:
More precise filtering:
With ShopLentor, you can filter WooCommerce products more precisely and accurately by creating custom attributes based on specific product characteristics. This is especially useful for stores with a vast product catalog where customers need to find specific products quickly.
Customizable filtering options:
ShopLentor allows you to customize your product filters to match your brand’s look and feel.
Better user engagement:
By providing customers with more customized and precise filtering options, you can enhance the user experience and keep them engaged for longer periods. This leads to increased customer satisfaction and can drive higher sales conversions.
Flexibility and ease of use:
ShopLentor’s user-friendly interface makes it easy to create and manage custom product attributes and filters, even for non-technical users. This saves time and streamlines the process of maintaining and updating your store’s product catalog.
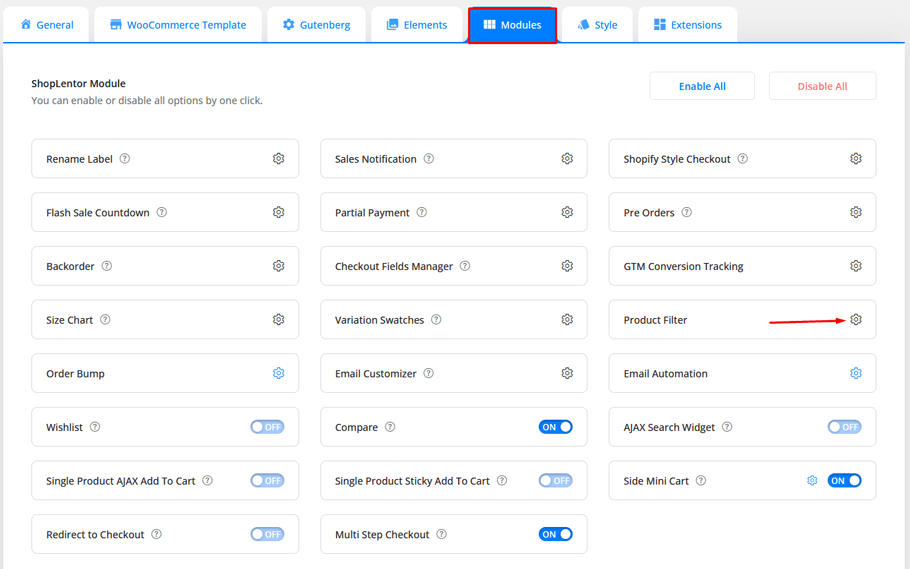
In order to filter WooCommerce products by custom attributes, firstly, download and install the plugin. Then navigate to WordPress Dashboard > ShopLentor > Settings
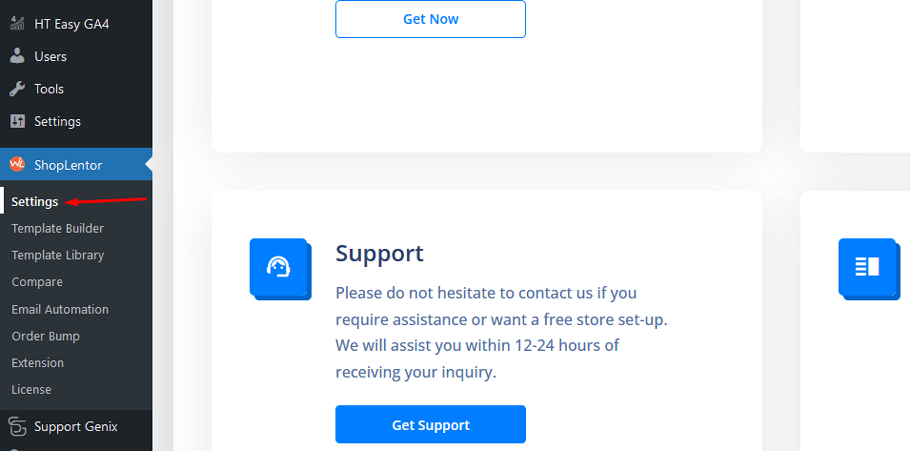
Then go to “Modules”. From the list of Modules, click the setting of Product Filter Module.
After that, you need to enable the Product Filter module and click the ‘Save Changes’ button.
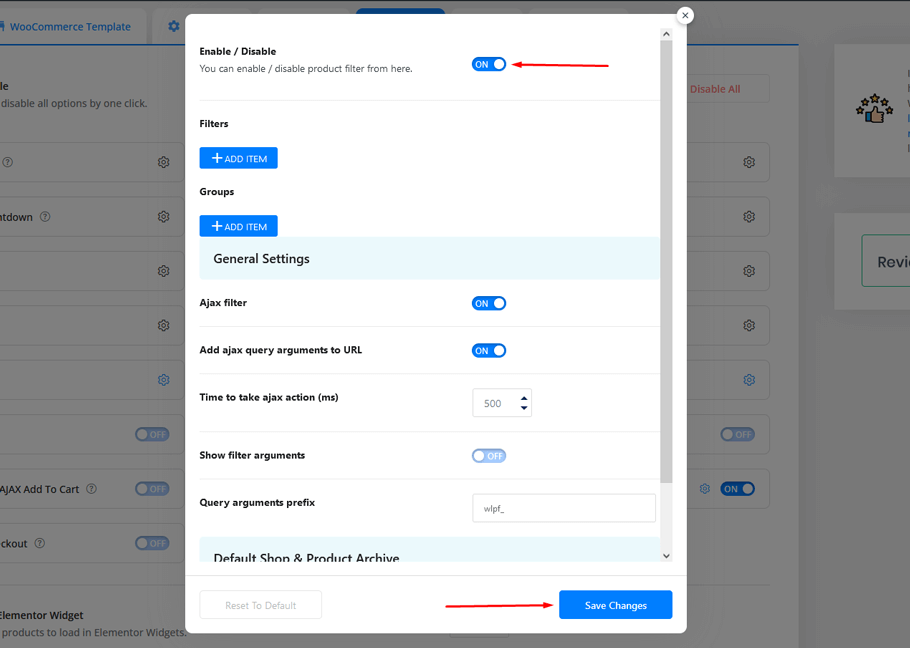
The following are the General Settings of the Product Filter module:
Ajax filter: Enable or disable the Ajax filter from this page. With Ajax filter enabled, customers can filter products without the need for page reloading, resulting in faster and more dynamic filtering.
Add Ajax query arguements to URL: From here, you can enable or disable the functionality of Ajax query parameters to URL.With this enabled, you can modify the URL when the Ajax filter is applied, resulting in search results that display a modified URL. This feature allows for a more seamless and intuitive user experience, enhancing the navigation and usability of your website.
Time to take Ajax action (ms): Change the time that Ajax action takes as required.
Query arguments prefix: With product filter feature, you can customize the Query Arguments Prefix displayed on the URL when a search query is entered. This means you have the option to set a unique prefix for any queries made, allowing for better organization and understanding of the search results.
Adding a Product Filter Item #
From Product Filter settings, click on the “ADD ITEM” button.
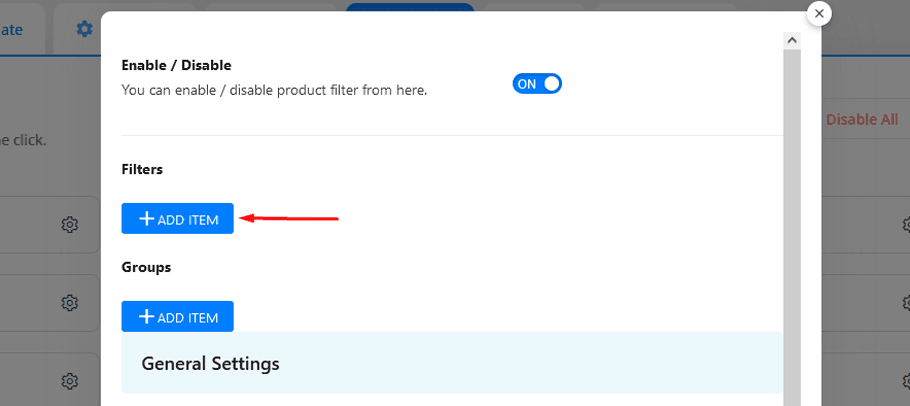
Then you’ll see that the required fields for the product filter will appear.
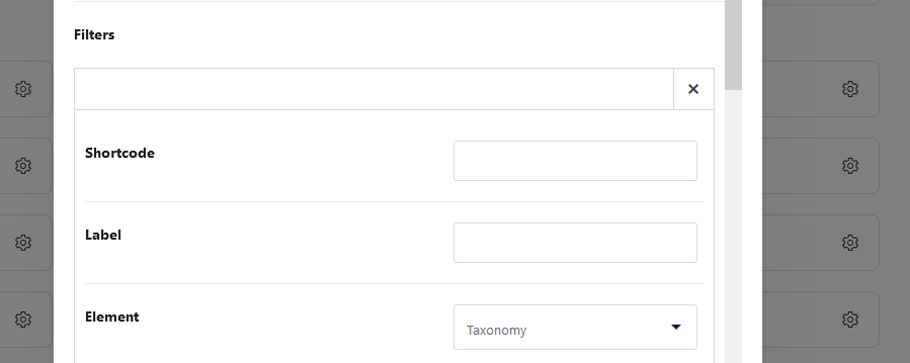
Label: Enter the name of your product filter item label.
Element: Taxonomy, Attribute, Author, Price Range, Search Input, and Sorting are examples of product filter elements.
If you want to add a custom attribute filter, choose “Attribute” as your preferred element.
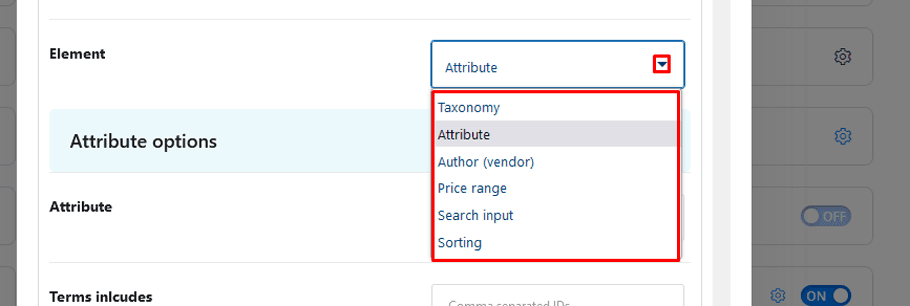
There are also several Attribute options such as Attribute type, terms inclusions/exclusions, order, field type, collapsibility, and so on.
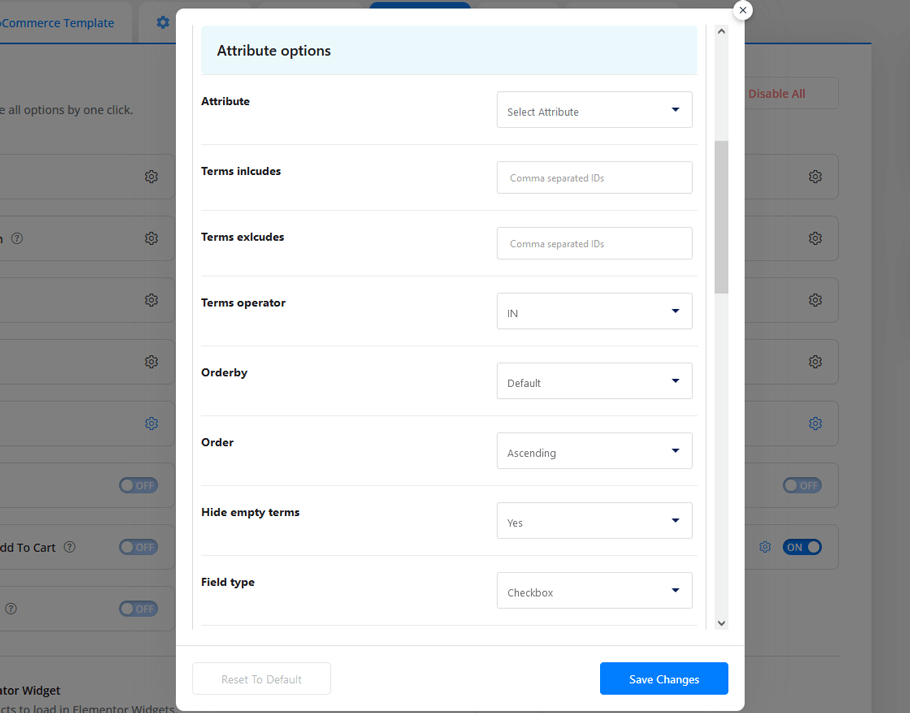
- Terms Include: This setting allows you to configure which attribute terms should remain visible when filters are applied on your website. All you have to do is mention the term IDs that you want to include. This feature ensures that customers can still see and select relevant filter options, even after narrowing down their search criteria.
- Terms Exclude: With this setting, you can configure which attribute terms will be excluded when filters are applied. All you have to do is mention the term IDs that you do not want to display.
- Terms Operator: With the “Terms Operator” setting, you have the ability to create conditional rules that determine when specific products should be displayed based on the chosen operator – IN, NOT IN, or AND. This powerful functionality allows you to fine-tune the product visibility on your website.
- Order by: From this setting, you can select the specific order type by which the products are to be displayed. The options include default, Term ID, Term name, Term slug, Term Order, Term Item Count, etc. By selecting the appropriate sorting option, you can tailor the product listing to align with your specific requirements and improve the overall browsing experience for your customers.
- Order: From here, you can choose whether to display the products in ascending or descending order.
- Field Type: From here, you can select the product filter field type. There are several options, such as radio, button, and dropdown list.
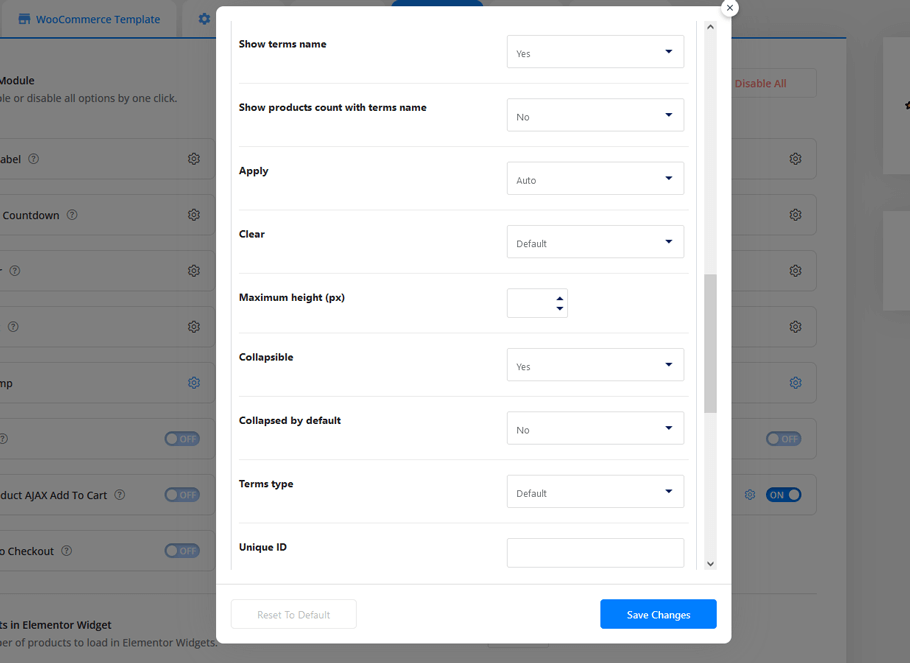
- Hide Empty Terms: Enabling the “hide empty terms” setting allows you to display only those attribute terms in the filters that have products available while hiding those that don’t. By doing so, you can provide a streamlined and efficient browsing experience for your customers, only displaying relevant and actionable filter options.
- Show terms name: You can choose whether or not to show the term names from this setting.
- Show products count with terms name: This option enables you to show or hide the product count for particular terms.
- Apply: With this option, you can configure whether the filters can be applied automatically or on button click. If you select the button click, you can set the text for the button.
- Clear: From here, you can configure whether the filters can be cleared by default or on button click. If you select ‘button click,’ you can set the text for the particular button.
- Maximum height (px): This option allows you to set the maximum height of the filter in pixels.
- Collapsible: From here, you can set whether the filter section will be collapsible or not.
- Collapsed by Default: From here, you can choose whether to keep the filter sections collapsed by default or not.
Once you configure all attribute settings, click the “Save Changes” button.
After that, you will get a Shortcode above the filter item panel. Copy the Shortcode to be used for your Shop page to filter the products by particular attributes.
Adding Shortcode Using Elementor Widgets #
To add a shortcode using the Elementor widget in ShopLentor, follow these steps:
Go to the ShopLentor plugin and navigate to Template Builder > Shop Page Elementor template.
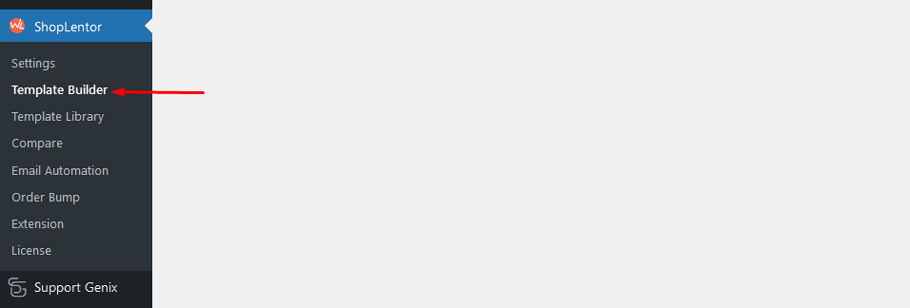
Edit the template using Elementor.
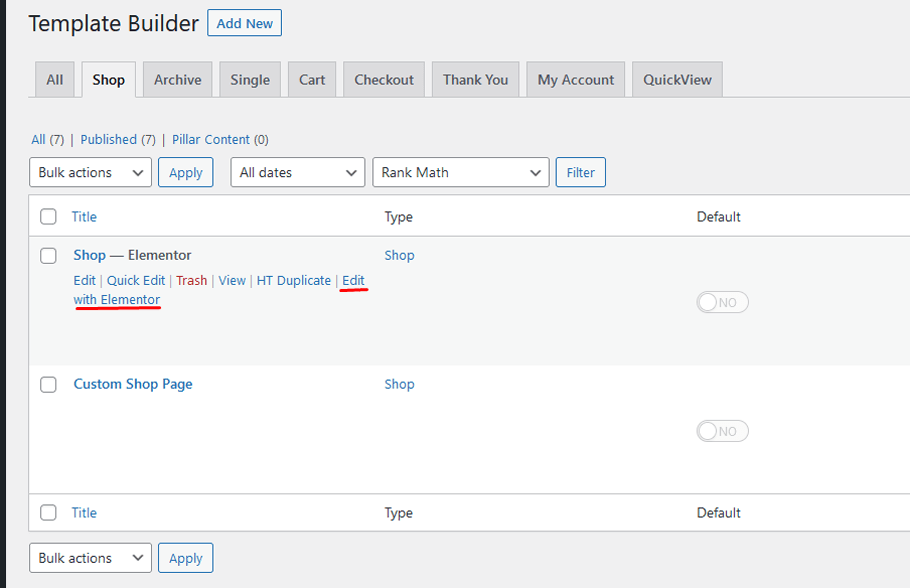
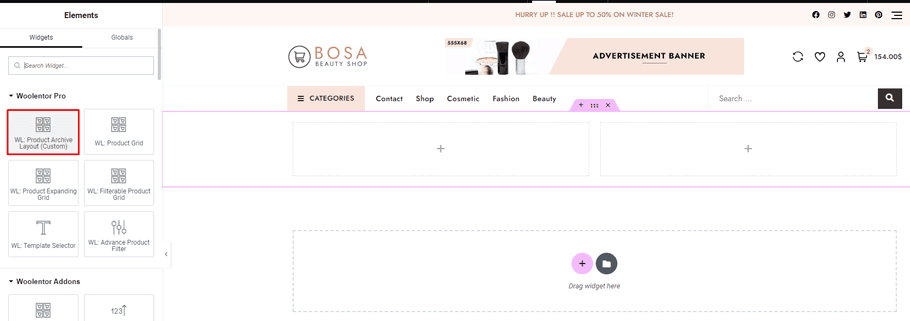
Within the Elementor editor, locate the section with at least two columns.
In one of the columns, drag and drop the “Product Archive Layout (Default)” or “Product Archive Layout (Custom)” widget.
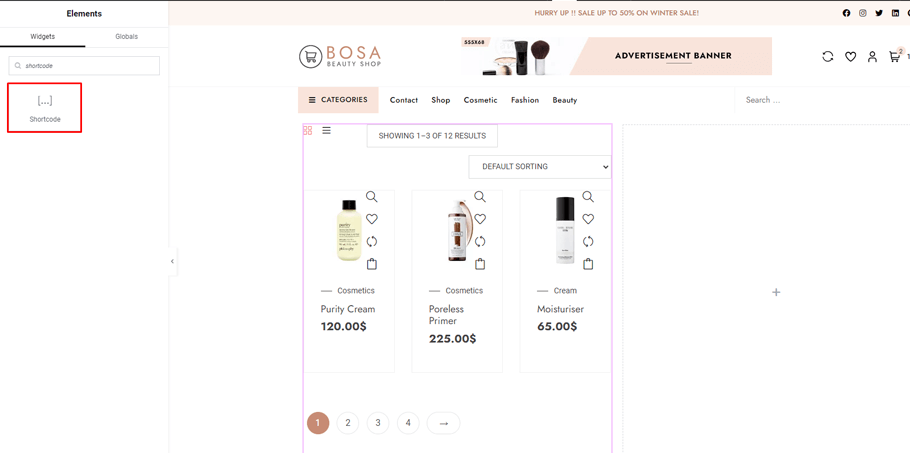
In the other column, add the “Shortcode” widget and paste the previously copied shortcode into it.
Customize the settings and appearance of the widgets as desired.
Once you have finished editing, click the “Update” button in the Elementor panel to save your changes.
By following these steps, you will successfully add the shortcode to your Shop Page template. This allows specific attributes of your choice to be displayed on the Shop Page, enabling customers to filter products based on those attributes for a more personalized shopping experience.
Using the “WL: Product Filter” widget #
Instead of using the Shortcode, you can also use the special widget for product filter named ““WL: Product Filter” widget.
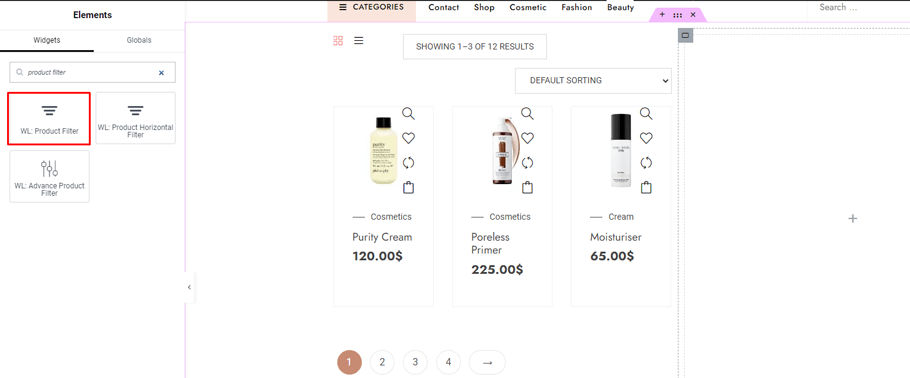
To use it, make sure that you have chosen a layout that includes at least two columns in Elementor.
Drag and drop the “WL: Product Filter” widget into one of the columns within the section and “Product Archive Layout (Default)” or “Product Archive Layout (Custom)” on the other.
Use the “Filter” panel to incorporate different product filters, enabling your customers to effortlessly locate the specific products they desire.
You can add a title text to the filter in the “Additional Options” panel.
If you wish to display icons before the list items, you can choose an icon from this menu.
The “Style” tab gives you complete control over all of the styles for this widget’s elements.
If you want to add filtering options horizontally, there’s another special widget named “WL: Product Horizontal Filter”. By using this widget to add a horizontal filter is similar to the previous process. Learn more about using this widget from here.
Using ShopLentor Gutengerg Blocks #
ShopLentor also allows you to customize the Shop Pages using a range of Gutenberg blocks.
You can add a user-friendly filter option by adding the “Filter by Attribute” block to an existing Shop Page template using Gutenberg.
To get started, go to ShopLentor > Template Builder. Then, switch to the Shop Page tab, where you can see the existing Shop Page templates. If there’s no Shop Page template available already, you can create a new Shop Page template from scratch.
To create a template a template from scratch, go to Template Builder > Add New. Then a popup box will appear where you have to set the template name, page type, Select editor (which is Gutenberg in this regard). Tick the “Set Default” checkbox”. Then start editing the template with your preferred Gutenberg blocks.
Using the Filter by Attribute Block #
To optimize your Shop Page template and enable product filtering based on preset attributes such as color or size, you can easily accomplish this by incorporating two Gutenberg blocks: WL: Product Archive Layout (Default) and Filter by Attribute. Follow these steps to set up the blocks and provide your users with efficient product filtering options:
- Access the Shop Page template
- Edit the template and navigate to the section where you want to display the products.
- Add the WL: Product Archive Layout (Default) Gutenberg block to one of the columns within the section. This block will showcase your products in a visually appealing and organized layout.
- In the other column of the same section, add the Filter by Attribute Gutenberg block. This block allows users to filter products based on attributes like color or size.
- Customize the attributes and filters within the Filter by Attribute block to align with your specific product attributes and customer preferences.
- Save and publish the updated Shop Page template.
Using the Gutenberg Shortcode block #
To seamlessly integrate the generated shortcode into your Shop Page using the ShopLentor Product Filter Module, you can leverage the Gutenberg shortcode block. Follow these simple steps to activate the product filter by custom attribute functionality:
- Access the Shop Page in your WordPress dashboard.
- Add a Gutenberg shortcode block to the desired section of the page.
- Paste the previously copied shortcode from the Product Filter Module into the Gutenberg block.
- Save the changes and update the Shop Page.
- The product filter by custom attribute functionality will now be active, allowing your customers to easily filter and refine their search based on specific attributes.
Frequently Asked Questions #
Q. How do I create custom attributes in WooCommerce? #
To create custom attributes in WooCommerce by default, follow these steps:
a. Go to your WordPress admin dashboard and navigate to “Products” > “Attributes”.
b. Enter a name for the attribute, such as “Color” or “Size”.
c. Choose the attribute type (e.g., text, select, or multiselect).
d. Add attribute values or options (e.g., red, blue, green for the “Color” attribute).
e. Save the attribute.
Q. How do I enable filtering by custom attributes on the front end? #
To enable filtering by custom attributes on the front end, you can use plugins or theme functionality specifically designed for WooCommerce product filtering. Some popular plugins include ShopLentor, Upfilter, WooCommerce Product Filter or WOOF – WooCommerce Products Filter. These plugins allow you to display attribute filters on the shop or category pages, allowing customers to refine their product search based on their preferences.
Q. Can I use multiple custom attribute filters simultaneously? #
Yes, most WooCommerce product filtering plugins support the ability to use multiple custom attribute filters simultaneously. This means customers can select multiple attributes to narrow down their product search further. For example, they can filter products by both color and size to find specific variations that match their requirements.
Q. Are there any plugins or extensions that can help with filtering by custom attributes? #
Yes, there are several plugins and extensions available for WooCommerce that can help with filtering products by custom attributes. Some popular options include ShopLentor, UpFilter, FacetWP, Advanced Woo Search, These plugins provide various features and customization options to create advanced product filtering systems on your WooCommerce store.
Q. Can I customize the appearance and styling of the attribute filters? #
Yes, most WooCommerce product filtering plugins offer customization options to control the appearance and styling of the attribute filters. You can typically configure settings for the layout, colors, typography, and other visual aspects to match your store’s branding and design preferences.
Final Thoughts #
Learning how to filter WooCommerce products by custom attribute is crucial because implementing custom attribute filters in WooCommerce can greatly enhance the shopping experience for your customers. By enabling them to refine their product search based on specific criteria, you increase the chances of customers finding the products that meet their needs, resulting in higher conversion rates and customer satisfaction.
Remember to regularly review and update your custom attributes and attribute values as your product catalog evolves. This ensures that the filtering options remain accurate and relevant.
Overall, filtering WooCommerce products by custom attributes empowers customers to find products quickly and efficiently, ultimately leading to a more engaging and successful e-commerce experience.