Woocommerce Checkout like Shopify is an effective way for you to create an easy and beautiful checkout process while also providing your customers with the best checkout experience. This module allows you to use a clean and simple checkout system on your WooCommerce site instead of a complicated one with so many fields. Make your customers’ checkout experience better with this exclusive module. Woocommerce Checkout like Shopify uses a clean, responsive, and modern interface that will make your customers feel confident while checking out.
Benefits of using WooCommerce Checkout like Shopify
- Hide Unnecessary Fields
- Use ‘Shipping Address’ as ‘Billing Address‘ by Default
- Use Inline Error Validation
- Remove Labels from Form Fields
- Remove Any Page Distractions
How to make WooCommerce checkout look like Shopify?
WordPress Dashboard > ShopLentor > Settings > Modules > Shopify Style Checkout
- Install ShopLentor WooCommerce Plugin
- Go to ShopLentor -> Settings -> Modules -> Shopify Style Checkout
- Enable the Shopify style checkout page
- Visit the checkout page.
Steps of adding WooCommerce checkout like Shopify
With ShopLentor, you can build a WooCommerce checkout page like Shopify and make the process of buying products easier and faster. Here are the easy steps of adding a Shopify Style Checkout Page.
Follow the following steps:
Step 1: Enable the Shopify style checkout page module.
First, enter your admin dashboard and go to ShopLentor > Settings > Modules -> Shopify Style Checkout
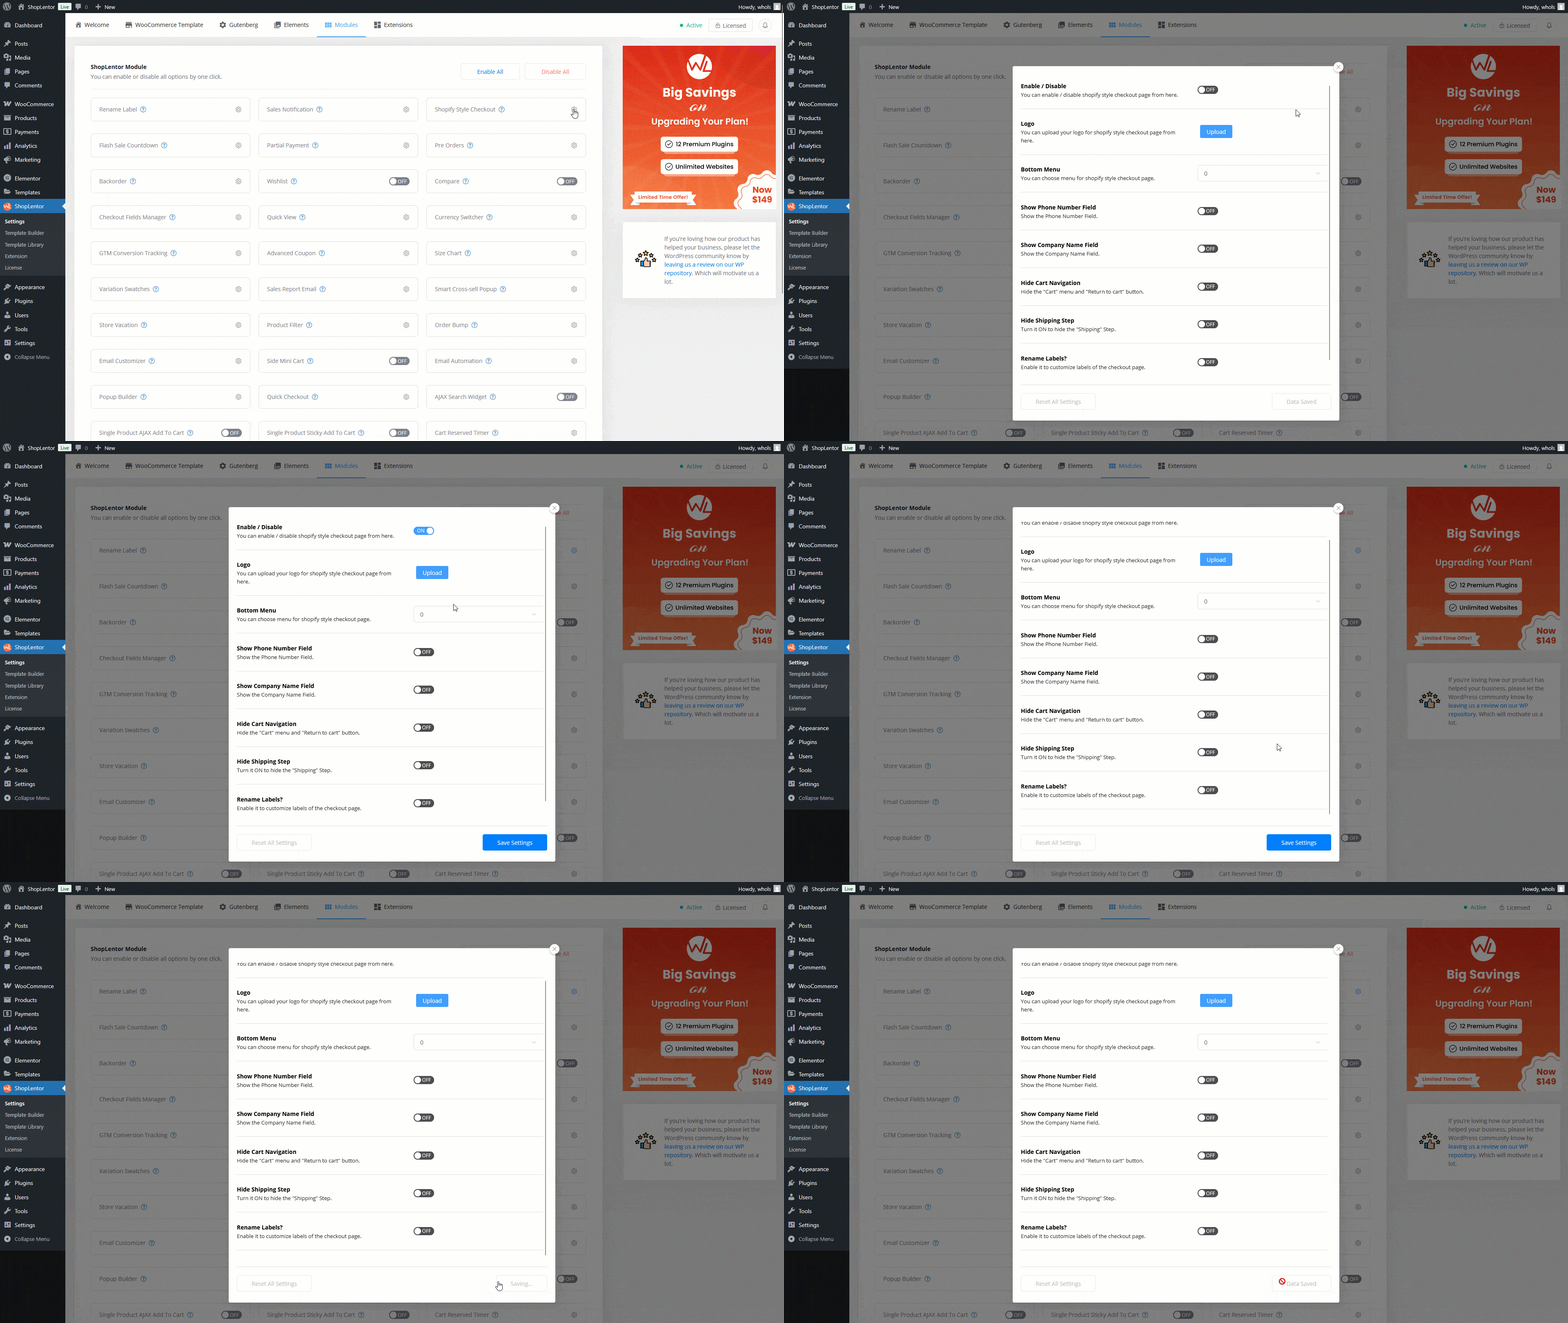
Once the module is enabled, you’ll have access to essential settings for your Shopify-like checkout page. These options are available in the free version and are vital for optimizing your customers’ checkout experience. Get familiar with these settings to enhance your checkout process.
- Enable/Disable: Activate or deactivate the Shopify style checkout page from here.
- Logo: Upload your logo for the Shopify style checkout page.
- Logo URL: Link your uploaded logo to an existing page or a custom URL.
- Bottom Menu: Choose the menu for the Shopify style checkout page’s bottom section.
- Show Phone Number Field: Display the Phone Number Field on the Shopify checkout page.
- Show Company Name Field: Display the Company Name Field on the Shopify Checkout Page.
- Hide Cart Navigation: Hide the “Cart” menu and “Return to cart” button.
- Hide Shipping Step: Turn it ON to hide the “Shipping” Step.
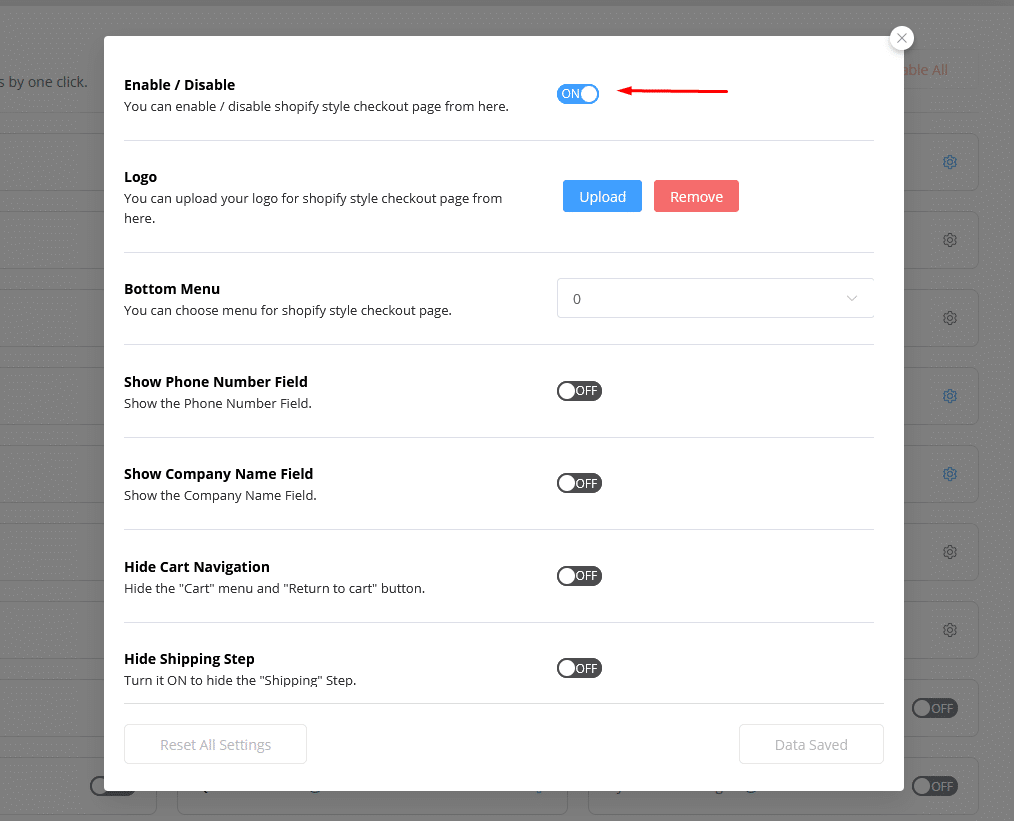
- Rename Labels?: Enable to customize labels of the checkout page.
Remember to click the “Save Changes” button to apply and save the modifications.
How to rename Shopify-Like Checkout Labels?
With the new feature introduced in the free version, you can now easily customize your Shopify-like checkout labels, enhancing your overall user experience. Below are the steps on how to rename these labels:
Step 1: Enable the “Rename Labels” Option:
Upon accessing your Shopify-like checkout settings, you’ll notice a new option called “Rename Labels?” Make sure to enable this feature to begin the customization process.

Step 2: Locate the “+ADD ITEM” Button:
Once the “Rename Labels?” option is enabled, you’ll find a “+ADD ITEM” button displayed on your screen. Click on this button to proceed with the label customization.

Step 3: Select Tab:
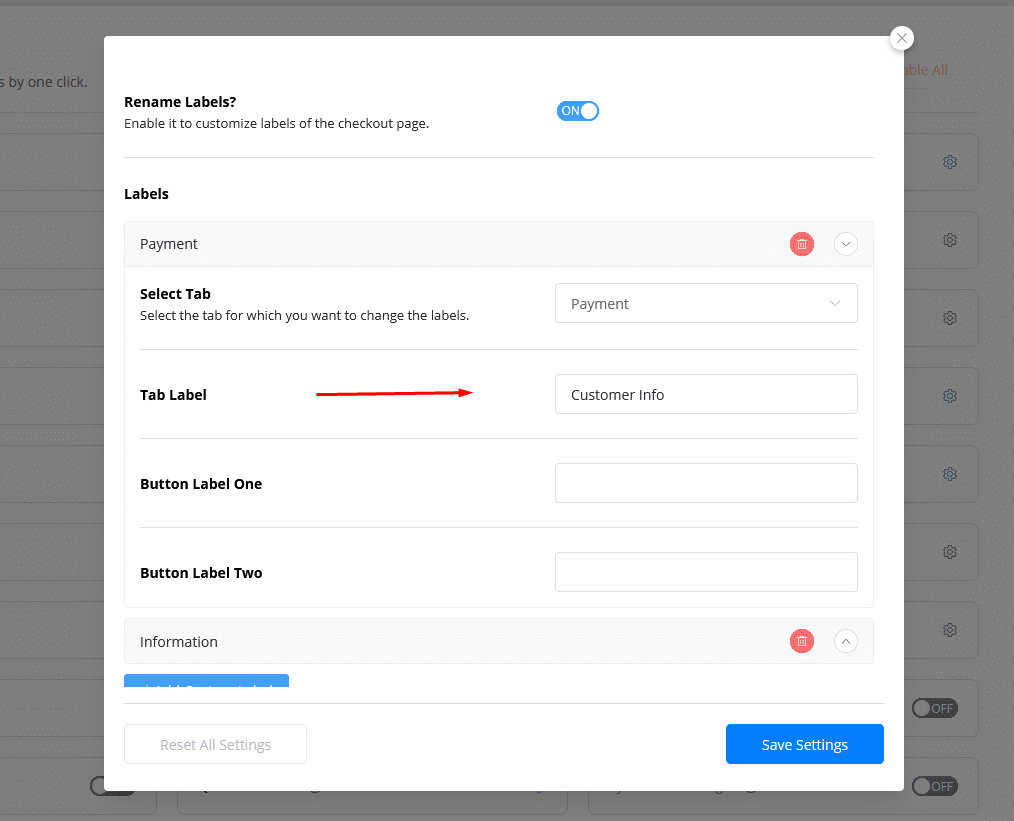
In this step, you will be presented with different tabs on the Shopify-like checkout page, accessible via the top navigation. Choose the specific tab for which you wish to modify the labels. Here you can modify 3 tab: Information, Shipping & Payment.

Step 4: Tab Label:
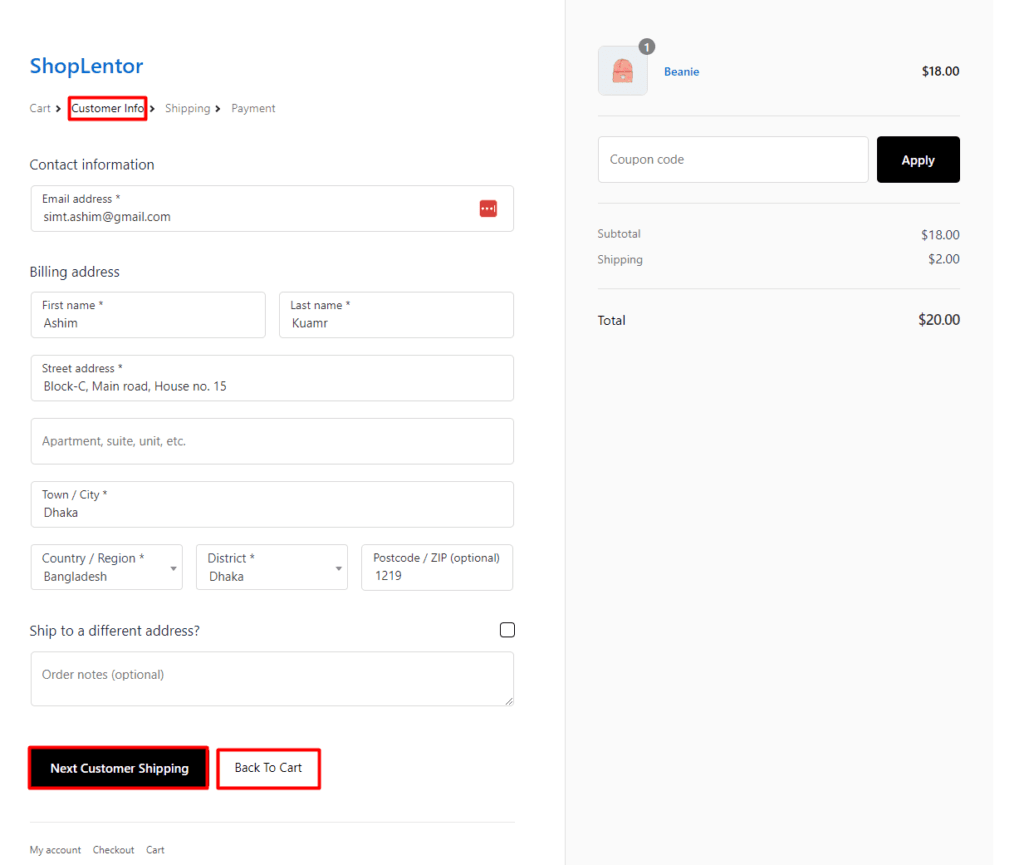
After selecting the desired tab, you can now insert the text for your newly customized label. This text will replace the original label displayed on the top navigation of the Shopify checkout page, providing a more personalized touch.
Step 4: Button Labels:
The customization process also extends to the buttons present at the bottom of the Shopify-like checkout page. You will be given the option to update two button labels.
a) Button Label One:
Insert your preferred text for the first button label. This will replace the existing text on the initial button.
b) Button Label Two:
Similarly, insert your desired text for the second button. This will replace the text currently displayed on the secondary button.

By following these simple steps, you can effectively rename and customize the labels on your Shopify-like checkout page, creating a more tailored and branded experience for your customers.
Remember, this feature is available for free, and its implementation is sure to contribute positively to the overall shopping experience on your platform.
Step 2: Visit your site’s product checkout page.
Now, visit your site and see how it works. Here is the outcome of the Shopify style checkout page of ShopLentor.
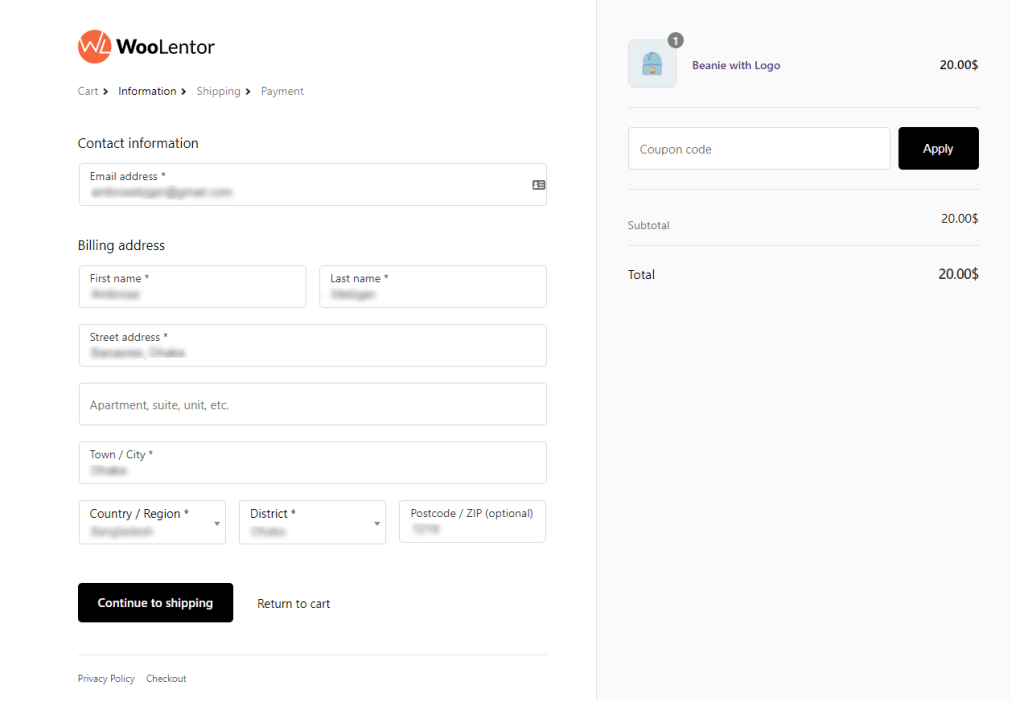
Make your WooCommerce checkout process user-friendly and visually appealing like Shopify with ShopLentor. Customize the logo, bottom menu, phone number, company name fields, cart navigation, and shipping step by enabling the Shopify Style Checkout Page in ShopLentor settings. The “Rename Labels” option lets you personalize tab and button labels, offering a seamless, branded checkout experience that boosts conversions and loyalty.
If you wish to customize the checkout field, you can activate the ShopLentor Pro version, which offers advanced features. The Checkout Field Manager is one of the exclusive Pro features in the ShopLentor plugin. For more detailed information about utilizing the Checkout Field Manager and its capabilities, I highly recommend referring to the provided documentation. Explore the extensive possibilities of the ShopLentor Pro version to tailor your checkout process to meet your specific needs and enhance your customers’ shopping experience.