

The Checkout Notices widget for Elementor lets you control where WooCommerce checkout notices appear on your checkout page. Instead of relying on the default notice position, you can display validation errors, coupon messages, and payment-related notices in a location that works best for your checkout layout.
The widget is part of ShopLentor Pro and allows you to position checkout notices using Elementor without writing custom code.
Why use the Checkout Notices widget?
Checkout notices help customers identify and resolve issues before completing their orders. Placing these messages in a visible location can make the checkout process easier to follow.
Use this widget to:
- Display WooCommerce checkout notices in a custom location.
- Show validation errors, coupon messages, and payment-related notices.
- Position notices above checkout forms or near the Place Order button.
- Keep important messages visible within multi-column checkout layouts.
- Customize notice placement using Elementor.
- Maintain compatibility with existing WooCommerce checkout notices.
Before you begin
Make sure WordPress, WooCommerce, Elementor, ShopLentor, and ShopLentor Pro are installed and active.
The Checkout Notices widget is available in ShopLentor Pro version 3.4.6 or later.
Important: This widget is available only in Checkout and Checkout Top Content templates created with ShopLentor Template Builder.
1. Enable Checkout Notices
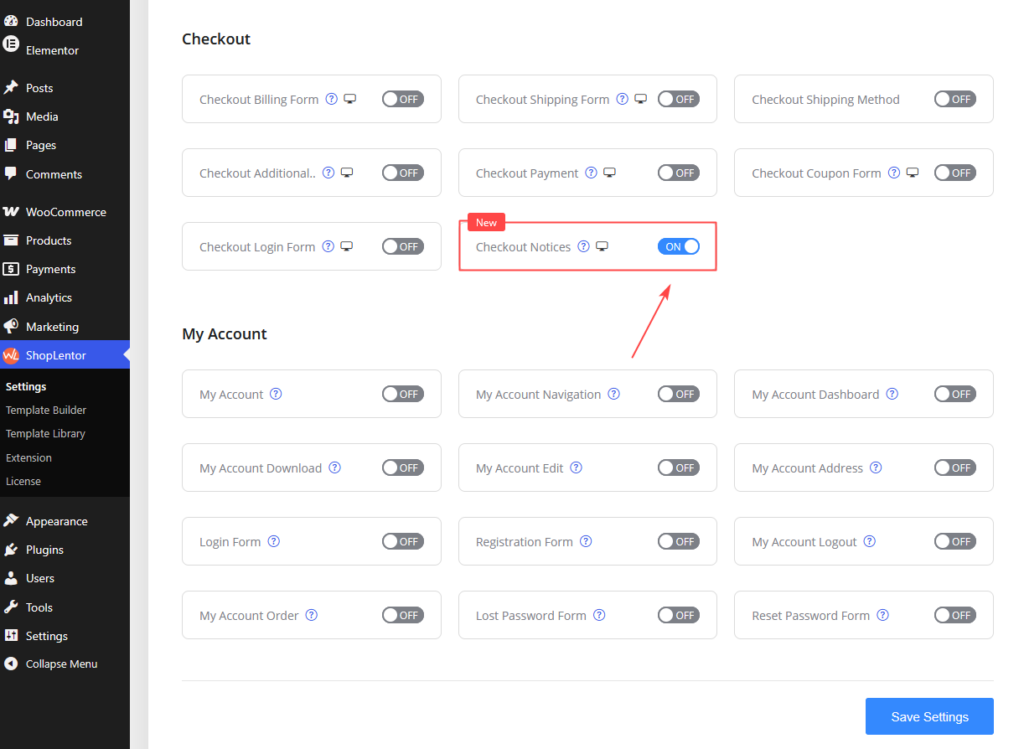
- Go to ShopLentor → Elements in your WordPress dashboard.
- Find Checkout Notices.
- Make sure the widget is turned ON.
- Save the changes if you changed its status.
The widget is enabled by default and appears with a New badge in the ShopLentor widget settings.
2. Add the widget to your checkout template
- Navigate to ShopLentor → Template Builder.
- Create or edit a Checkout or Checkout Top Content template.
- Select Edit with Elementor.
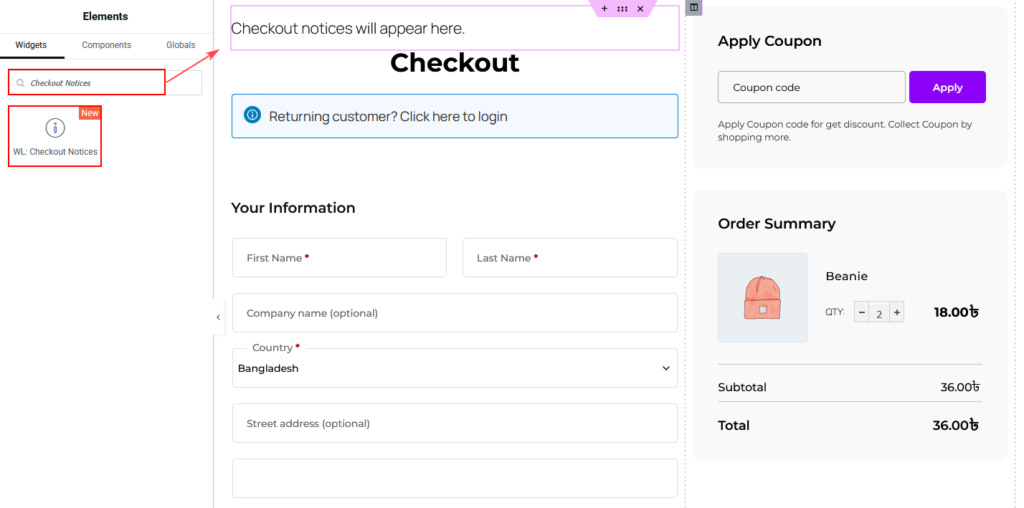
- Search for
checkout noticesornoticein the Elementor Elements panel. - Find WL: Checkout Notices under ShopLentor.
- Drag the widget into your preferred section or container.
- Update or publish the template.
Important: Add the Checkout Notices widget only once per page. If multiple instances are added, notices are directed to the first matching widget location.
3. Configure the Checkout Notices widget
The Checkout Notices widget works as a placeholder for WooCommerce checkout messages. It does not require additional configuration.
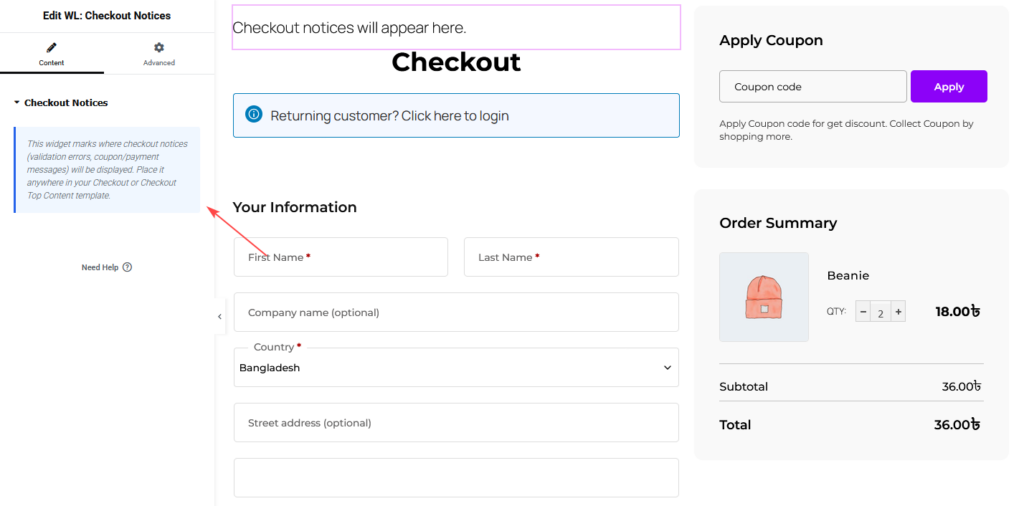
Open Content → Checkout Notices to view the widget information.
| Setting | Description |
|---|---|
| Checkout Notices | Displays an informational message explaining where checkout notices will appear. |
| Content Controls | No additional settings are required. |
| Notice Placement | Determined by the widget’s position in the Elementor template. |
The Content tab displays the following message:
This widget marks where checkout notices (validation errors, coupon/payment messages) will be displayed. Place it anywhere in your Checkout or Checkout Top Content template.
Simply position the widget where you want WooCommerce notices to appear.
4. Customize the widget’s appearance
The Checkout Notices widget does not include a dedicated Style tab.
WooCommerce and your active WordPress theme control the appearance of checkout notices.
You can use Elementor’s Advanced tab for additional layout adjustments.
| Option | How to use it |
|---|---|
| Margin | Adjust spacing around the notice area. |
| Padding | Control spacing within the Elementor widget area. |
| Responsive Settings | Adjust the widget’s layout or visibility across devices. |
| CSS Classes | Add custom classes for targeted styling. |
| Custom CSS | Customize notice colors, typography, borders, and backgrounds where supported. |
Note: Changing the widget’s position controls where notices appear, while WooCommerce or theme CSS determines how those notices look.
5. How the Checkout Notices widget works
The widget automatically displays WooCommerce checkout notices at the selected location.
| Behavior | Description |
|---|---|
| Elementor Preview | Displays the placeholder text “Checkout notices will appear here.” |
| Frontend Display | Creates an empty notice container until WooCommerce generates a checkout notice. |
| Validation Errors | Displays errors when customers submit incomplete or invalid checkout information. |
| Coupon Messages | Displays applicable WooCommerce coupon notices. |
| Payment Errors | Displays payment-related checkout notices. |
| Page Load | Moves existing WooCommerce checkout notices to the widget location. |
| Checkout Errors | Updates the notice location when WooCommerce triggers a checkout error. |
| Widget Not Added | WooCommerce continues displaying notices in its default location. |
The widget uses the WooCommerce checkout notice containers to display messages in the selected position.
Important: The widget does not generate validation or payment errors. It only controls where existing WooCommerce checkout notices are displayed.
6. Recommended placement
You can place the Checkout Notices widget anywhere within a supported checkout template.
| Placement | Best for |
|---|---|
| Above the Checkout Form | Displaying important messages before customers enter their details. |
| Above the Place Order Button | Helping customers notice errors when submitting an order. |
| Top of the Checkout Page | Keeping validation, coupon, and payment messages in one visible location. |
| Above a Multi-Column Checkout Layout | Displaying notices clearly without interrupting individual checkout sections. |
Recommendation: For most checkout layouts, place the widget near the top of the checkout form or above the Place Order button.
Avoid placing it in locations where customers may overlook important validation messages.
7. Responsive and usability tips
Review your checkout template using Elementor’s desktop, tablet, and mobile preview modes.
- Place checkout notices where customers can easily see them.
- Keep enough spacing between notices and checkout fields.
- Ensure error messages remain readable on mobile devices.
- Avoid hiding notices using responsive visibility settings.
- Maintain sufficient contrast between notice text and backgrounds.
- Test checkout validation errors before publishing.
- Use only one Checkout Notices widget per page.
A clearly positioned checkout notice can help customers identify errors without searching through the checkout form.
8. Test the Checkout Notices widget
After adding the widget, verify that notices appear in the intended location.
- Update or publish your checkout template.
- Add a product to your WooCommerce cart.
- Navigate to the checkout page.
- Leave a required checkout field empty.
- Click Place Order.
- Confirm that the validation error appears at the widget’s location.
- Correct the information and continue testing the checkout process.
You can also test coupon or payment-related notices when those features are available in your store.
Note: The Elementor editor displays placeholder text. Actual WooCommerce notices appear on the frontend when the relevant events occur.
9. Troubleshooting
The widget does not appear in Elementor
Make sure Checkout Notices is enabled under ShopLentor → Elements.
Also, confirm that you are editing a Checkout or Checkout Top Content template.
Search for checkout notices or notice in the Elementor Elements panel.
Nothing appears where I placed the widget
This is normal.
The widget creates an empty container on the frontend. Content appears only when WooCommerce generates a checkout notice.
The placeholder text appears in Elementor
The message “Checkout notices will appear here.” is an editor placeholder.
It helps identify the widget’s position and is not the actual checkout notice.
Checkout notices appear in the wrong location
Make sure you have added only one Checkout Notices widget to the page.
If multiple instances exist, the widget’s notice-handling functionality targets the first matching location.
Checkout errors are not appearing
Verify that WooCommerce is generating the expected validation or payment error.
Also, confirm that your checkout template is active and the Checkout Notices widget is present.
Can I change the notice colors or typography?
The widget does not provide dedicated styling controls.
Use your theme’s WooCommerce styles or custom CSS to modify notice colors, typography, backgrounds, and borders.
Changes do not appear on the live checkout page
- Update the template in Elementor.
- Clear your browser cache.
- Clear WordPress, server, or CDN caches if applicable.
- Regenerate Elementor CSS and data if needed.
- Test the checkout page in a private browser window.
Frequently asked questions
What is the Checkout Notices widget?
The Checkout Notices widget is a ShopLentor Pro Elementor widget that lets you control where WooCommerce checkout validation errors, coupon messages, and payment notices appear.
Is the Checkout Notices widget free?
No. The widget is part of ShopLentor Pro.
Which ShopLentor version supports Checkout Notices?
The widget was introduced in ShopLentor Pro version 3.4.6.
Can I use the widget on any Elementor page?
No. The widget is available only in ShopLentor’s Checkout and Checkout Top Content templates.
Does the widget display notices automatically?
Yes. When WooCommerce generates a checkout notice, the widget displays it at the selected location.
Why is the widget empty on the frontend?
The widget displays content only when a WooCommerce checkout notice exists. Otherwise, its container remains empty.
Can I add multiple Checkout Notices widgets?
You should use only one instance per page. If multiple widgets are added, notices are directed to the first matching widget location.
What happens if I don’t use the Checkout Notices widget?
WooCommerce continues displaying checkout notices in its default location. Existing checkout templates remain unaffected.
Can I customize checkout notice styling?
Yes, but the widget does not include dedicated styling controls. Use your theme’s WooCommerce CSS or custom CSS for visual customization.