

The Marquee – 2026 widget for Elementor lets you add a smooth, continuously scrolling message strip to a WooCommerce page without custom code. Use it for shipping promises, return policies, warranties, promotional messages, category names, partner logos, or short store announcements.
A marquee works best when it communicates a small set of useful messages that customers can scan at a glance. For example, you can display Free Worldwide Shipping, 30-Day Easy Returns, Certified Quality, and 2-Year Warranty in a slim band below your site header or above a product grid.
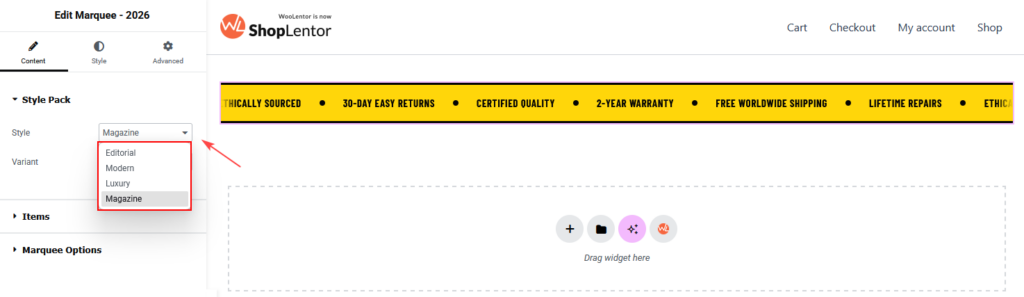
The widget includes four visual style packs—Editorial, Modern, Luxury, and Magazine. Each pack has three variants, so you can change the look of the scrolling band while keeping the same content.
Why use the Marquee widget?
The Marquee widget keeps important store benefits visible without taking up much page space. You can use it to:
- Highlight delivery, returns, warranty, support, or quality promises.
- Promote a time-sensitive offer or collection.
- Display linked brand logos, press mentions, or category labels.
- Add visual movement to a homepage, landing page, or campaign page.
- Match the strip to a clean, editorial, premium, or bold storefront design.
Before you begin
Make sure WordPress , Elementor, and ShopLentor are installed and active. The Marquee – 2026 widget is available in ShopLentor 3.4.8 and later.
Variant 1 in every style pack is available with the free version. Variants 2 and 3 require ShopLentor Pro.
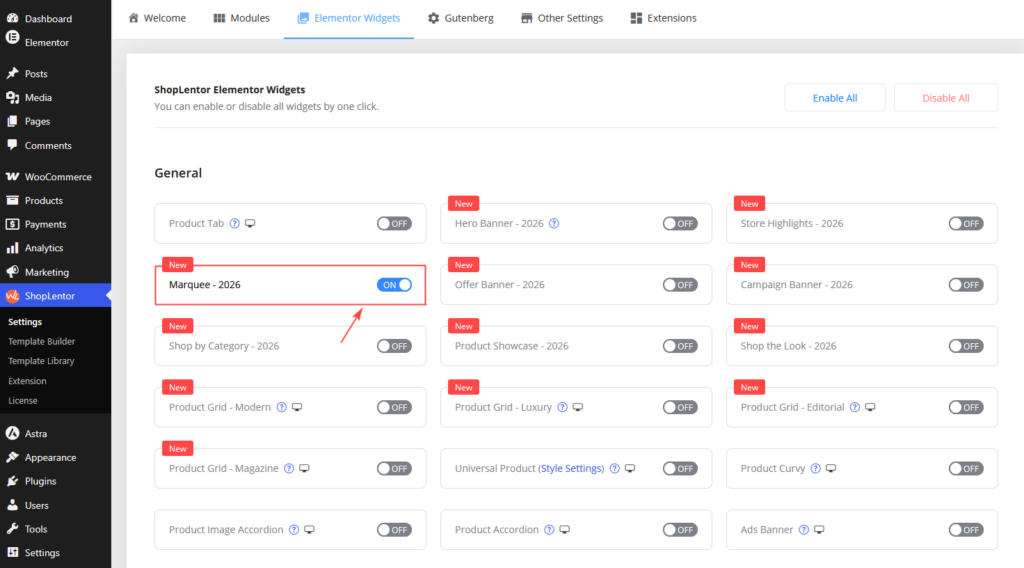
1. Enable Marquee – 2026
Enable the widget before looking for it in Elementor.
- From the WordPress dashboard, go to ShopLentor → Settings → Elementor Widgets.
- Find Marquee – 2026.
- Turn on the widget.
- Save the settings.
2. Add the widget to an Elementor page
Once enabled, you can add the widget to any Elementor page or template.
- Open the page you want to edit.
- Select Edit with Elementor.
- Search for Marquee – 2026 in the Elements panel.
- Drag the widget into a section or container.
- Open the Content tab to start configuring it.
For a full-width announcement bar, place the widget in a full-width container. For a more contained design, place it inside the same content width as the surrounding page sections.

3. Choose a style pack and variant
Open Content → Style Pack. Choose a Style first, then select its Variant.
Choose a style
| Style | Best for |
|---|---|
| Editorial | Fashion, lifestyle, and content-led stores that need a typographic, refined strip. |
| Modern | Clean, contemporary shops and general ecommerce stores. |
| Luxury | Jewellery, premium fashion, watches, and high-end brands. |
| Magazine | Bold promotions, editorial commerce, and visually dense storefronts. |
Choose a variant
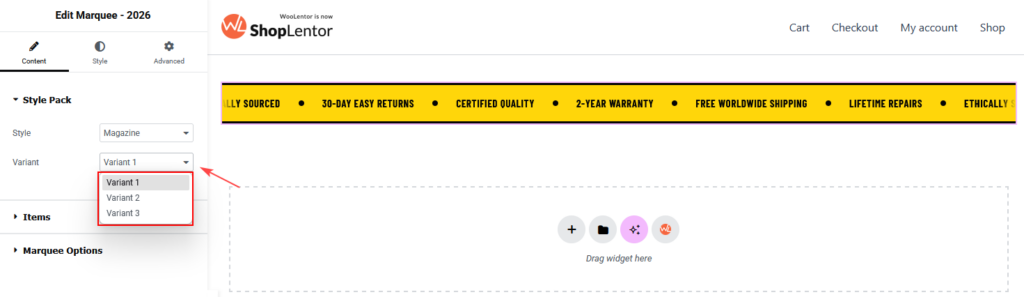
Each style pack includes Variant 1, Variant 2, and Variant 3. Changing the variant changes the visual treatment while preserving your item content.
Some controls appear only when the selected style and variant use them. This is normal: Elementor shows the controls that apply to the current design.
Note: A locked variant requires ShopLentor Pro before it can be used on a live page.
4. Add and manage marquee items
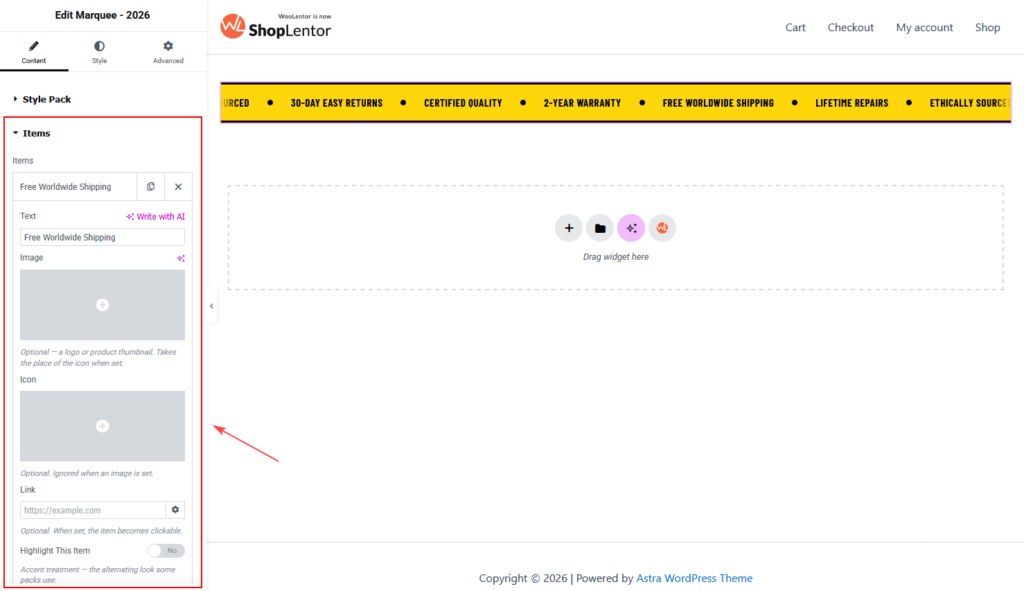
Open Content → Items. Every repeater entry creates one item in the scrolling band.
You can add, duplicate, delete, and edit items independently. A useful starting set is:
- Free Worldwide Shipping
- 30-Day Easy Returns
- Certified Quality
- 2-Year Warranty
- Lifetime Repairs
- Ethically Sourced
Marquee item settings
| Setting | Description |
|---|---|
| Text | The message shown in the marquee. Keep it short and easy to understand. |
| Image | An optional logo or product thumbnail. When an image is set, it takes the place of the selected icon. |
| Icon | An optional Elementor icon displayed alongside the text. |
| Link | An optional destination URL. When set, the individual marquee item becomes clickable. |
| Highlight This Item | Applies the selected design’s alternate accent styling to the item. |
Click Add Item to create another entry. Use the duplicate icon to reuse an existing item, or the delete icon to remove one.
Write effective marquee copy
Keep each item focused on one benefit. Visitors should be able to understand it in a second or two.
| Less clear | Better |
|---|---|
| We provide shipping services | Free Worldwide Shipping |
| Our return policy | 30-Day Easy Returns |
| Learn about our products | Certified Quality |
| Contact support | Expert Support, 7 Days a Week |
Avoid long sentences, multiple promises in a single item, or overly similar messages. If an item has a link, use copy that accurately describes the linked page.
5. Configure the marquee movement
Open Content → Marquee Options to control the animation and separators.
| Setting | What it does |
|---|---|
| Loop Duration (seconds) | Sets the time for one complete pass. A higher number makes the marquee move more slowly. The default is 30 seconds. |
| Direction | Choose Left or Right for the scrolling direction. |
| Pause on Hover | Stops the animation while a visitor points at the band, making it easier to read or click an item. |
| Separator | Choose Dot, Dash, Slash, Star, Diamond, or None between items. |
| Fade Edges | Softens the left and right edges as items enter and leave the band. |
| Fade Width | Controls how wide the softened edge area is. This setting appears when Fade Edges is enabled. |
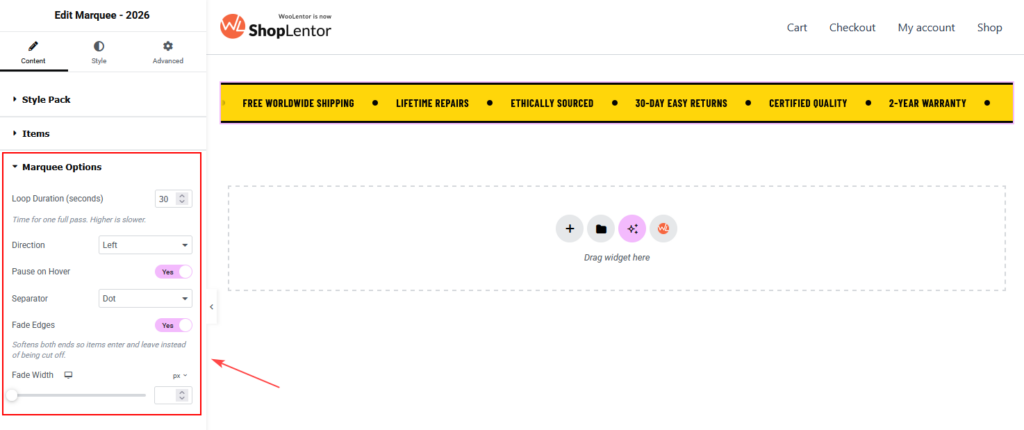
Recommended marquee settings
| Use case | Suggested settings |
|---|---|
| Store benefits | 25–35 seconds, Left direction, Dot separator, Pause on Hover enabled. |
| Short promotion | 18–25 seconds, Left or Right direction, Star or Diamond separator. |
| Logo strip | 30–45 seconds, Pause on Hover enabled, no separator or a subtle Dot. |
| Accessibility-focused message band | 35 seconds or slower, Pause on Hover enabled, high text contrast. |
Tip: Do not make the marquee too fast. A slower loop makes important messages readable and reduces visual distraction.
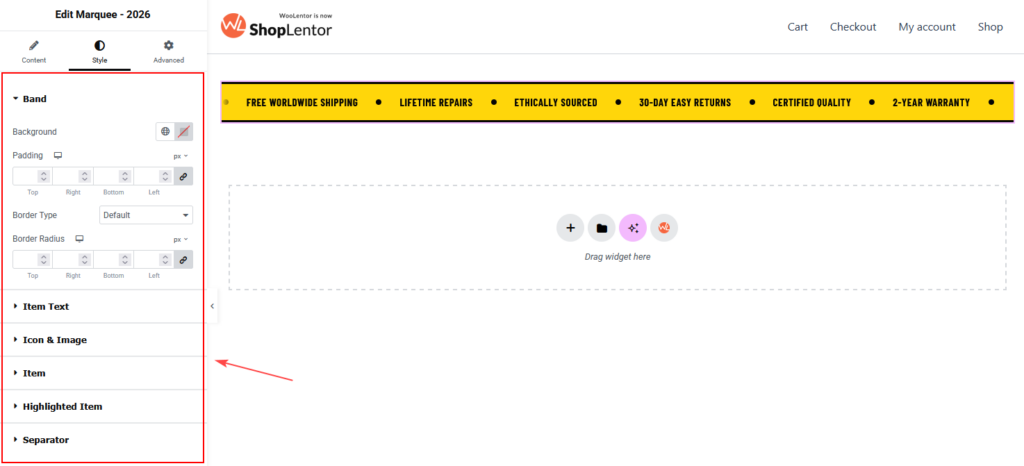
6. Customize the Style tab
After selecting a style pack and variant, open the Style tab. The available sections may change to match the selected design.
| Style section | What you can customize | Best practice |
|---|---|---|
| Band | Background, padding, border type, and border radius. | Match the band to your site palette, but ensure the message text remains easy to read. |
| Section Label | Label color, typography, and spacing below the label. This section is available when the selected design includes a small label above the band. | Keep the label short and use it to introduce the messages, not repeat them. |
| Item Text | Text color and typography for Normal and Hover states. | Use a clear hover color for linked items so visitors can recognize that they are interactive. |
| Icon & Image | Icon color and size, uploaded image height, and image border radius. | Use icons or images that support the text. For logo-based marquees, use images with a consistent visual weight and similar proportions. |
| Item | Padding around each marquee item and the gap between its icon or image and text. | More spacing improves readability; tighter spacing works best for short, compact labels. |
| Highlighted Item | Separate text color and icon color for items with Highlight This Item enabled. | Highlight only one or two key messages to maintain a clear visual hierarchy. |
| Separator | Separator color and size. | Make separators visible enough to distinguish items, but subtler than the message text. |
Tip: Controls that do not apply to the selected style or variant are hidden. Select the intended design before looking for a design-specific style option.
7. Responsive, accessibility, and SEO best practices
Check the marquee in Elementor’s desktop, tablet, and mobile preview modes before publishing.
- Use high contrast between the band background and text. Light gray text on a white background can be difficult to read.
- Keep messages concise, particularly on mobile screens.
- Enable Pause on Hover when items are linked or contain important information.
- Do not use movement as the only way to communicate essential content. Important policies should also be available from your navigation, footer, or relevant policy page.
- Use descriptive link destinations, such as a shipping policy or returns policy page.
- Add meaningful text even when an icon or logo is present; images alone may not communicate the message to every visitor.
- Avoid adding too many items. Five to eight short items usually creates a balanced, readable loop.
- Use a sensible speed. Fast animations can be distracting and make content difficult to scan.
For search visibility, use natural customer-facing phrases such as “Free Shipping,” “30-Day Returns,” or “Secure Checkout” only when they accurately reflect your store policies. Do not repeat keywords unnecessarily in every marquee item.
8. Best places to use a marquee
The Marquee widget is especially useful in these locations:
- Below the site header for shipping, returns, and store-wide trust messages.
- Below a homepage hero to reinforce key buying benefits.
- Above a featured product or category grid.
- On a campaign landing page for short promotional messages.
- Near a purchase-focused section when customers may need reassurance about delivery or returns.
Use the marquee as a supporting element rather than the only place a customer can find essential store information.
9. Troubleshooting
The Marquee – 2026 widget is not visible in Elementor
Confirm that the widget is enabled in ShopLentor → Settings → Elementor Widgets. Reload the Elementor editor and search for Marquee – 2026 again.
My marquee does not move as expected
Open Content → Marquee Options and check the Loop Duration and Direction settings. Make sure the widget has more than one item, then update the page and check the frontend rather than relying only on the editor canvas.
The text is cut off at the edges
When Fade Edges is enabled, items intentionally soften as they enter and leave the band. Reduce Fade Width or turn off Fade Edges if you prefer a sharp edge.
A marquee item is not clickable
Open Content → Items, expand the relevant item, and add a valid URL in its Link field. Update the page and test the link on the frontend.
Icons or images do not look aligned
Open Style → Icon & Image and adjust the icon size or image height. Use source images with similar proportions, and then adjust Style → Item gap and padding if needed.
Changes are not visible on the frontend
- Update the page in Elementor.
- Clear your browser cache.
- Clear any WordPress, server, or CDN cache.
- Go to Elementor → Tools and regenerate CSS and data.
- Check the page in a private browser window.
Frequently asked questions
Can I add text, icons, and images in the same marquee?
Yes. Each item can use text with an icon or an uploaded image. When you set an image for an item, it takes the place of the selected icon.
Can I link each marquee item to a different page?
Yes. Add a separate URL in the Link field for each item. For example, you can link shipping, returns, warranty, and support messages to their respective information pages.
Can I make one item stand out?
Yes. Enable Highlight This Item for the relevant entry, then customize its text and icon color in Style → Highlighted Item.
Why are parts of the text faded at both ends?
The Fade Edges option is enabled. It creates a softer entry and exit for moving items. Turn it off or reduce Fade Width for a sharper edge.
Can I stop the animation when visitors hover over the marquee?
Yes. Enable Pause on Hover in Content → Marquee Options. This is particularly helpful when the items contain links.
Which variants are available in the free version?
Variant 1 of Editorial, Modern, Luxury, and Magazine is available in the free version. Variants 2 and 3 require ShopLentor Pro.