

The Shop by Category – 2026 widget for Elementor helps you turn WooCommerce product categories into a visual, easy-to-browse shopping section. Add a short introduction, a link to your full shop or category archive, and category cards with images, product counts, and directional arrow buttons—without custom code.
Use it on a homepage, shop page, landing page, or campaign page to help visitors find the part of your catalogue that matters to them. The widget can automatically show categories from WooCommerce or let you replace individual category content when a tailored presentation is needed.
Why use the Shop by Category widget?
- Make a large WooCommerce catalogue easier to explore.
- Direct shoppers to important product collections with a clear visual path.
- Automatically display top-level, selected, or child categories.
- Use category images and product counts to give shoppers useful context.
- Match a modern, editorial, luxury, or magazine-inspired store design.
- Adjust the number of columns for desktop, tablet, and mobile.
Before you begin
Make sure Elementor, and ShopLentor are installed and active. Create the product categories you want to feature first, and add a category image in Products → Categories where appropriate.
For the clearest browsing experience, use a small set of meaningful parent categories. Categories with descriptive names, suitable images, and active products are more helpful than a long, unstructured list.
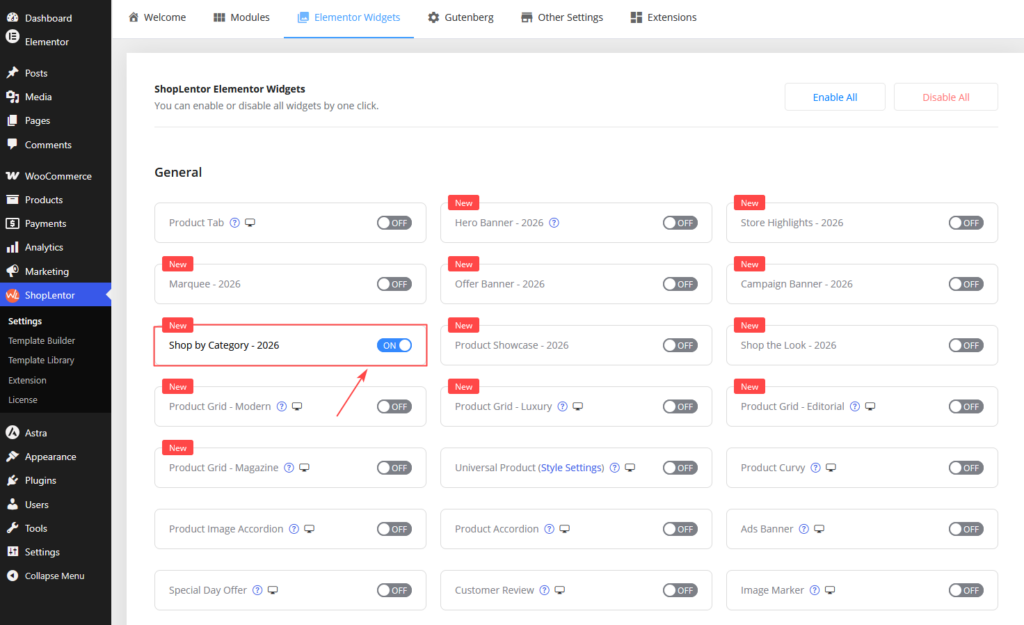
1. Enable Shop by Category – 2026
- In the WordPress dashboard, go to ShopLentor → Settings → Elementor Widgets.
- Find Shop by Category – 2026.
- Enable the widget and save your settings.
2. Add the widget to an Elementor page
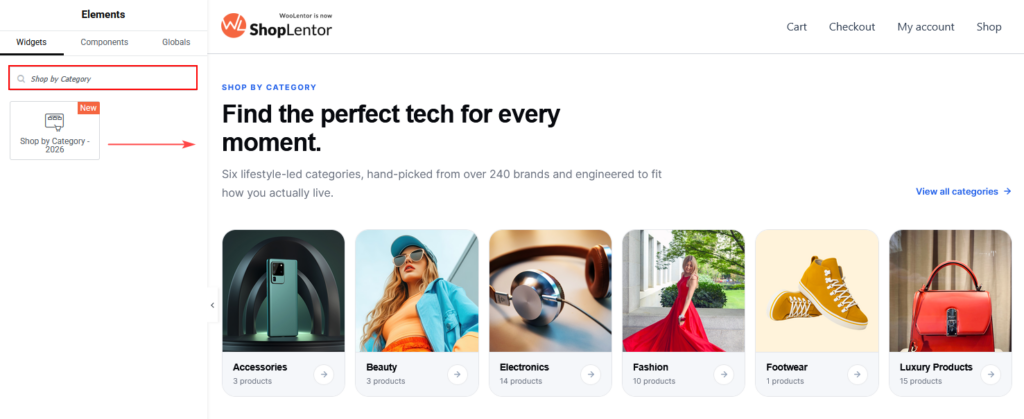
- Open the page or template where you want to display product categories and select Edit with Elementor.
- Search for Shop by Category – 2026 in the Elements panel.
- Drag the widget into a section or container.
- Open the Content tab to configure it.
Place the widget near the beginning of a homepage, below a hero section, or above a product grid. It works best when it gives shoppers a clear next step rather than repeating category links already visible nearby.
3. Choose a style pack and variant
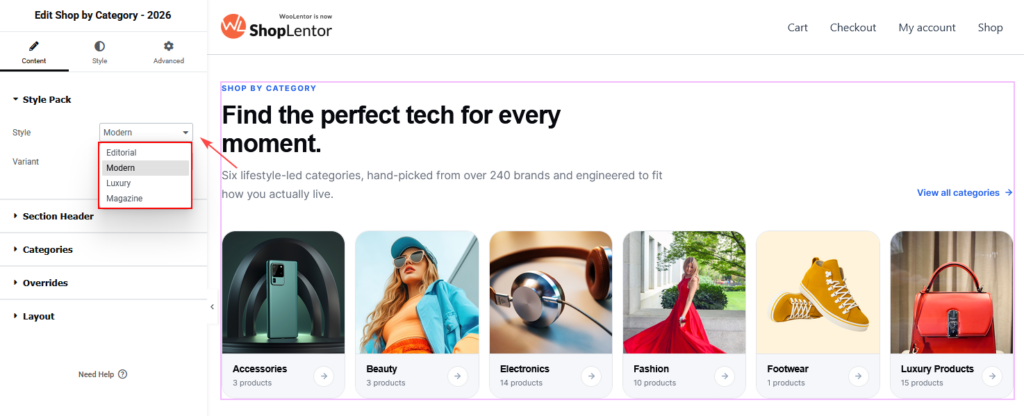
Open Content → Style Pack, then choose a Style and Variant.
| Style pack | Best for |
|---|---|
| Modern | Technology, contemporary retail, and clean product-led stores. |
| Editorial | Fashion, lifestyle, and story-led category collections. |
| Luxury | Premium fashion, beauty, jewellery, and curated catalogues. |
| Magazine | Bold retail layouts with a denser, high-contrast feel. |
Each style pack has Variant 1, Variant 2, and Variant 3. Changing a variant changes the card composition while keeping the widget content available for reuse. Select your final style pack and variant before doing detailed styling, because the available controls can differ by design.
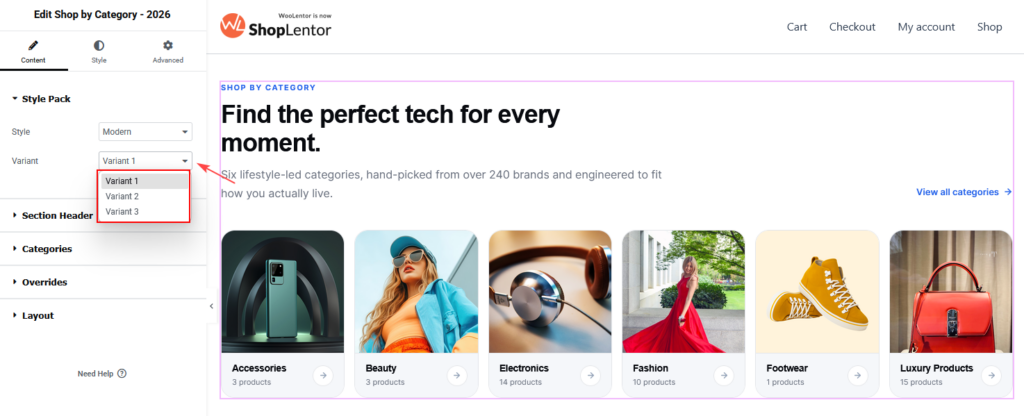
Note: Variant availability depends on your ShopLentor plan. If Elementor displays an upgrade notice for a selected variant, use an available variant or upgrade before publishing it.
4. Write the section header
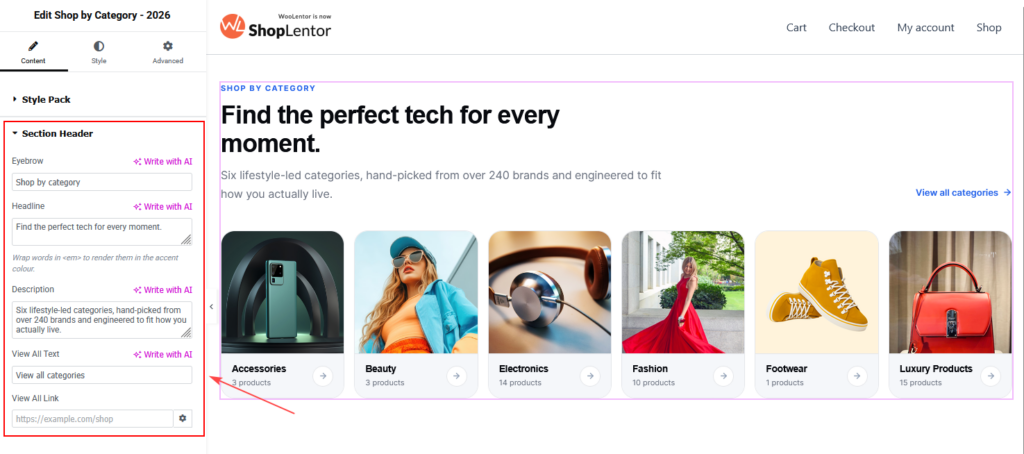
Open Content → Section Header to introduce the category collection.
| Setting | What it does | Best practice |
|---|---|---|
| Eyebrow | Displays a short label above the main heading. | Use a concise label such as “Shop by category” or “Explore collections”. |
| Headline | Displays the primary message for the section. | Explain the shopper benefit, not just the widget type. |
| Description | Adds supporting text below the heading. | Use one or two short sentences; avoid repeating the headline. |
| View All Text | Sets the label for the link that leads to the complete catalogue. | Use an action-led label such as “View all categories” or “Browse the shop”. |
| View All Link | Sets the destination for the View All link. | Link to a relevant shop, category archive, or curated collection page. |
You can use <em> around a short phrase in the headline to render that phrase in the configured accent colour. For example: Find the perfect <em>tech</em> for every moment. Use this sparingly so the heading remains easy to read.
Write category-section copy that helps shoppers
Keep the heading specific and customer-focused. The description should clarify the selection or make browsing feel easier.
| Less effective | Better |
|---|---|
| Product categories | Find what you need, faster |
| Shop everything | Explore our most-loved collections |
| Browse categories now | Curated essentials for work, weekends, and every day |
Avoid using the same keyword unnaturally in the eyebrow, headline, description, and link. Write for visitors first; search engines benefit from clear, relevant page content too.
5. Choose which WooCommerce categories to show
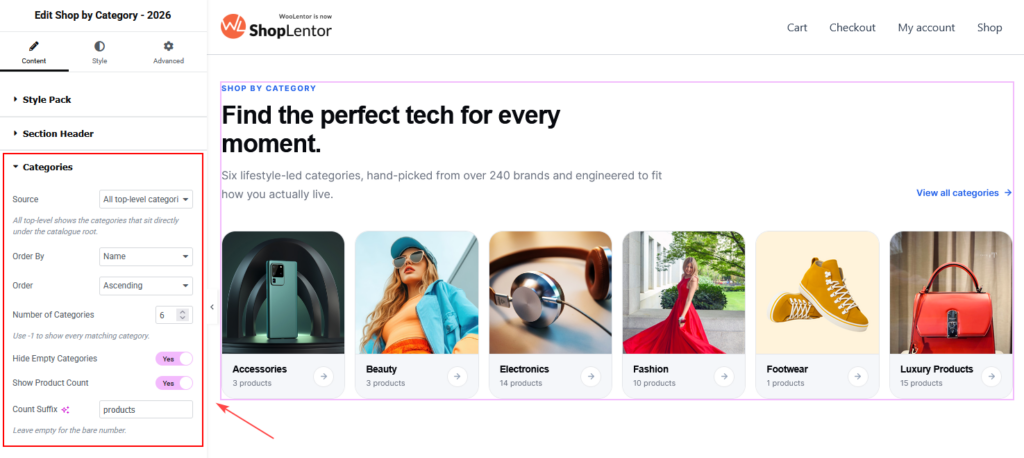
Open Content → Categories to control the category query and card information.
| Setting | What it does | Best practice |
|---|---|---|
| Source | Chooses All top-level categories, Selected categories, or Children of a category. | Use top-level categories for a broad shop entry point; use selected categories for a focused campaign; use child categories on a parent-category page. |
| Order By | Defines how matched categories are sorted, such as by name. | Use a predictable order for evergreen navigation. |
| Order | Sets the sort direction, such as ascending. | Keep the direction consistent across similar sections. |
| Number of Categories | Limits the cards displayed. Enter -1 to show every matching category. | Feature 4–8 categories on most homepages; do not overload the section. |
| Hide Empty Categories | Hides categories that have no products. | Keep this enabled in most live stores to avoid dead ends. |
| Show Product Count | Shows the number of products for each category. | Enable it when counts help shoppers compare category breadth; hide it for a cleaner, more editorial layout. |
| Count Suffix | Adds text after the count, such as products. | Use a brief, correctly translated suffix, or leave it blank to show only the number. |
Select the right category source
All top-level categories is normally the best choice for a main shop landing page because it shows the store’s primary navigation categories. Selected categories is useful when you want to feature a seasonal edit, best-selling collections, or only the categories with strong imagery. Children of a category is ideal for a focused category landing page where shoppers need one more level of navigation.
When you use a manual selection, ensure every featured category has a live product destination and does not duplicate another visible navigation pattern on the same page.
6. Override an individual category card
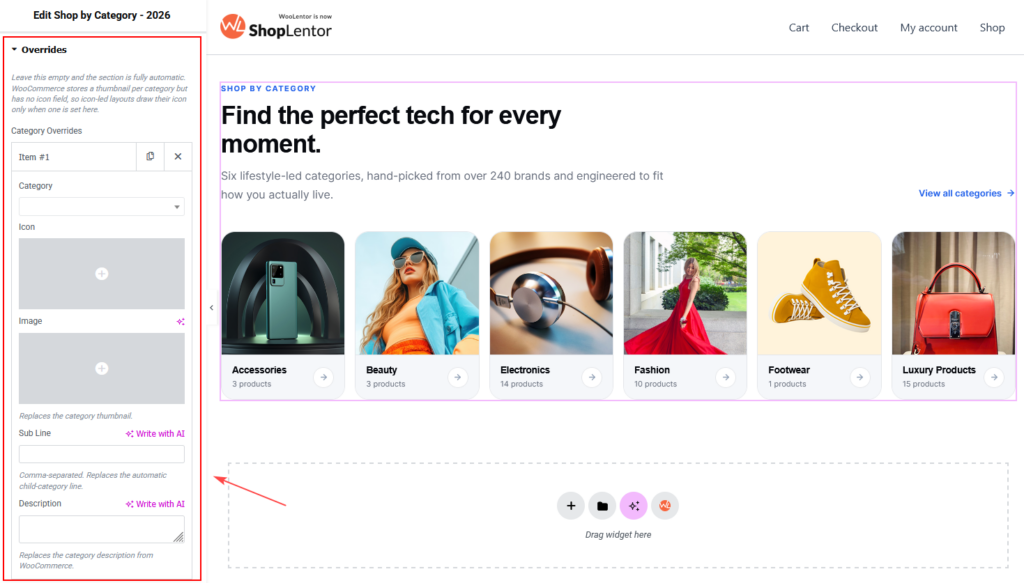
By default, the widget uses the category name, category thumbnail, child-category line, and description from WooCommerce. Open Content → Overrides when a particular card needs different content or media.
- Open Overrides and select Add Item.
- Choose the category you want to change.
- Optionally add an Icon or replacement Image.
- Add a Sub Line and Description if the selected design uses them.
- Repeat for other categories as needed, then update the page.
| Override | What it does |
|---|---|
| Category | Identifies the WooCommerce category that the override applies to. |
| Icon | Adds a category-specific icon for designs that support it. |
| Image | Replaces the WooCommerce category thumbnail for this widget only. |
| Sub Line | Replaces the automatic child-category line. Enter multiple items separated by commas. |
| Description | Replaces the category description supplied by WooCommerce. |
An override changes only this widget instance. It does not replace the category image or description across WooCommerce. Use overrides for intentional merchandising; do not create them merely to duplicate data that is already correct in the category settings.
7. Set the category-card layout
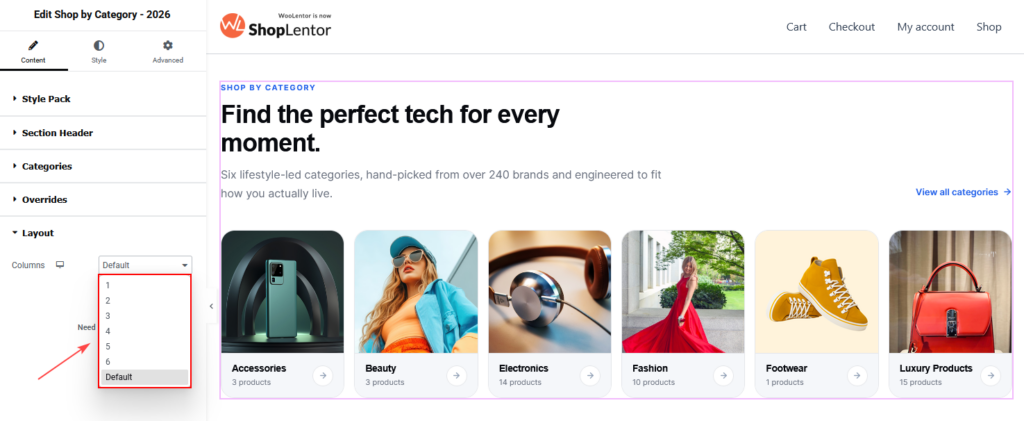
Open Content → Layout and set Columns.
Choose Default to use the selected style’s layout, or choose between 1 and 6 columns. Use Elementor’s responsive controls to review and adjust the value for desktop, tablet, and mobile.
| Device | Recommended starting point |
|---|---|
| Desktop | 4–6 columns for compact category cards; 3–4 columns for larger visual cards. |
| Tablet | 2–3 columns to protect image and text readability. |
| Mobile | 1–2 columns, depending on the selected card style and image aspect ratio. |
Do not choose a desktop column count simply because it fits. A category card should retain a readable name, an accessible arrow button, and a clear image at every breakpoint.
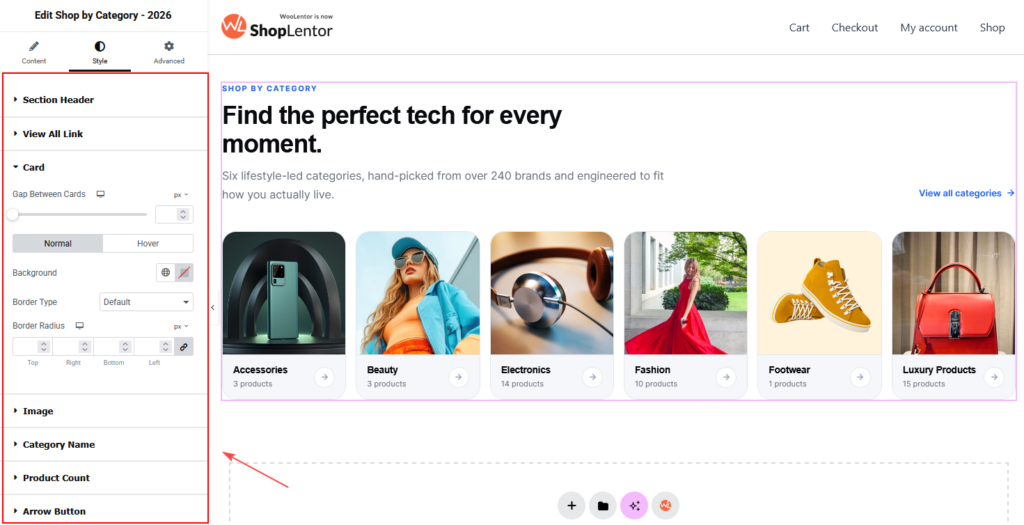
8. Customize the Style tab
Open the Style tab after you have chosen the final style pack and variant. The available style sections are organised around the visible parts of the section.
| Style section | Available controls | Best practice |
|---|---|---|
| Section Header | Eyebrow colour and typography; headline colour, accent colour, and typography; description colour and typography; spacing below header. | Establish a clear hierarchy: eyebrow is subtle, headline is dominant, description is easy to scan. |
| View All Link | Link appearance for the section-level action. | Use a strong text contrast and a clear hover state. |
| Card | Card-level appearance, such as background, spacing, border, or radius where supported by the variant. | Match card spacing and corners to the surrounding site design. |
| Image | Category image presentation where supported. | Use consistently cropped, relevant images; avoid low-resolution or text-heavy thumbnails. |
| Category Name | Category-name colour and typography. | Keep names short and readable without relying on truncation. |
| Product Count | Product-count colour and typography. | Make it secondary to the category name, but retain sufficient contrast. |
| Arrow Button | Arrow/button styling and hover appearance. | Make the target visibly interactive and distinguish its hover state without relying only on colour. |
Use the global colour and typography controls where possible to preserve consistency with the rest of the site. Check the normal and hover state of each interactive element before publishing.
9. Accessibility, responsive design, and SEO best practices
Review the completed section in Elementor’s desktop, tablet, and mobile previews, then test the published page.
- Use a heading level that fits the page’s existing heading hierarchy. Do not make every widget heading the page’s main
H1. - Write a descriptive, natural heading and introductory paragraph. Avoid keyword stuffing such as repeatedly saying “product categories” without adding useful information.
- Use meaningful category names. A category named “Accessories” is more useful than “Miscellaneous”.
- Add relevant WooCommerce category images and keep their visual treatment consistent. Ensure alternative text is meaningful where your image settings support it.
- Maintain readable colour contrast between the card, image overlay if used, text, links, and arrow buttons.
- Do not communicate category state or interaction only with colour; category names and arrow controls should remain understandable on their own.
- Keep the View All destination and each category’s archive link active and relevant.
- Use short link labels that clearly communicate the destination; avoid generic labels such as “Click here”.
- Test keyboard navigation, including the View All link and every category card or arrow button.
- Review the number of cards on mobile. A long list can push important product content too far down the page.
10. Recommended placements and examples
Use Shop by Category – 2026 in one of these common locations:
- Homepage: immediately after the hero to direct new visitors into primary product collections.
- Shop landing page: above the product grid as a visual alternative to a plain category list.
- Seasonal campaign page: use selected categories to feature relevant gift, sale, or collection pages.
- Parent category page: show child categories so shoppers can narrow their browsing path.
For example, a technology shop could show Accessories, Audio, Computers, Gaming, Smart Home, and Wearables. A fashion shop could feature New Arrivals, Women, Men, Shoes, Bags, and Accessories. Choose categories according to shopper intent, not only internal catalogue structure.
11. Troubleshooting
The widget is not visible in Elementor
Confirm that Shop by Category – 2026 is enabled in ShopLentor → Settings → Elementor Widgets. Reload the editor and search for the widget again.
No categories appear
Check the Content → Categories → Source setting. Confirm the selected categories exist, are assigned as intended, and contain products if Hide Empty Categories is enabled. If you selected Children of a category, confirm the chosen parent category has child categories.
A category image is missing or wrong
Go to Products → Categories and check that the category has a thumbnail image. If this widget uses an override, open Content → Overrides and review the replacement image for that category.
The product count is not showing
Open Content → Categories and enable Show Product Count. Confirm the category contains products and that the widget’s selected style displays the count as expected.
My custom category text or image does not appear
Open Content → Overrides, make sure the correct category is selected in the override item, then update the page. Remember that the override applies only to this widget instance.
Cards look too narrow or wrap poorly on mobile
Open Content → Layout → Columns and set an appropriate responsive value. Reduce the tablet or mobile column count, then review card names, counts, images, and arrow controls in Elementor’s responsive preview.
My changes are not visible on the live page
- Update the page in Elementor.
- Clear browser, WordPress, server, and CDN caches.
- Go to Elementor → Tools and regenerate CSS and data.
- Test the page in a private browser window.
Frequently asked questions
Can I show only selected WooCommerce categories?
Yes. Open Content → Categories, choose Selected categories as the source, and select the categories you want to feature.
Can I show subcategories instead of parent categories?
Yes. Choose Children of a category in Content → Categories, then select the relevant parent category.
Can I hide categories with no products?
Yes. Enable Hide Empty Categories in the Categories section. This is generally recommended for public store navigation.
Can I remove the word “products” after the count?
Yes. Clear the Count Suffix field to show the count without a suffix, or replace it with your preferred translated wording.
Can I replace a category image only in this widget?
Yes. Use Content → Overrides → Add Item, select the category, and add a replacement image. The WooCommerce category thumbnail remains unchanged elsewhere on the site.
How many categories should I show?
Start with 4–8 categories for a homepage. Show more only when the category structure remains easy to scan, particularly on mobile devices.