

The Express Checkout widget for Elementor lets you display Stripe-powered express payment buttons on your WooCommerce cart and checkout pages. Customers can use supported payment methods, such as Apple Pay, Google Pay, and Link, to complete purchases faster without manually entering all their payment details.
With ShopLentor Pro, you can position express checkout buttons anywhere within your cart or checkout template, customize the surrounding layout, and add an optional separator—all without custom code.
The widget is available for Elementor and Gutenberg.
Why use the Express Checkout widget?
Express checkout buttons help simplify the payment process by allowing customers to use their preferred digital wallets.
Use this widget to:
- Display Apple Pay, Google Pay, and Link payment options through Stripe.
- Add express payment buttons to WooCommerce cart or checkout pages.
- Position payment buttons above the standard checkout form.
- Customize the button container and separator appearance.
- Provide a faster checkout option for customers using supported devices.
- Reduce the need for customers to enter payment information manually.
Note: Available payment methods depend on Stripe configuration, the customer’s browser, device, and wallet availability.
Before you begin
Make sure WordPress, WooCommerce, Elementor, ShopLentor, and ShopLentor Pro are installed and active.
The Express Checkout widget requires ShopLentor Pro version 3.4.4 or later.
You must also configure Stripe Express Checkout.
| Requirement | Description |
|---|---|
| WooCommerce Stripe Payment Gateway | Install and activate the Stripe payment gateway plugin. |
| Stripe Configuration | Configure Stripe under WooCommerce → Settings → Payments → Stripe. |
| Express Checkout | Enable Express Checkout in your Stripe settings. |
| HTTPS | Use a secure HTTPS website for supported wallet payments. |
| Supported Browser or Device | Apple Pay, Google Pay, and Link availability depends on Stripe and the customer’s environment. |
Important: The buttons displayed in Elementor are only a preview. Actual payment buttons are rendered by Stripe on the frontend.
1. Enable Express Checkout
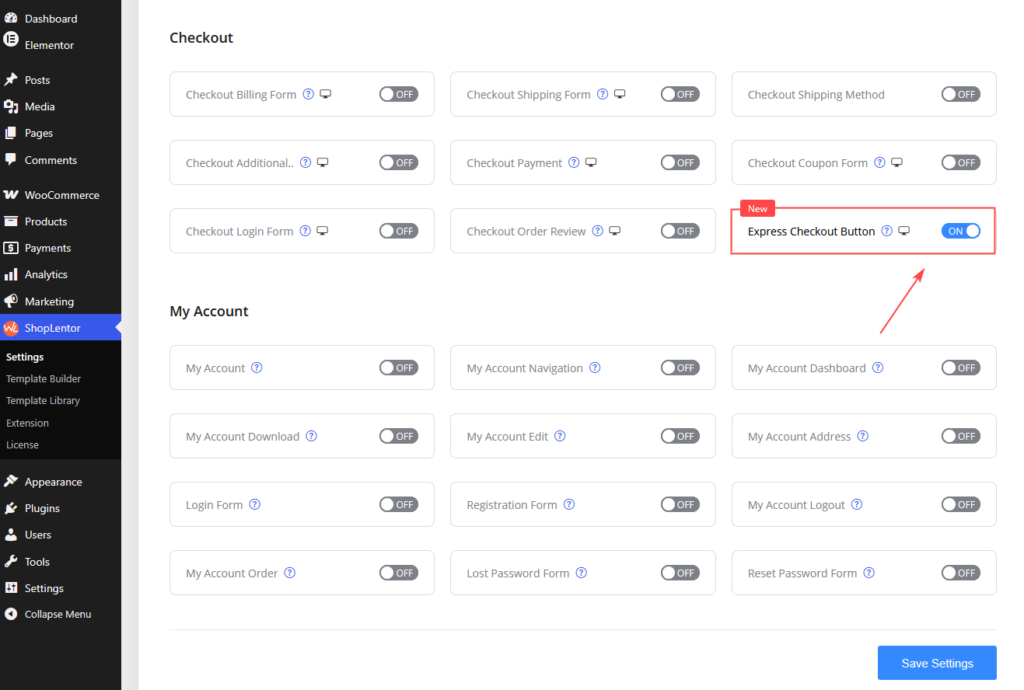
- Go to ShopLentor → Elements in your WordPress dashboard.
- Find Express Checkout Button.
- Make sure the widget is turned ON.
- Save the changes if you changed its status.
The widget is enabled by default and appears with a New badge in the ShopLentor widget settings.
2. Add the widget to an Elementor template
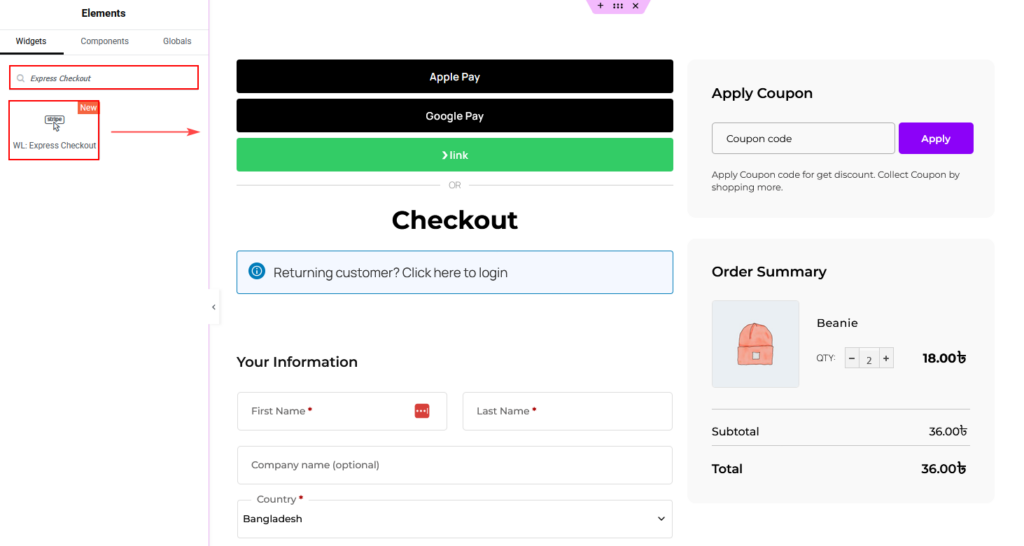
- Navigate to ShopLentor → Template Builder.
- Create or edit a Checkout template.
- Select Edit with Elementor.
- Search for
expressorapple payin the Elements panel. - Find WL: Express Checkout under ShopLentor.
- Drag the widget into your preferred section or container.
- Configure the widget and publish or update the template.
Recommended placement: Add the widget above the standard checkout form or near the beginning of your cart or checkout layout so customers can easily find express payment options.
3. Configure Express Checkout settings
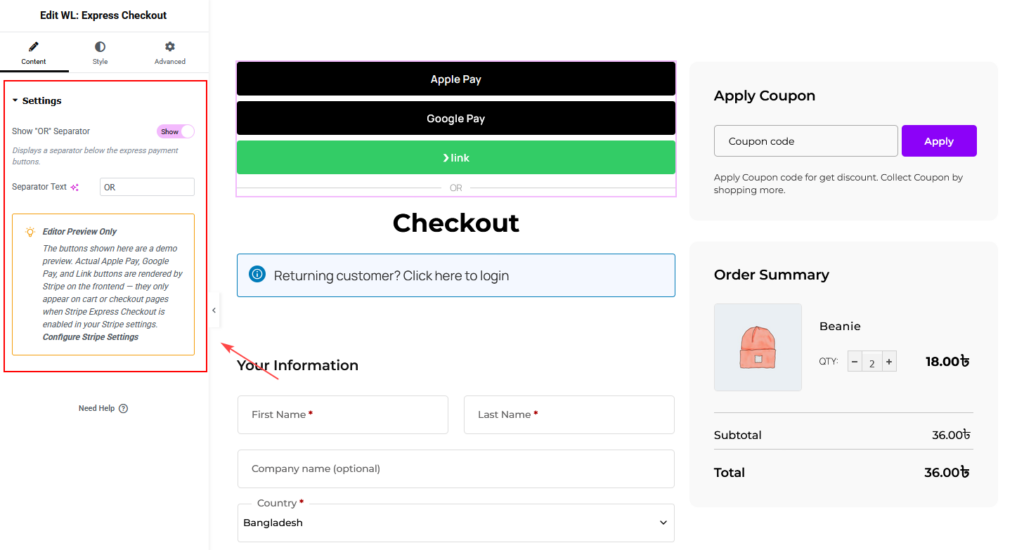
Open Content → Settings to configure the widget.
| Setting | Description | Default |
|---|---|---|
| Show ‘OR’ Separator | Displays a separator below the express payment buttons to distinguish them from the standard checkout process. | Show |
| Separator Text | Customizes the separator label. | OR |
For example, you can change the separator text from OR to Or continue with checkout.
Editor preview notice
The Content tab includes an Editor Preview Only notice.
This explains that the Apple Pay, Google Pay, and Link buttons shown in Elementor are demonstration buttons.
Actual payment buttons appear on the frontend only when Stripe Express Checkout is enabled and supported.
The notice also includes a Configure Stripe Settings link for accessing the relevant Stripe configuration.
4. Customize the container styling
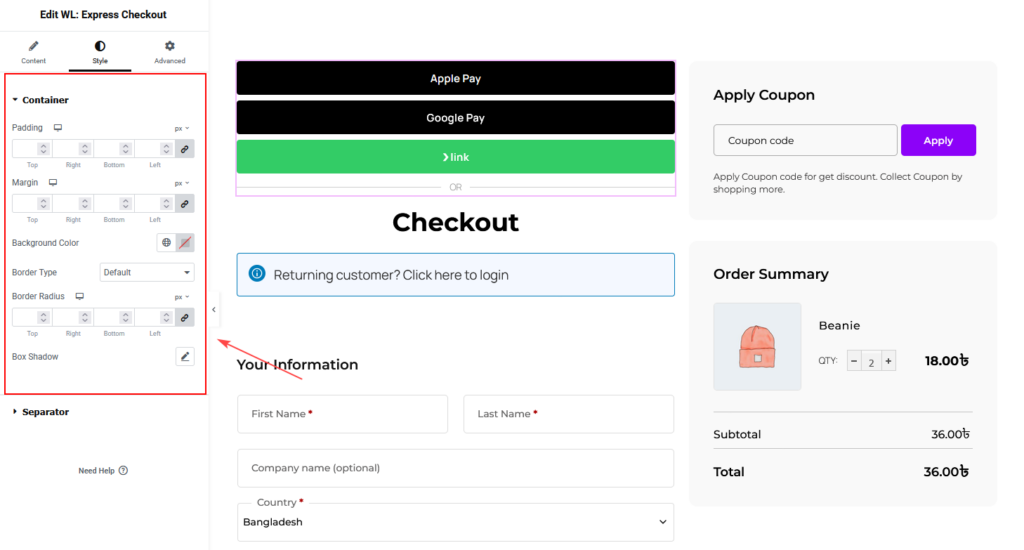
Open Style → Container to customize the area surrounding your express checkout buttons.
| Control | Description |
|---|---|
| Padding | Adjusts the spacing inside the widget container. |
| Margin | Controls the spacing around the widget. |
| Background Color | Sets the container background color. |
| Border Type | Adds or changes the container border style. |
| Border Radius | Adjusts the container’s corner rounding. |
| Box Shadow | Adds a shadow around the container. |
Padding, margin, and border radius include responsive controls.
Tip: Use consistent spacing and a subtle background to make express payment options easy to identify without distracting from the checkout form.
5. Customize the separator styling
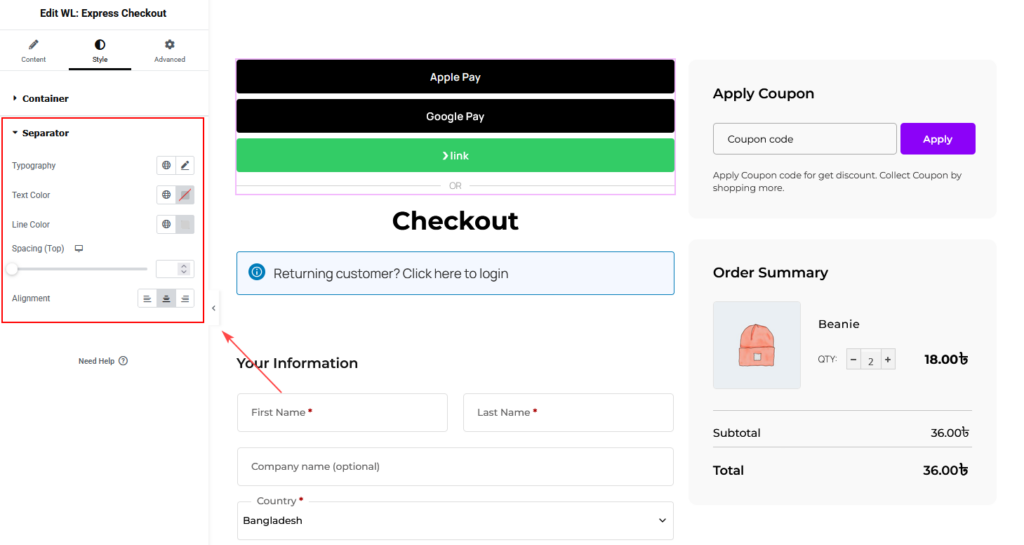
Open Style → Separator to customize the separator displayed below the payment buttons.
| Control | Description |
|---|---|
| Typography | Adjusts the separator text font, size, weight, and other typography settings. |
| Text Color | Changes the separator label color. |
| Line Color | Changes the color of the separator lines. |
| Spacing (Top) | Controls the space above the separator. |
| Alignment | Positions the separator text to the left, center, or right. |
The default separator line color is #d0d0d0, and the default alignment is Center.
The Spacing (Top) control supports values from 0 to 100px.
Note: The separator appears on the frontend only when Stripe express payment buttons are available and displayed.
6. How the Express Checkout widget works
The widget integrates with Stripe to display available express payment methods.
| Behavior | Description |
|---|---|
| Elementor Preview | Displays demonstration Apple Pay, Google Pay, and Link buttons. |
| Frontend Buttons | Stripe renders the actual payment buttons based on its configuration and the customer’s environment. |
| Loading State | Displays a skeleton loader while Stripe payment buttons initialize. |
| No Available Wallet | Hides the loading placeholder after approximately five seconds if no supported wallet button appears. |
| Separator Visibility | Displays the optional separator only when express payment buttons are visible. |
| Duplicate Prevention | Suppresses Stripe’s default express buttons in supported ShopLentor cart or checkout templates to avoid duplicate buttons. |
| Stripe Separator | Replaces Stripe’s default separator with the widget’s customizable separator. |
Important payment method behavior
Not every customer will see all three payment methods.
For example, Apple Pay may be available in a supported Safari environment, while Google Pay availability depends on browser, device, and wallet configuration.
Stripe determines which payment buttons appear. ShopLentor controls their placement and surrounding presentation.
7. Gutenberg block support
In addition to Elementor, ShopLentor Pro provides an Express Checkout Gutenberg block.
| Setting | Details |
|---|---|
| Block Name | Express Checkout |
| Block Identifier | woolentor/checkout-express |
| Supported Pages | Cart and Checkout |
| Plugin | ShopLentor Pro |
You can use the Gutenberg block when building a supported cart or checkout layout with the WordPress block editor.
8. Responsive and usability tips
Review your cart and checkout templates on desktop, tablet, and mobile devices.
- Place express checkout buttons above the standard checkout form when possible.
- Maintain enough spacing between the payment buttons and other checkout elements.
- Keep the separator text short and easy to understand.
- Use consistent container styling across cart and checkout pages.
- Check that payment buttons display correctly on supported browsers and devices.
- Test actual payment functionality on the frontend rather than relying on the Elementor preview.
Recommendation: Position express checkout buttons before the standard checkout fields, with an OR separator below them. This clearly distinguishes express payment from the regular checkout process.
9. Troubleshooting
Express checkout buttons appear in Elementor but not on the live website
The Elementor buttons are only demonstration elements.
Check the following:
- The WooCommerce Stripe Payment Gateway plugin is installed and active.
- Express Checkout is enabled in Stripe settings.
- Your website uses HTTPS.
- The customer’s browser or device supports an available payment method.
- The widget is placed on a supported Cart or Checkout page.
Only one or two payment methods appear
This is normal.
Stripe determines which payment methods are available based on the customer’s device, browser, and wallet configuration.
Express checkout buttons appear twice
ShopLentor prevents duplicate Stripe buttons when its supported Cart or Checkout template is active.
If duplicates still appear, check whether your theme or another plugin is adding express payment buttons separately.
The ‘OR’ separator does not appear
Make sure Show ‘OR’ Separator is enabled under Content → Settings.
The separator appears on the frontend only when express payment buttons are displayed.
An Express Checkout error message appears
The widget may display the following messages when its requirements are not met.
| Error Message | Solution |
|---|---|
| Express Checkout only renders on the cart or checkout page. | Place the widget on a supported Cart or Checkout page. |
| Express Checkout requires the WooCommerce Stripe Gateway plugin to be installed and active. | Install and activate the WooCommerce Stripe Payment Gateway plugin. |
| Express Checkout is not initialized. Ensure Stripe Express Checkout is enabled in Stripe → Settings. | Enable and configure Stripe Express Checkout. |
Frequently asked questions
Is the Express Checkout widget free?
No. The Express Checkout widget is available in ShopLentor Pro version 3.4.4 or later.
Does the widget support Apple Pay, Google Pay, and Link?
Yes. It integrates with Stripe Express Checkout to display these payment methods when they are supported and available.
Can I use Express Checkout on both Cart and Checkout pages?
Yes. The widget supports ShopLentor Cart and Checkout templates. A Gutenberg block is also available for supported layouts.
Can I hide or customize the ‘OR’ separator?
Yes. Open Content → Settings to disable the separator or change its text. You can also customize its appearance under Style → Separator.
Why are the payment buttons different on different devices?
Stripe determines payment method availability based on the customer’s browser, device, wallet setup, and payment configuration.