

The Campaign Banner – 2026 widget for Elementor lets you build a prominent WooCommerce promotion without custom code. Use it for a flash sale, seasonal event, coupon offer, collection launch, or limited-time campaign. A banner can include an eyebrow label, headline, supporting description, optional display figure, live countdown, fine print, and up to two calls to action.
Choose from four visual style packs—Editorial, Modern, Luxury, and Magazine—then select a variant that matches your campaign. Keep the content focused on one offer and one main action.
Why use the Campaign Banner widget?
- Promote a sale, launch, product collection, or time-sensitive offer.
- Create real urgency with a countdown to a specific deadline.
- Send shoppers to a sale collection, category, product, or campaign page.
- Use a consistent campaign design on desktop, tablet, and mobile.
- Match a clean, editorial, premium, or high-contrast store design.
Before you begin
Make sure WordPress, Elementor, and ShopLentor are installed and active. Campaign Banner – 2026 requires ShopLentor 3.4.8 or later.
Variant 1 of every style pack is available in the free version. Variants 2 and 3 require ShopLentor Pro. Before publishing, prepare the button destination and confirm the campaign’s terms and end time.
1. Enable Campaign Banner – 2026
- Go to ShopLentor → Settings → Elementor Widgets in the WordPress dashboard.
- Find Campaign Banner – 2026.
- Turn on the widget and save the settings.
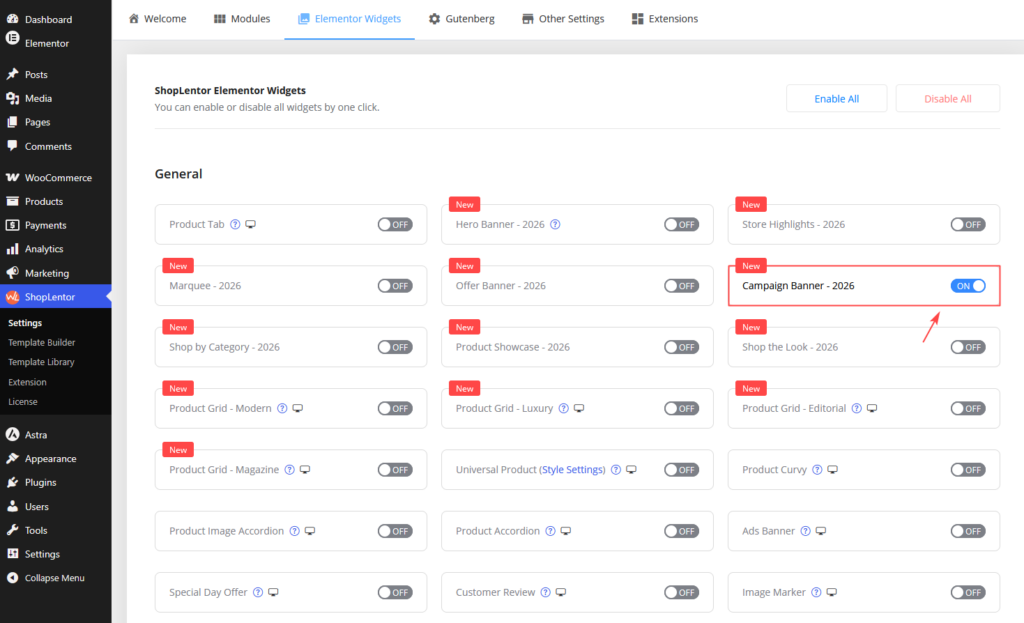
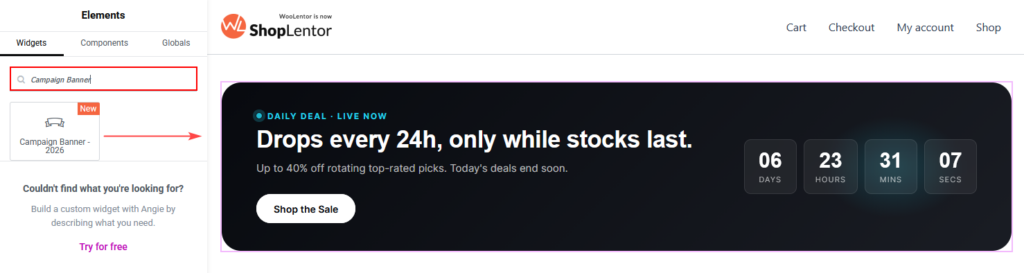
2. Add the widget to an Elementor page
- Open the page or template you want to edit and choose Edit with Elementor.
- Search for Campaign Banner – 2026 in the Elements panel.
- Drag the widget into a section or container.
- Open the Content tab to configure it.
For a major promotion, put the banner near the top of the homepage or at the beginning of a campaign landing page. Leave enough surrounding space for the headline, timer, and primary button to remain easy to scan.
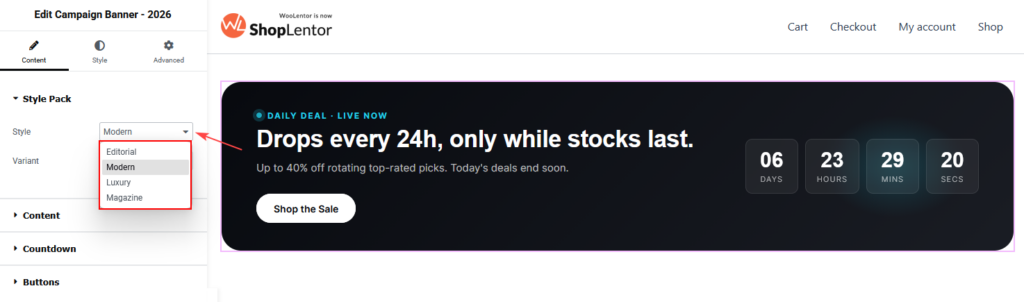
3. Choose a style pack and variant
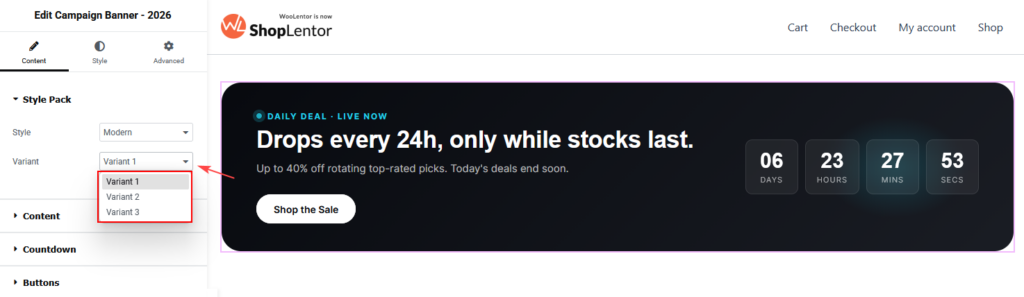
Open Content → Style Pack. Choose a Style first, then a Variant.
| Style pack | Best for |
|---|---|
| Editorial | Fashion, lifestyle, and content-led campaigns. |
| Modern | Contemporary stores, technology, and product launches. |
| Luxury | Jewellery, premium fashion, watches, and high-end offers. |
| Magazine | Bold, high-contrast, visually dense promotions. |
Each pack includes Variant 1, Variant 2, and Variant 3. Changing a variant updates the visual layout while preserving your content. Elementor shows only the controls that apply to the selected design; this is normal.
Note: Pro-only variants display an upgrade notice in the editor and require ShopLentor Pro for a live page.
4. Add campaign content
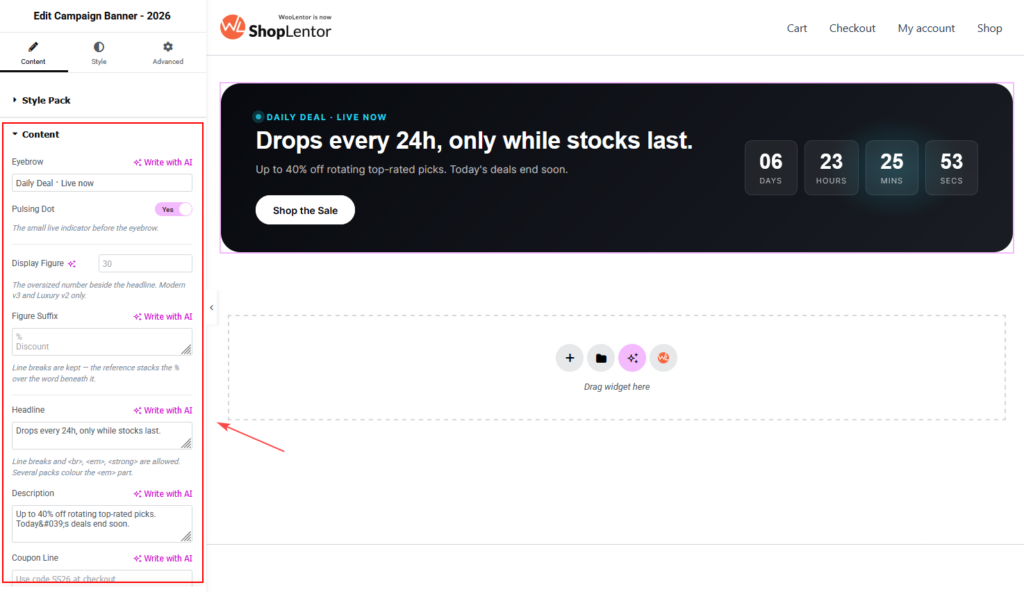
Open Content → Content to write your offer.
| Setting | What it does | Best practice |
|---|---|---|
| Eyebrow | A small label above the headline, such as “Daily Deal · Live now”. | Keep it short and use it for context. |
| Pulsing Dot | Adds a small live-status indicator before the eyebrow. | Use only for an active, time-sensitive offer. |
| Display Figure | Adds a large offer figure in supported layouts. | Use a single clear value, such as 40. |
| Figure Suffix | Adds text beside or under the figure, such as % and Discount. | Use short lines that remain legible on mobile. |
| Headline | The main campaign message. | Lead with the offer or customer benefit. |
| Description | Supporting campaign information. | Keep it to one or two concise sentences. |
| Coupon Line | A coupon prompt in supported designs. | Include the code and where to use it. |
| Fine Print | A short qualification or campaign note. | State accurate exclusions, availability, or terms. |
The Display Figure is supported by Modern Variant 3 and Luxury Variant 2. The Coupon Line is supported by Editorial Variant 2 and Luxury Variant 3. Luxury Variant 2 displays Fine Print vertically on the right edge as a campaign side label.
Write effective campaign copy
Use the eyebrow for context, the headline for the value, and the description for key details.
| Less effective | Better |
|---|---|
| Big sale happening now | Flash sale: Save up to 40% on selected essentials |
| Shop products | Ends Sunday: Shop the autumn collection |
| Use code | Use code SAVE20 at checkout |
Avoid all-caps sentences, repeated keywords, and multiple unrelated offers. Every claim—discount, stock availability, deadline, and coupon—should be accurate.
5. Set up the countdown timer
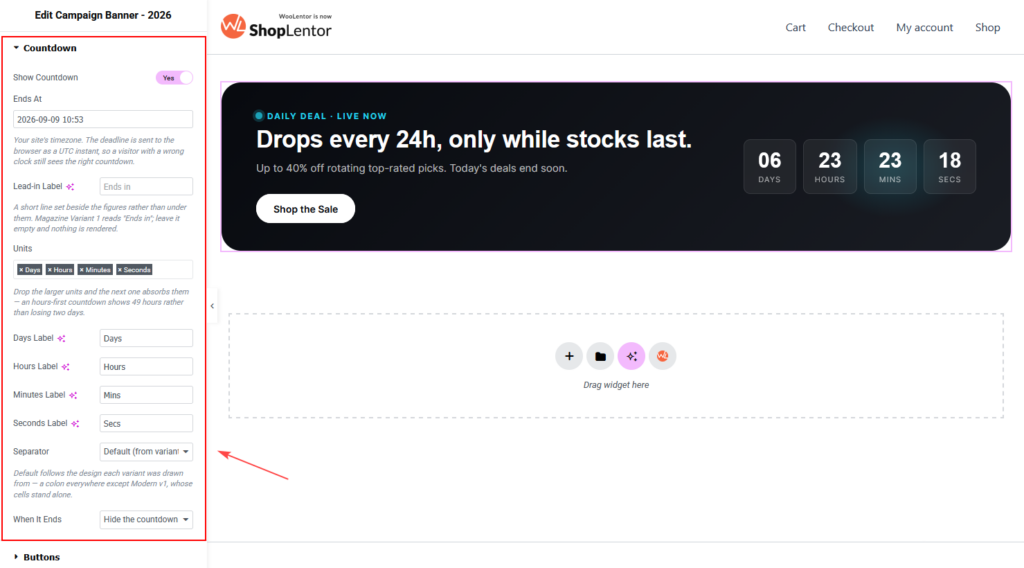
Open Content → Countdown and enable Show Countdown.
| Setting | What it does |
|---|---|
| Ends At | Sets the campaign deadline. It is sent to a visitor’s browser as a UTC instant. |
| Lead-in Label | Adds text near the figures, such as “Ends in”. Leave it empty to hide it. |
| Units | Shows or removes Days, Hours, Minutes, and Seconds. Removing a larger unit carries its value into the next unit. |
| Days / Hours / Minutes / Seconds Label | Changes the label beneath each value for shorter wording or translation. |
| Separator | Uses the selected divider or the variant default. Most defaults use a colon; Modern Variant 1 uses standalone cells. |
| When It Ends | Choose Hide the countdown, Hide the whole section, or Show a message. |
For example, if Days is removed, 2 days and 1 hour displays as 49 hours. If you use Show a message, add a helpful expiry notice such as “This offer has ended. Explore current offers.”
Countdown best practices
- Use a genuine deadline; do not use a resetting timer to create false urgency.
- Check the site timezone and deadline before publishing.
- Use all units for short campaigns; hide Seconds for a calmer, longer-running offer.
- Select Hide the whole section only if it will not leave an awkward gap on the page.
- Select Show a message when the campaign section should remain useful after expiry.
6. Add campaign buttons
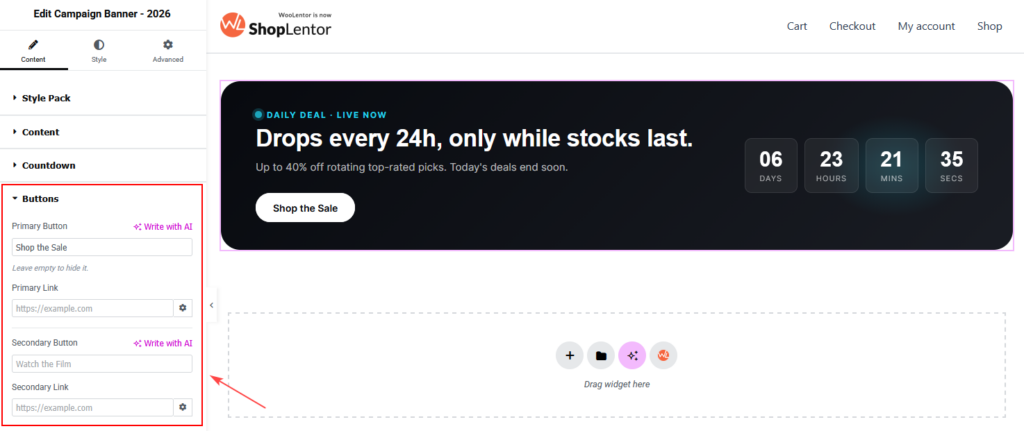
Open Content → Buttons to add up to two calls to action.
| Setting | What it does |
|---|---|
| Primary Button | The main action, for example, “Shop the Sale”. Leave empty to hide it. |
| Primary Link | The destination URL for the primary button. |
| Secondary Button | An optional supporting action, such as “Watch the Film” or “View the Lookbook”. |
| Secondary Link | The destination URL for the secondary button. |
Use one primary action whenever possible. A secondary action should support—not compete with—the main goal. Prefer labels like Shop the Sale, Browse New Arrivals, or View Offer Details instead of vague text such as Click Here.
7. Customize the Style tab
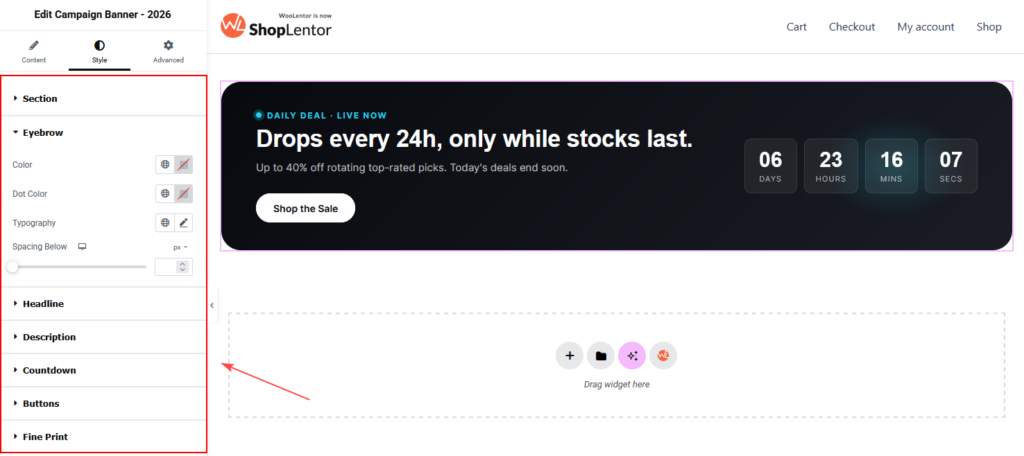
Open the Style tab after selecting the intended design. Available sections vary by style pack and variant.
| Style section | Available controls | Best practice |
|---|---|---|
| Section | Background Type, Minimum Height, Padding, Border Type, Border Radius, and Gap Between Panels. | Keep padding and corners consistent with the rest of the site, and leave enough room around the content. |
| Eyebrow | Color, Dot Color, Typography, and Spacing Below. | Keep the eyebrow subtle and readable; use the dot only for an active, time-sensitive promotion. |
| Headline | Color, Accent Color, Typography, and Spacing Below. Accent Color applies to text marked with <em> in supported headlines. | Make the headline the strongest visual element and reserve accent color for a small, important phrase. |
| Description | Color, Typography, Max Width, and Spacing Below. | Limit the maximum width when needed to avoid long, hard-to-read lines. |
| Countdown | Cell Background, Border Type, Cell Radius, Cell Padding, Cell Minimum Width, Gap, Number Color and Typography, and Label Color and Typography. | Make cells large enough to read on mobile and use clear contrast for the number and label. |
| Buttons | Primary and Secondary tabs, each with Color, Background, Hover Color, Hover Background, Border Type, Typography, Padding, and Border Radius. | Make the primary button more prominent and verify contrast in normal and hover states. |
| Fine Print | Color and Typography. | Keep it readable while visually secondary to the headline and call to action. |
8. Responsive, accessibility, and SEO best practices
Check the widget in Elementor’s desktop, tablet, and mobile preview modes before publishing.
- Use one clear campaign heading within the page’s existing heading hierarchy; do not create competing page titles.
- Write a specific, customer-focused headline and a natural supporting description. Avoid repeating the same keyword in the eyebrow, headline, description, and button.
- Maintain sufficient contrast between the background, text, countdown cells, and buttons.
- Keep text and button labels short enough to avoid awkward wrapping on small screens.
- Do not rely only on color, movement, or a countdown to explain the offer; state the key details in text.
- Use precise button labels and link each button to a relevant, working page.
- Confirm coupon codes, percentage claims, stock claims, exclusions, and end dates before publishing.
- Add campaign terms or link to them when restrictions apply.
- Test both buttons using keyboard navigation as well as pointer hover.
9. Recommended placements
Use Campaign Banner – 2026 near the top of a homepage for a store-wide sale, at the start of a Black Friday or product-launch landing page, above a matching product grid, or on a relevant category page. Avoid placing several large campaign banners back to back; one campaign should have a clear priority.
10. Troubleshooting
The widget is not visible in Elementor
Confirm that Campaign Banner – 2026 is enabled in ShopLentor → Settings → Elementor Widgets, then reload Elementor and search again.
A field or style control is missing
Controls depend on the selected Style Pack and Variant. Select the intended design first, then reopen the applicable Content or Style section. Display Figure, Coupon Line, and Fine Print appear only in variants that use them.
My countdown time is incorrect
Check Ends At and the WordPress site timezone. Update the page, clear caches, and test the frontend in a private browser window. The timer is delivered to visitors as a UTC instant.
The countdown ended but the banner is still visible
Set Content → Countdown → When It Ends to the behavior you need. If the page is cached, clear browser, WordPress, server, and CDN caches.
A button does not work
Open Content → Buttons, confirm that the correct button has a valid URL, update the page, and test the published frontend. Ensure the destination page is available to visitors.
My changes are not visible on the live page
- Update the page in Elementor.
- Clear your browser cache and any WordPress, server, or CDN cache.
- Go to Elementor → Tools and regenerate CSS and data.
- Test the page in a private browser window.
Frequently asked questions
Can I use Campaign Banner – 2026 without a countdown?
Yes. Keep Show Countdown disabled for an evergreen collection launch, brand message, or promotion without an expiry date.
Can I show one or two buttons?
Yes. Configure a primary button for the main action and an optional secondary button for supporting content. Leave a button field empty to hide it.
Can I translate the countdown labels?
Yes. Change the Days, Hours, Minutes, and Seconds labels in Content → Countdown. You can also edit or remove the Lead-in Label.
Why does the timer show more than 24 hours?
When Days is removed from Units, the time rolls into Hours. For example, 2 days and 1 hour displays as 49 hours. Add Days to display it separately.
What happens when the campaign ends?
Choose the behavior in Content → Countdown → When It Ends: hide the timer, hide the entire banner, or show an expiry message.
Which variants are free?
Variant 1 of Editorial, Modern, Luxury, and Magazine is available in the free version. Variants 2 and 3 require ShopLentor Pro.